NOTE: Ready Stock and Ship from Malaysia.
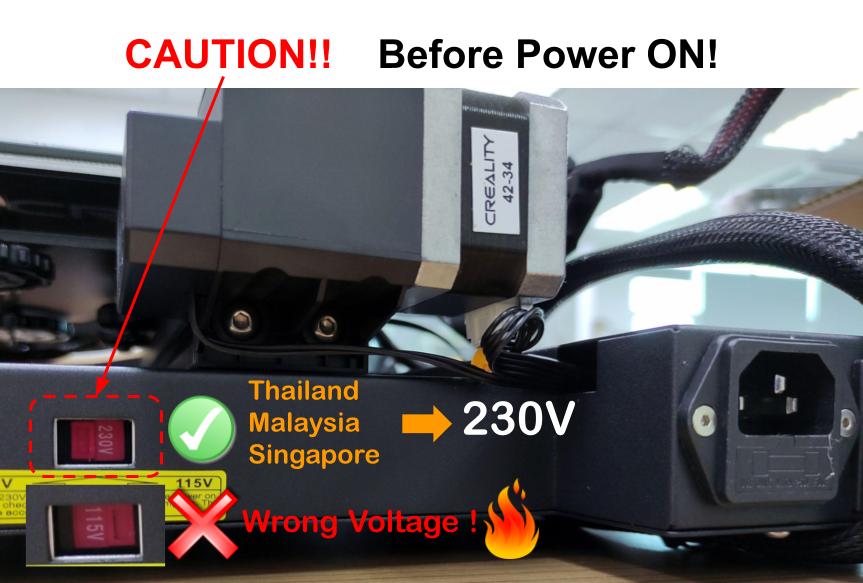
NOTE: Please make sure the Voltage Setting for the Power Supply is 230V for Malaysia, Singapore and Thailand.
Fully Upgraded Ender-3, Version 2
Check out the review video by Johnson Lam from KakiDIY on Ender-3 V2: And here is the reviews from the famous 3D printing-related channel, CHEP: Another time-lapse build and reviews by Peter Ong from Prototechies:
Note: This is the latest Creality Ender-3 V2 version of 3D Printer DIY (Do It Yourself) Kit.
.jpg)
.jpg)
.jpg)
.jpg)
.jpg)
.jpg)
.jpg)
 .jpg )
.jpg)
.jpg)
.jpg)
.jpg)
Creality Ender-3 V2 Upgrades:
- Carborundum Glass Print Bed: The carborundum glass platform enables the hotbed to heat up quicker and prints adhere better. Ultra smoothness even on 1st layer. And it can support higher temperatures to support more filament types.
- 4040 ALUMINIUM EXTRUSION for Y-AXIS: Again, this is being applied on Ender-3 PRO and get much feedback that it provides more stable print bed and better printing quality. It is on Ender-3 V2 too. The 4040 extrusion on Y-axis offers less wobbling print bed.
- 32-bit MCU with SILENT Driver: Updated mainboard with silent TMC220X stepper drivers. Compared to the Ender 3 and Ender 3 PRO, the V2 delivers out-of-the-box experience and silence-oriented upgrades(quieter 3D printers) to the user. The new controller will ensure smooth movement under 50dB, and no noise during printing.
- Colorful LCD + Updated UI: The V2 comes with a colorful LCD and the User Interface firmware is also updated. It is simple and quick to interface!
- New Injection Tensioner: The XY-axis now comes with an injection tensioner with a knob. It is now super easy to adjust the belt of both axes.
- Rotary Knob for Extruder: Many users added this by themselves, yet Creality listens to feedback and includes a knob on the extruder. Now it is very convenient to load and feed filament.
- An Integrated Toolbox: This is not a big deal, but many users have 3D printed a toolbox for Ender-3 and Ender-3 PRO underneath the print bed to store tools and small spare parts. The new Ender-3 V2 comes with this toolbox preinstalled, making your 3D printing work easier and convenient, of course, the printing area is also tidier.
.jpg)
Generally, Creality Ender-3 Features:
- HIGH-POWERED, SAFE POWER SUPPLY: The Ender 3 3D Printer comes with a high-quality power supply, with two separate fuses to protect your printer from unexpected power surges, that can heat the build surface to 100ºC in just 5 minutes!
- PARTIALLY-ASSEMBLED KIT: The lower base and all wiring completed in our factory. This kit-style 3D printer comes with all tools included and is a great project for middle school and high school-aged students. The perfect gift to spark a lifelong love for science and engineering, and provide a deeper understanding of machinery and robotics!
- Resume Printing after power-off: ender three could resume prints after a power outage or lapse occurs
- Easy and Quick Assembly: Though many claims it only requires only 10 minutes with 20 screws assembly before the first printing, from our experience, it may take 1 to 2 hours of assembly work depending on your skill level :) Yet, once it is assembled and calibrated it is worth the time and learning, Win-Win for fun and time.
- Reach 100℃ for hotbed in about 5 minutes, meet the needs of fast heating and printing ABS
- CNC machining of the Y-rail mounting groove to make sure precise positioning and keep the solid frame with the high-precision printing quality. And big hand twist nut, make the print platform easier to level.
Worry about assembling it? Check out the most detailed assembly build by Just Vlad, with several sample prints at the back:
Build and firmware update by CHEP, very detailed build too:
Another detailed build by BV3D: Bryan Vines, unboxing, build, bed leveling and 1st print:
The assembly and first print by Creality 3D (Manufacturer):
Another video that takes 20 minutes on unboxing and assembly by CraftPom:
Parameters:
- Model: Creality Ender 3 V2
- Modeling Technology: FDM (Fused Deposition Modeling)
- Printing Size: 220x220x250mm / 8.6 x 8.6 x 9.8 inches
- Machine Size: 475x470x620mm
- Package Weight: 9.6 kg/21.2 lbs
- Printer Weight: 7.8 kg/17.2 lbs
- Max Traveling Speed: ≤180mm/s, normal 60mm/s
- Filament: 1.75mm PLA, TPU, PETG
- Input: AC 100-265V 50-60Hz, Manual selection
- Linear motion: V-wheel on V-slot aluminum extrusion
- Layer Thickness: 0.1-0.4mm
- Nozzle diameter: 0.4mm
- Precision: ±0.1mm
- File Format: OBJ, G-Code, STL(in CURA converted to G-Code)
- Working Mode: USB Cable (Not included) Online or microSD card offline
- Max Nozzle Temperature: 255℃
- Max Hot bed Temperature: = 100℃
- 4.3" Color screen
Features:
- Brand: Creality3D
- Type: Do It Yourself Assembly (DIY)
- Model: Ender-3 V2
- An upgraded version of the best budget 3D Printer in the market with a large printing size/area/volume
- Meanwell 24VDC powered offering reliable, industry-grade, faster heat-up time
- Power resume function, cope with sudden power cut off
- Carborundum Glass build plate, better heating, and filament adhesive
- Assembly process is just around 1 hour, it is faster than assemble some DIY furniture
- You will learn how to fix if through the assembly process
- Engraving Accuracy: 0.1mm
- Packing Type: unassembled packing
- Cartesian: i3 Style aka X and Z on the head, Y on bed
- A rotary knob on MK-8 extruder greatly reduces plugging risk and bad extrusion
- V-slot with POM wheel makes it move noiseless, smoothly and durable
- The one-piece structure provides a large printing size
- The semi-knockdown package ensures quick assemble
- Safely protected power supply, reaching 100ºC in about 5 minutes
- Additional power cut protection function to meet the needs of fast heating and longtime printing
- CNC machining of Y - rail mounting groove to ensure precise positioning and printing quality
- Upgraded with many features:
- New rotary injection tensioner for XY-axis
- Color LCD and new UI
- Silent controller to offer quieter printing
- Comes with UK Plug (Type G) for Malaysia and Singapore use
.jpg)
.jpg)
Note:
- We notice the microSD card from the factory is formated into NTFS instead of FAT32, and the Ender-3 V2 is not able to display files within the folder including the sample print gcode. You use the microSD card reader, insert it to your computer, move the gcode files to the drive (not in any folder) or format the microSD card to FAT32 (make sure you copy the entire content of the microSD card first).
- Please read and follow the user manual carefully before you assemble or operate the 3D printer.
- Modification and customization of the 3D printer are allowed but we will take no responsibility for any problems resulting from modifications.
- Always use the correct AC voltage for your region.
- Please do not place the 3D printer near flammable/combustible materials, or any heat sources.
- Use the 3D printer only in properly ventilated areas. Maintain a safe distance from the printer.
- Because it is a Do It Yourself (DIY) kit, the warranty does not cover the damage during assembly.
- If any parts come with a manufacturing defect, please let us know, we will replace it.
- If it is just minor scratches, please accept it as it won't affect the printer functionality.
Packing List:
- 1 x Printer Base Frame (partially assembled)
- 1 x Meanwell Switching Power Supply with UK Plug Power Cord
- 1 x Ender-3 V2 Display Panel
- 1 x Extruder Kit
- 1 x Stepper Motor
- 2 x Big Size Aluminum Profile
- 2 x Small Size Aluminum Profile
- 1 x Screw Rod (T-type Screw)
- 1 x Z Passive Block
- 1 x Z-axis motor kit
- 1 x Z-axis limit switch
- 1 x Z-axis Profile (left)
- 1 x Z-axis Profile (right)
- 1 x X-axis Tensioner
- 1 x X-axis Profile
- 1 x XE-axis kit
- 1 x Gantry Profile
- 1 x Filament Holder
- 1 x Spatula
- 1 x Assemble Tools
- 1 x Printed Assembly Guide


Resources:
Creality Ender-3 V2 Firmware Update, motherboard, and display, by Chep:
Ender-3 V2 Nozzle Cleaning Tutorials: Worry about bed leveling? Let's try this method shown by Suad using bed-leveling gcode from CHEP: It is worth the upgrades? Check out the assembly of Ender-3 V2, and the comparison between Ender-3, Ender-3 PRO and Ender-3 V2, by Crosslink: Stringing issue? Maybe adjusting the hotend temperature will help: Warranty Period: 12 months
 International
 Singapore
 Malaysia
 Thailand
 Vietnam
-UK Plug")
-800x800.jpg "Creality Ender-3 V2 3D Printer DIY Kit (Unassembled)-UK Plug")
-800x800.jpg "Creality Ender-3 V2 3D Printer DIY Kit (Unassembled)-UK Plug")
-800x800.jpg "Creality Ender-3 V2 3D Printer DIY Kit (Unassembled)-UK Plug")