 International
 Singapore
 Malaysia
 Thailand
 Vietnam
Your shopping cart is empty!

Build an IoT Project Using LoRaWAN Network with Cytron LoRa-RFM Shield and Helium Console
- Hairil Mutalib
- 01 Jul 2022
- 1541
Hardware:
- Cytron UNO (Any compatible Arduino Uno board should work too)
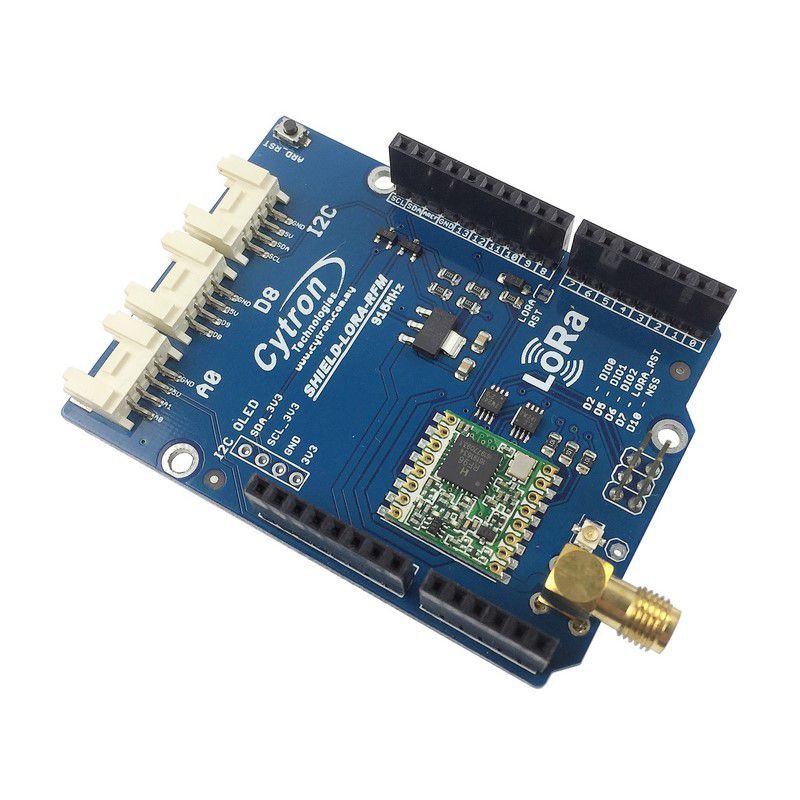
- Cytron LoRa-RFM Shield
- USB Micro B Cable
- DHT22 Sensor Module
- Male to Female Jumper

You are probably familiar with WiFi and how widely it has broadened our opportunities. But WiFi, as well as Bluetooth, have a limited coverage range and relatively high energy consumption levels. Often referred to as a PAN, Personal Area Network as they cover the nearby vicinity.
Imagine someone telling you that there is a technology available to provide even more wireless coverage and connect even more things efficiently, facilitating the creation of smart homes, cities, and industrial centers. As technology advances, new IoT solutions enter the market, helping industries grow significantly and private users benefit from extra technological capability.
What is LoRa?
LoRa technology is a long-range and low-power wireless communications protocol that’s steadily becoming the ‘go-to’ wireless platform of the Internet of Things (IoT). Its story began in 2009 in France when its founders aimed to develop a long-range and low-power modulation technology. The invention was later acquired by an American company called Semtech in 2012.
Semtech’s LoRa chipsets connect sensors to the Cloud and enable real-time communication of data and analytics that can be used to enhance efficiency and productivity. LoRa devices allow the implementation of smart IoT solutions that solve some of the biggest challenges facing our planet: pollution control, energy management, natural resource reduction, and infrastructure efficiency.
What is LoRaWAN technology?
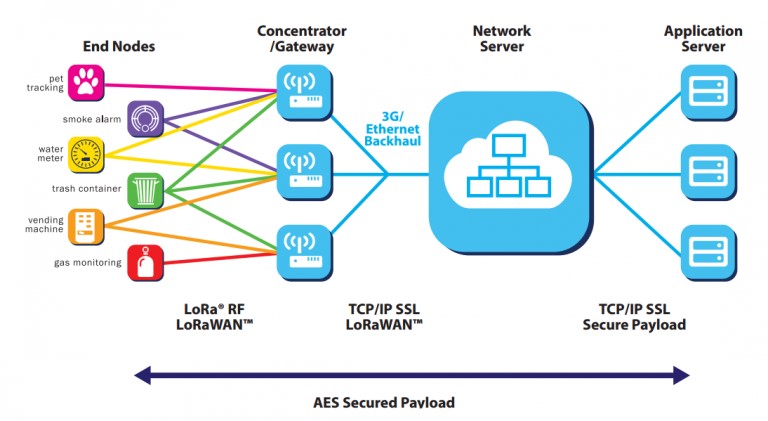
In simple words, LoRaWAN uses LoRa wireless technology and adds a networking component to it. Additionally, it incorporates node authentication and data encryption, making the network secure. What’s more, LoRaWAN networks are perfect for IoT devices that continuously monitor a process/installation status, as they can trigger alerts back to gateways when the monitored data exceeds a set threshold. These IoT devices require little bandwidth and can run on battery power for months or even years.
What is a Helium Network?
Helium network is a decentralized wireless network that allows devices worldwide to wirelessly connect to the Internet and geolocate themselves with no need for high power-consuming satellite location hardware or expensive cellular plans. Thanks to Helium capability that fully supports the LoRaWAN wireless protocol. Helium is a blockchain-based network for IoT devices that uses hotspots as gateways to connect wireless devices to the network. It is also called “the People’s Network”. Anyone can own a Helium hotspot and it is FREE for everyone to use the network. Wide coverage and easy to use, no need to ask permission from the hotspot owner to use the Helium coverage!
Preparations
Here is a demo showing you how to build an IoT project using the LoRaWAN network with Cytron LoRa-RFM Shield. These modules are able to collect temperature and humidity parameters from the environment and send them to the Helium console.
Note: LoRa-RFM Shield (end nodes) need to be in Helium hotspot coverage in order to function. You can refer to this map to check if there are nearby Helium hotspots located in your area.
Note: Please ensure the consistency of the frequency band among the end nodes, gateway, and Helium console configuration you are using when following this instruction. The frequency plan this demo applied is for AS923 (for Malaysia).
Step 1: Hardware Setup
Stack the Cytron LoRa-RFM shield to the Arduino UNO board. I am using the CT-Uno from Cytron Technologies. Then, follow the connections as follow:
| RFM-LoRa Shield | DHT22 Sensor |
| 5V | VCC |
| GND | GND |
| Pin 8 | DAT |
ALWAYS remember to connect an antenna to the LoRa-RFM shield before powering up the Arduino board. Then, connect the CT Uno to your laptop using a USB micro B cable.

Step 2: Arduino IDE Setup
Install the latest open-source Arduino IDE here.
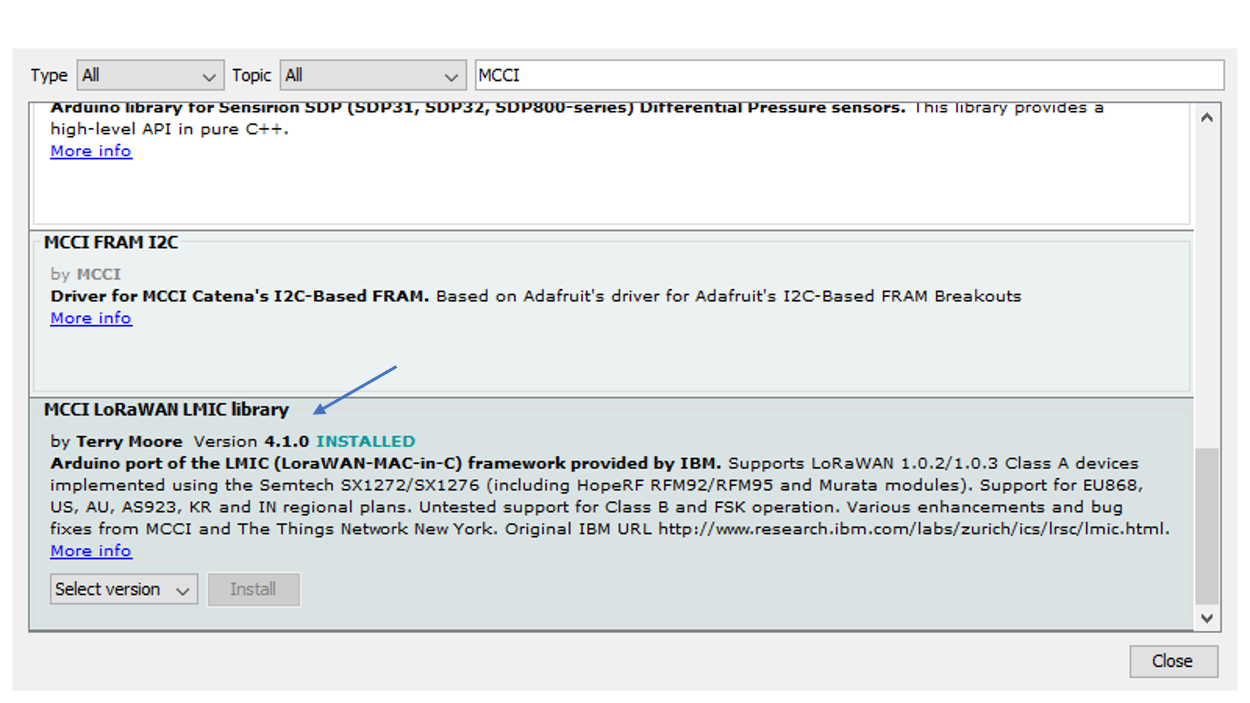
Install the MCCI LoRaWAN LMIC library.
- In the Arduino IDE, select the menu Sketch | Include Library | Manage Libraries
- In the search box enter: MCCI
- Click the MCCI LoRaWAN LMIC library by Terry Moore.
- Select the latest version and press the Install button.
- For this tutorial, I installed version 4.1.0
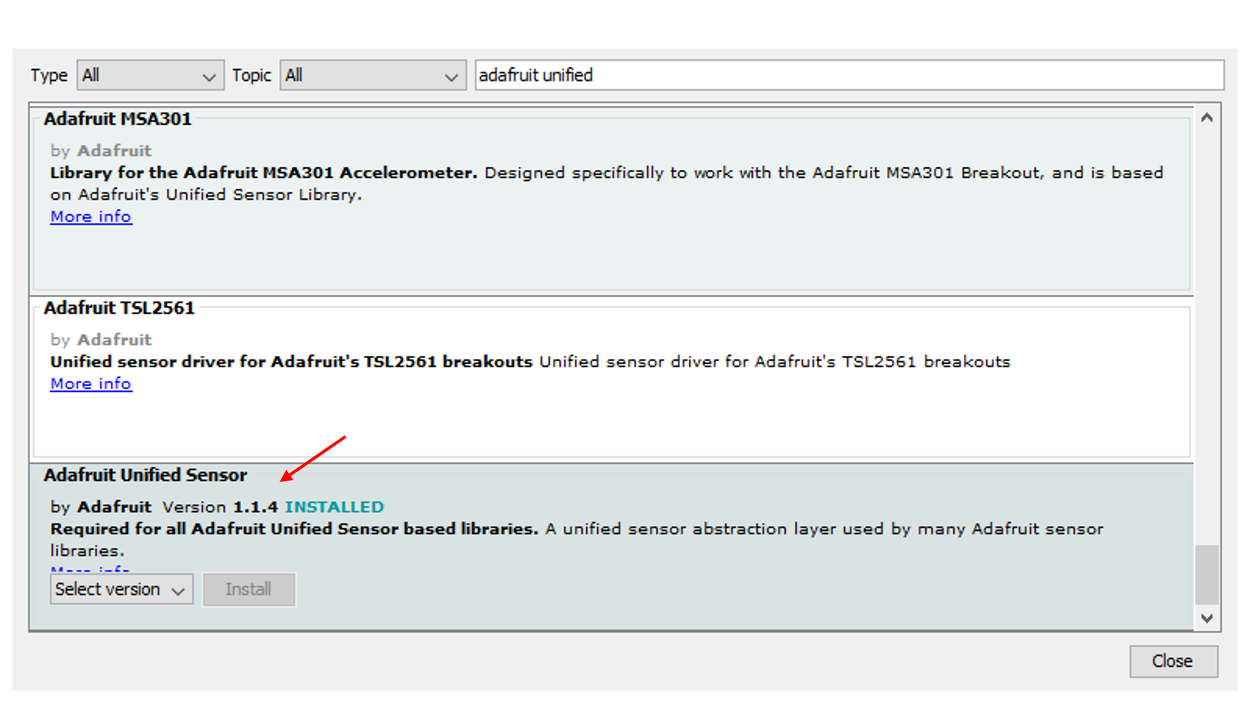
Install the Adafruit Unified Sensor library.
- In the Arduino IDE, select the menu Sketch | Include Library | Manage Libraries
- In the search box enter: adafruit unified
- Click the Adafruit Unified Sensor library by Adafruit. More info: https://github.com/adafruit/Adafruit_Sensor
- Select the latest version and press the Install button. For this tutorial, I installed version 1.1.4
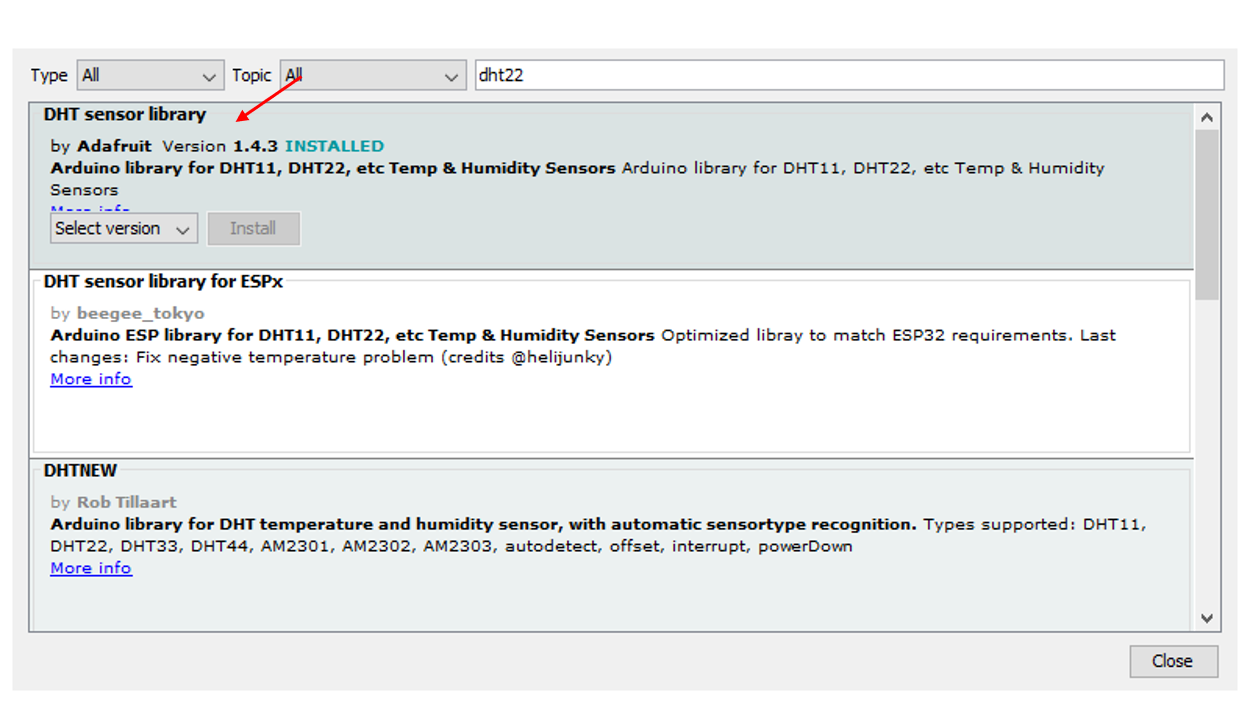
Install the DHT sensor library.
- In the Arduino IDE, select the menu Sketch | Include Library | Manage Libraries
- In the search box enter: dht22
- Click the DHT sensor library by Adafruit. More info: https://github.com/adafruit/DHT-sensor-library
- Select the latest version and press the Install button. For this tutorial, I installed version 1.4.3
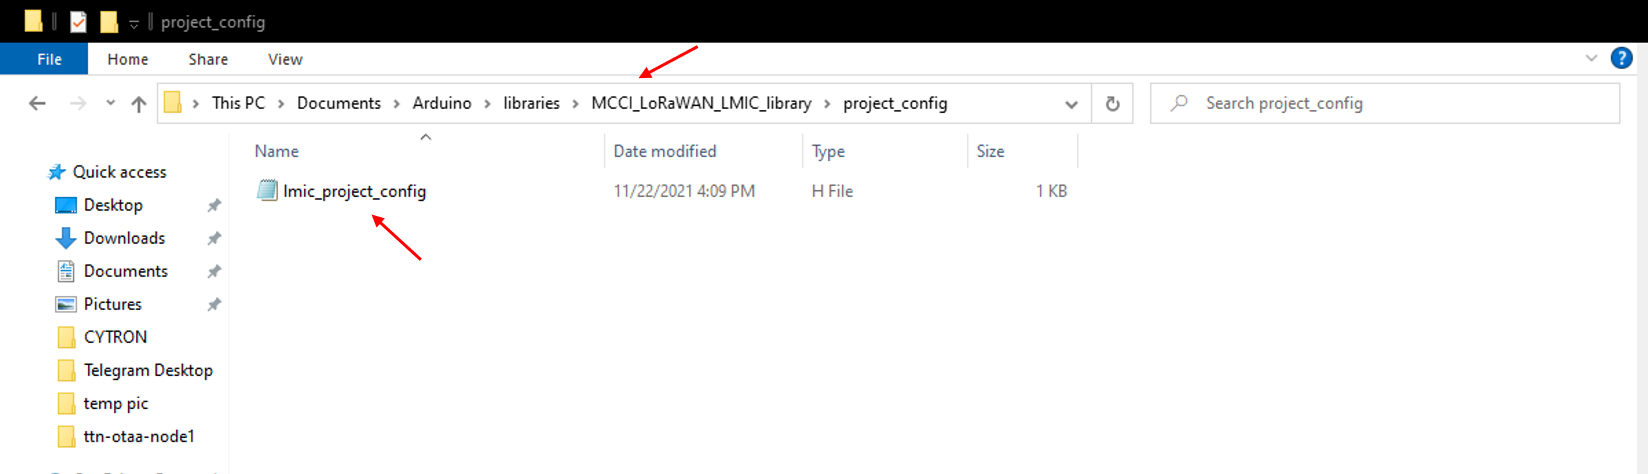
Configure the MCCI LoRaWAN LMIC Library according to your situation.
Edit file lmic_project_config.h. This file can be found at:
...Documents/Arduino/libraries/MCCI_LoRaWAN_LMIC_library/project_config
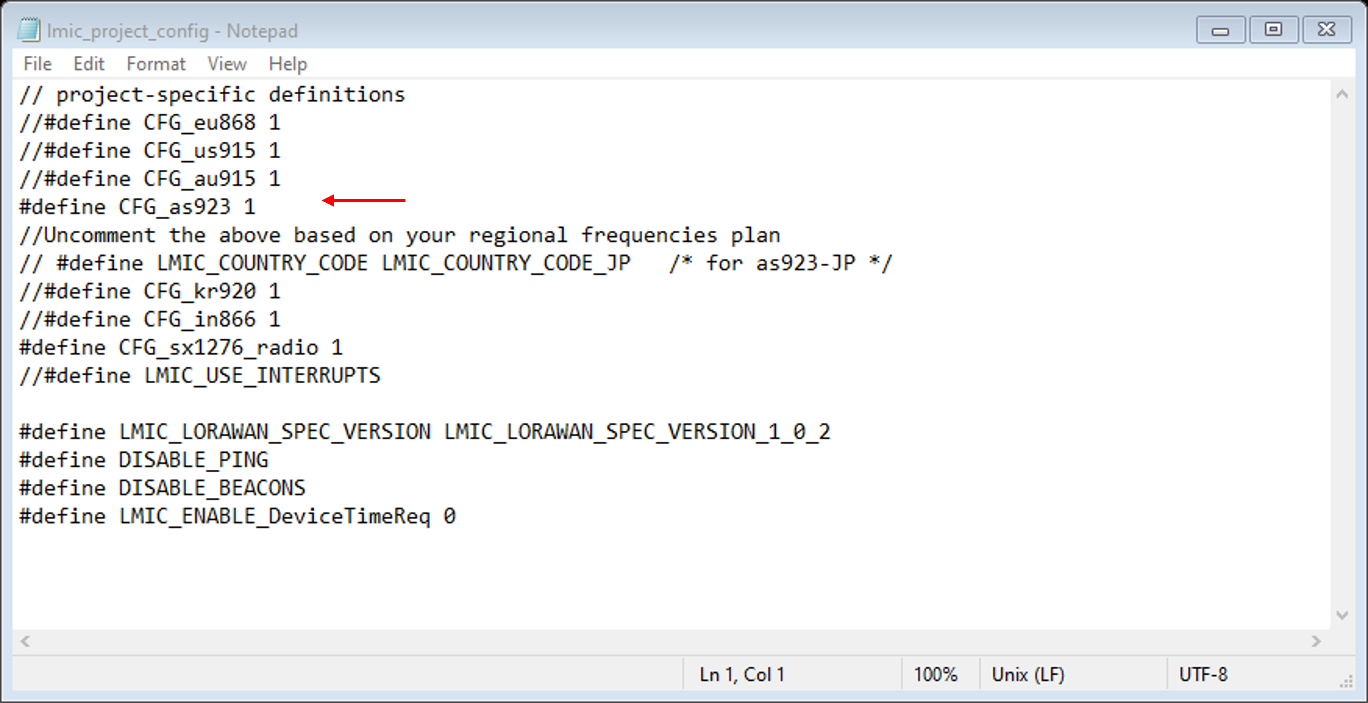
I made the following changes to MY lmic_project_config.h file.
Kindly change any line according to YOUR situation by uncommenting your related region.
Step 3: Helium Console Setup
Create an account to use the Helium console. You can register here and insert your email. Then, click submit.
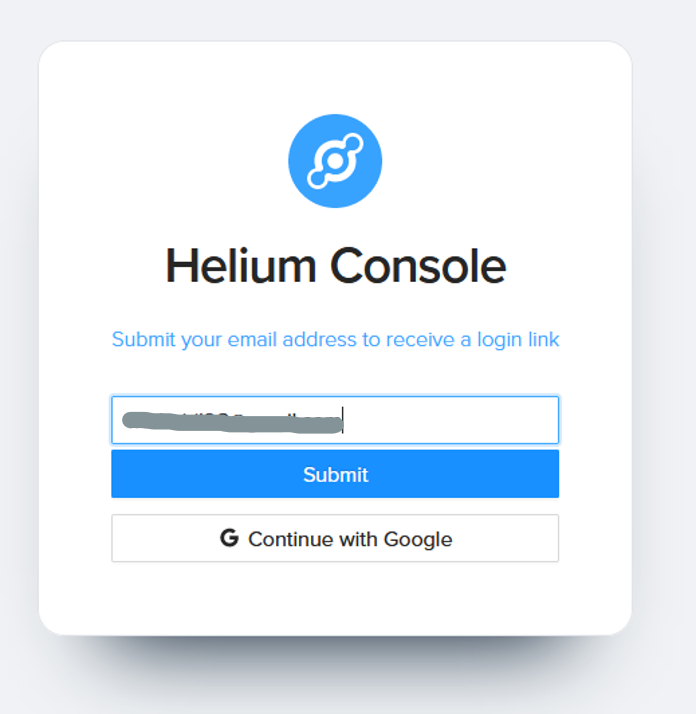
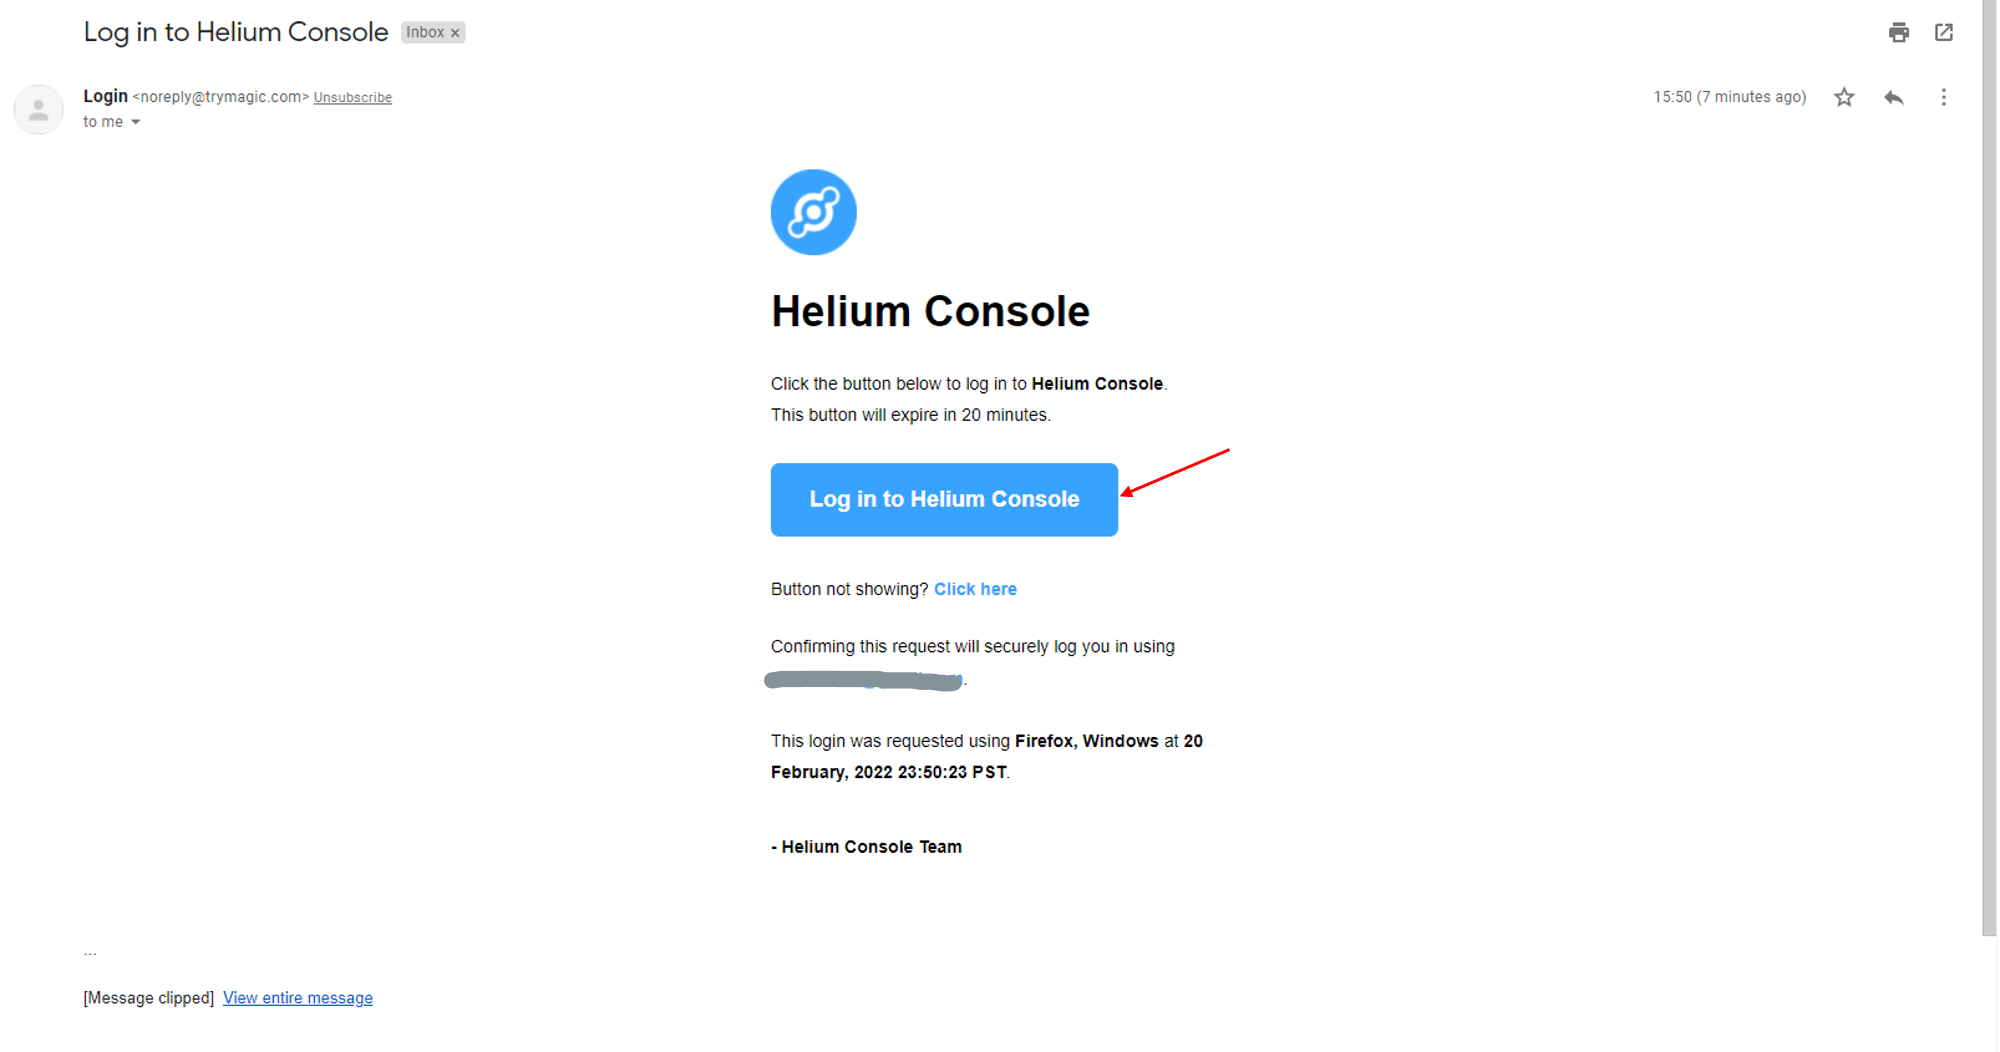
You will be prompted to your email inbox once you click "Check your inbox".

Click "Login to Helium Console". Please be reminded that this button will expire in 20 minutes.
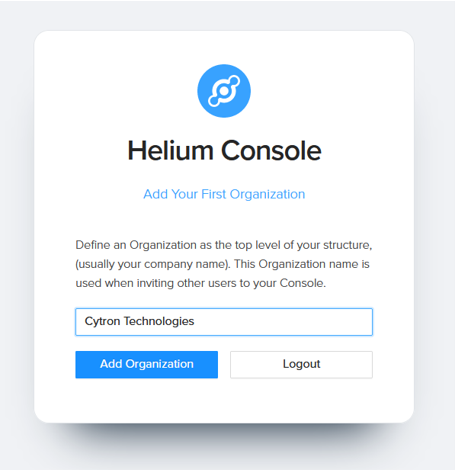
You have successfully logged in to the Helium console. Now go back to the original tab.
To proceed you need to add an organization. It can be anything that you want such as your school or university name.
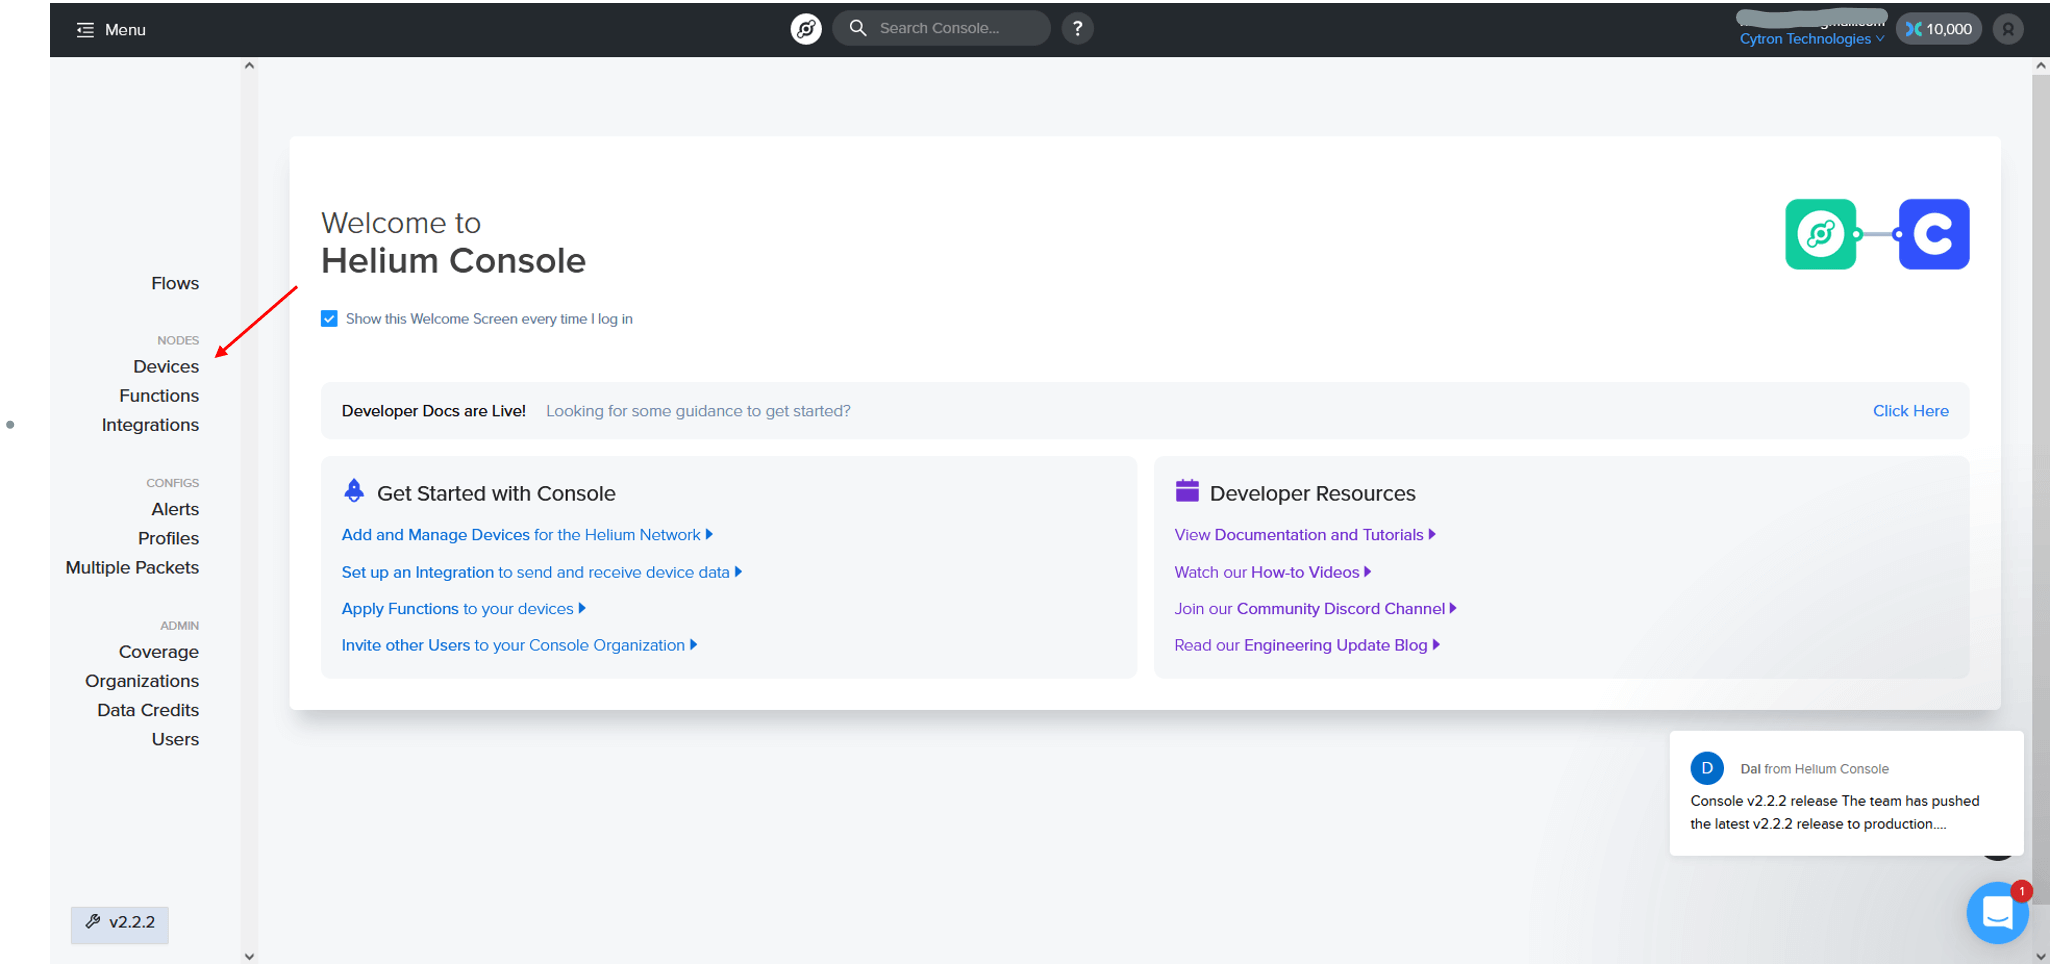
This is the Welcome Screen of the Helium Console. Every new account comes with free 10, 000 Data Credits which is enough to last for some time (The latest Helium Console only gives you 250 DC upon signing up. You will need to answer a survey to claim up to 10, 000 DC). The top right corner shows the Data Credits balance in your account.
There are four things that we need to setup here:
1. Add a new device.
2. Setup the custom function.
3. Setup the integration.
4. Setup the flow.
To create a new device for the Cytron RFM shield, click "Devices" on the left side of the screen.
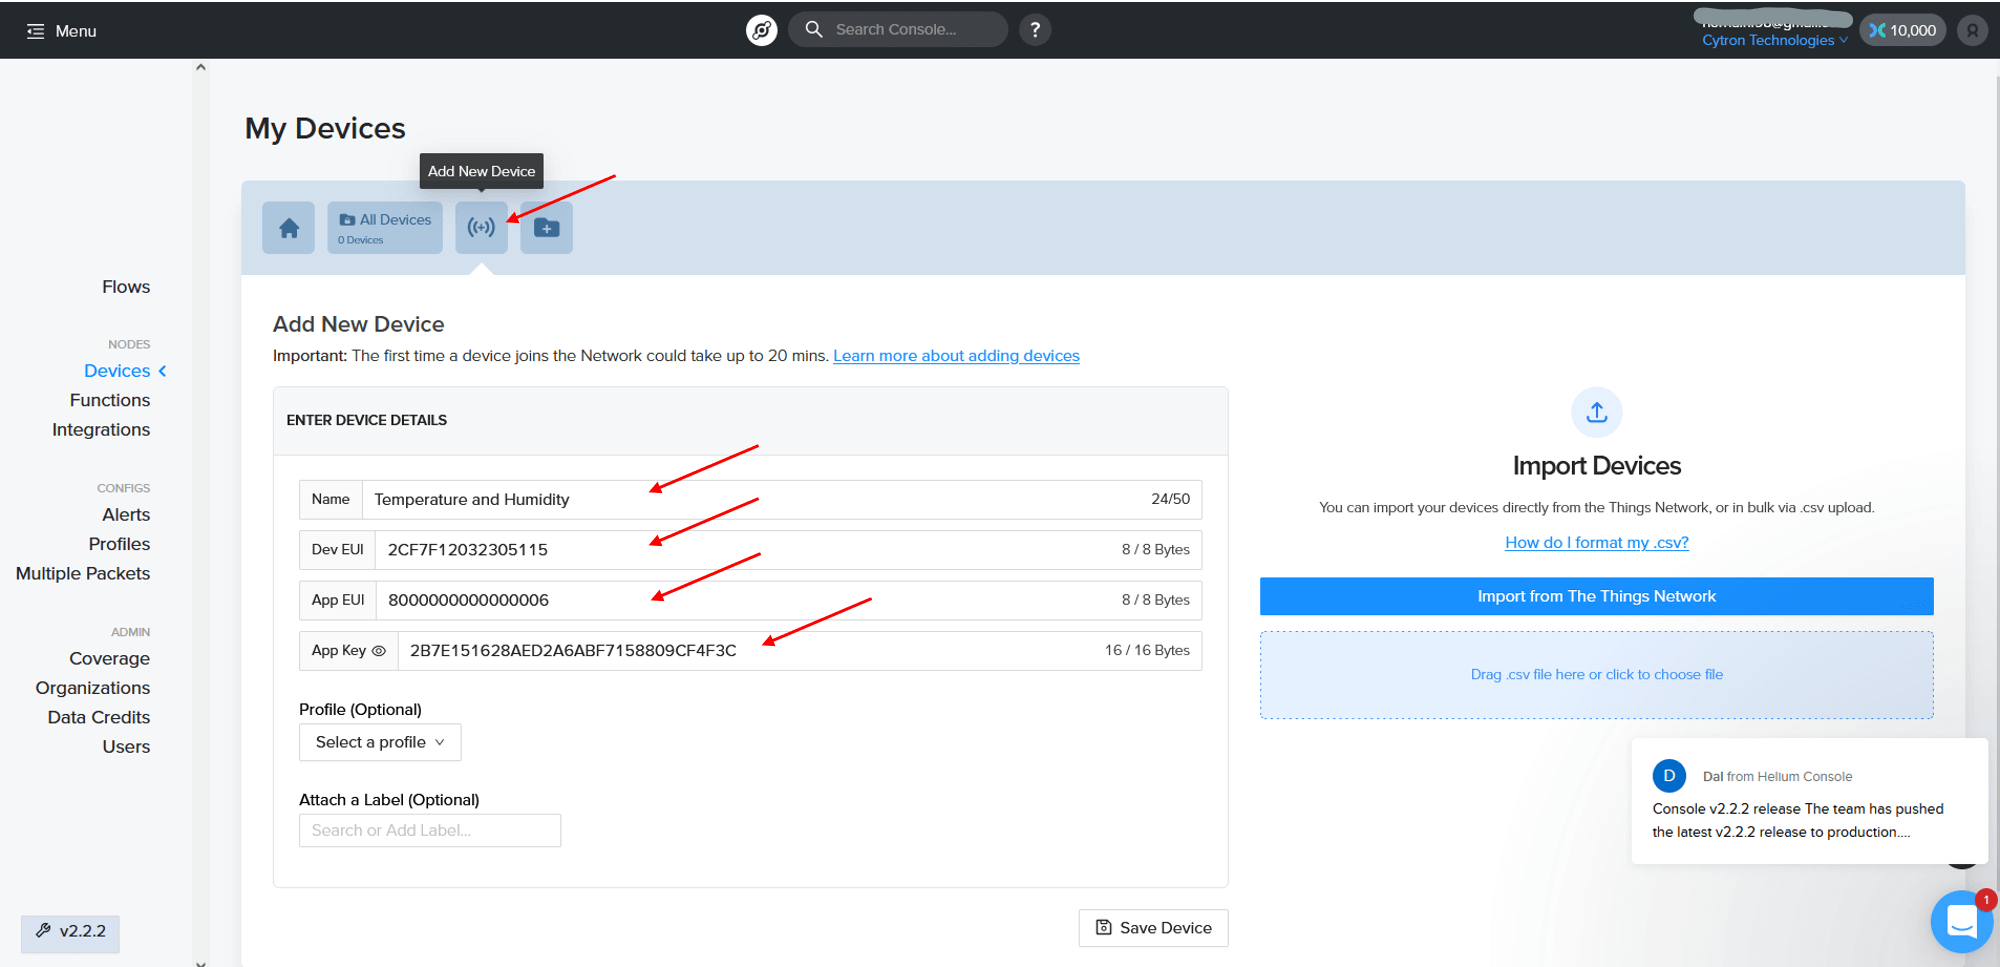
Go to "Add New Device" and fill in the required information. You can put anything that you like for the device name.
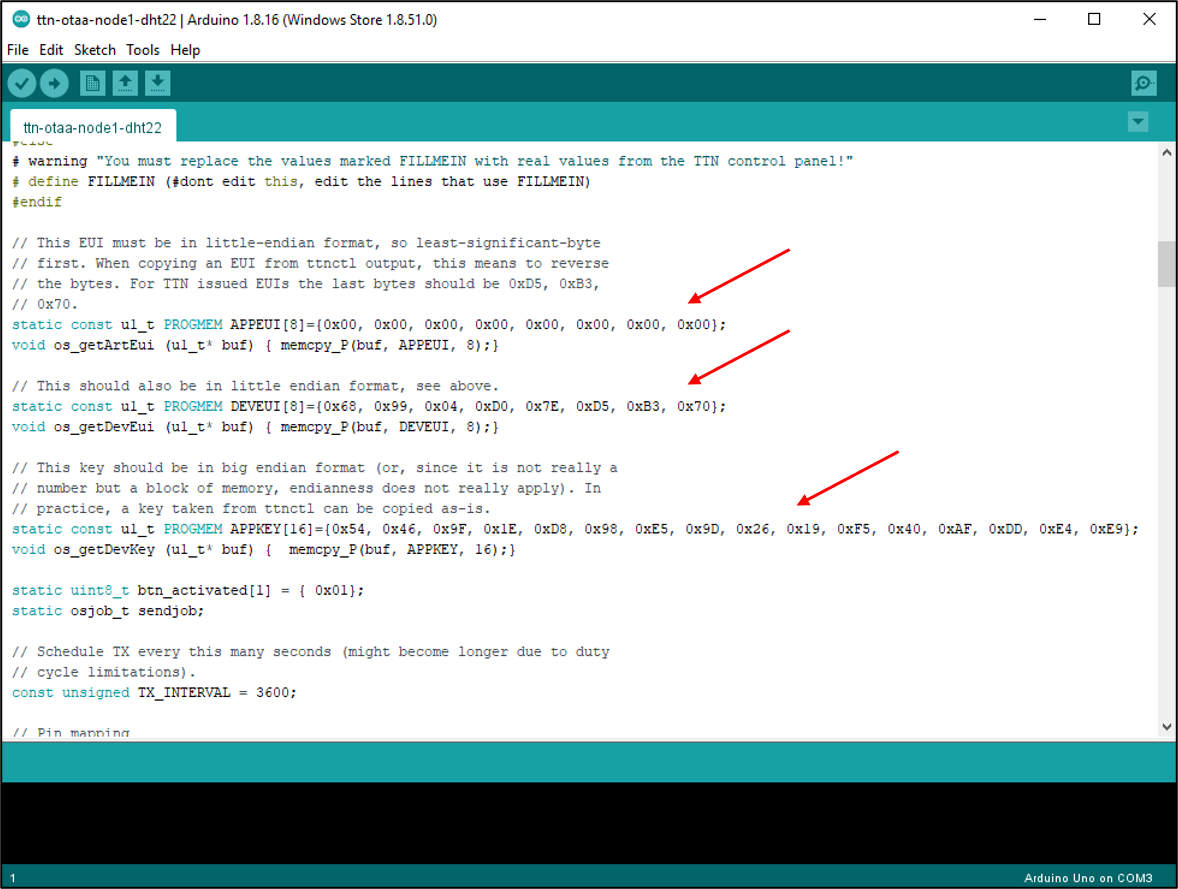
Every time you want to add a new device, the Helium console will generate a unique Dev EUI, App EUI, and App Key. Please take note that you will need all this information to put in the Arduino sketch. Another important thing is that the DevEUI or AppEUI must be converted to an array of 16 bytes in LSB order while the AppKey must be converted to an array of 32 bytes in MSB order. I have found an online tool that converts these values to a bytes array in its correct order (LSB/MSB). Kindly use this online tool to prevent any negligence.
Then, click "Save Device".
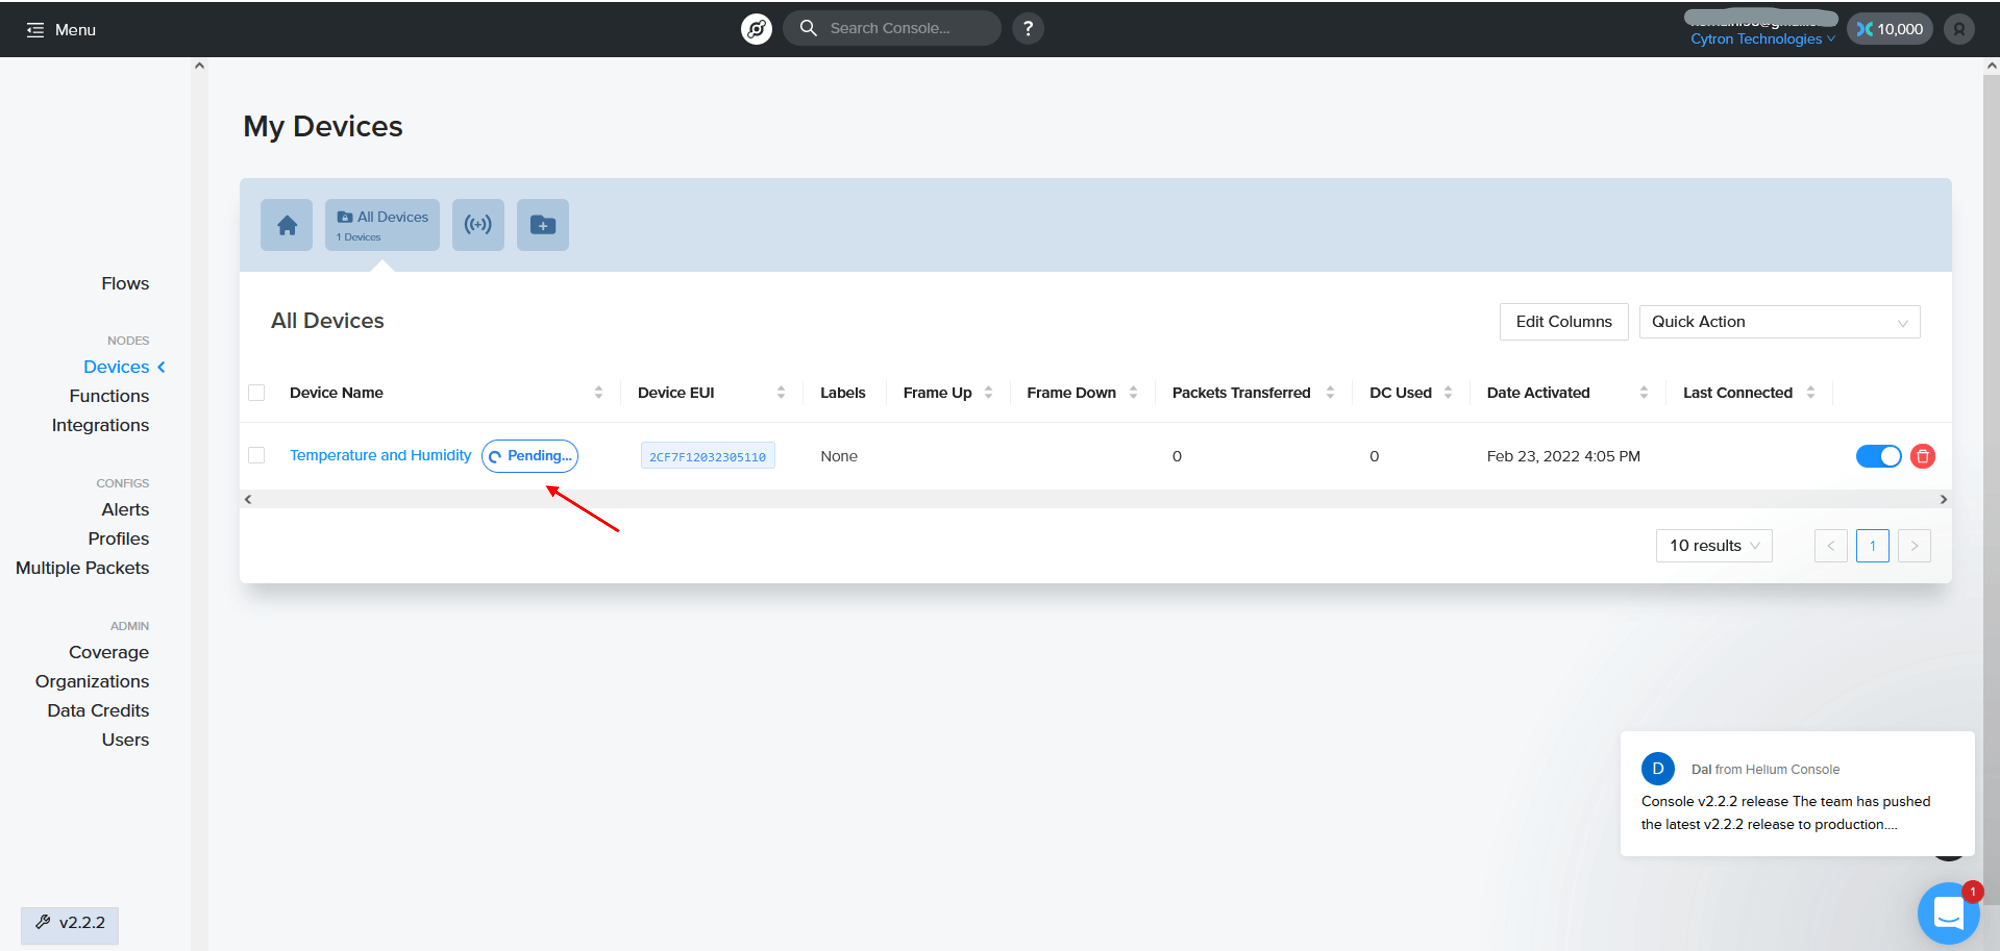
Once you have successfully created a device for the Cytron RFM shield, you will see a pending status beside of your device name.
Note: The first time a device joins the network could take up to 20 mins.
Just wait until the pending status disappears.
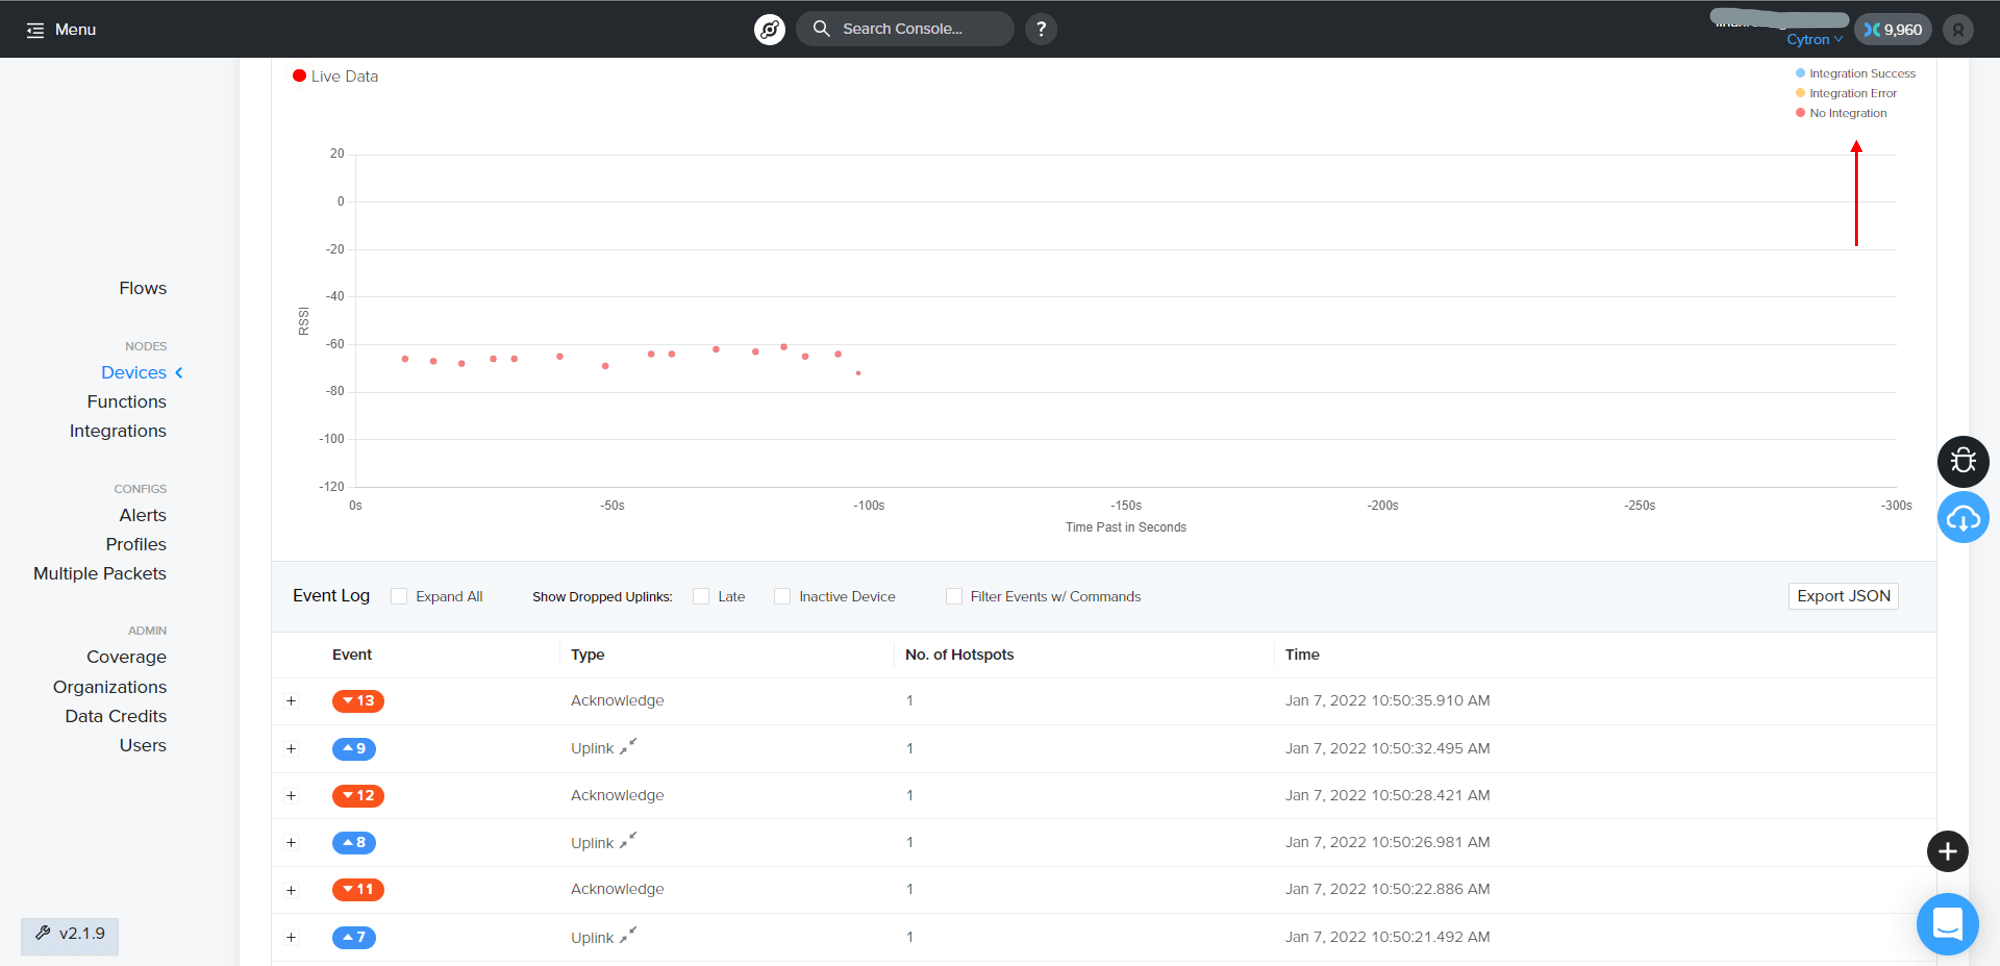
You can click on the device name to see all the details about your device including Live Data and Event Log.
Helium console can only display the temperature and humidity data in bytes. So, we need to decode the data into real values using the "Functions" feature. Then, the values can be displayed in any IoT platform using the "Integrations" feature.
Easily said, it is compulsory to have three components which are devices, functions, and integrations to complete this LoRaWAN project using the Helium console. We have done the device part, so let's proceed to the functions and integrations parts. In this tutorial, we will use Google Sheet for integrations to display the DHT22 sensor data.
Step 4: Create Google Sheet Integrations
Go to the Integrations tab and click "Add New Integrations". You can see that there are so many options that you can choose for integrations in the Helium console. For the time being, let's just choose Google Sheet for the integrations.

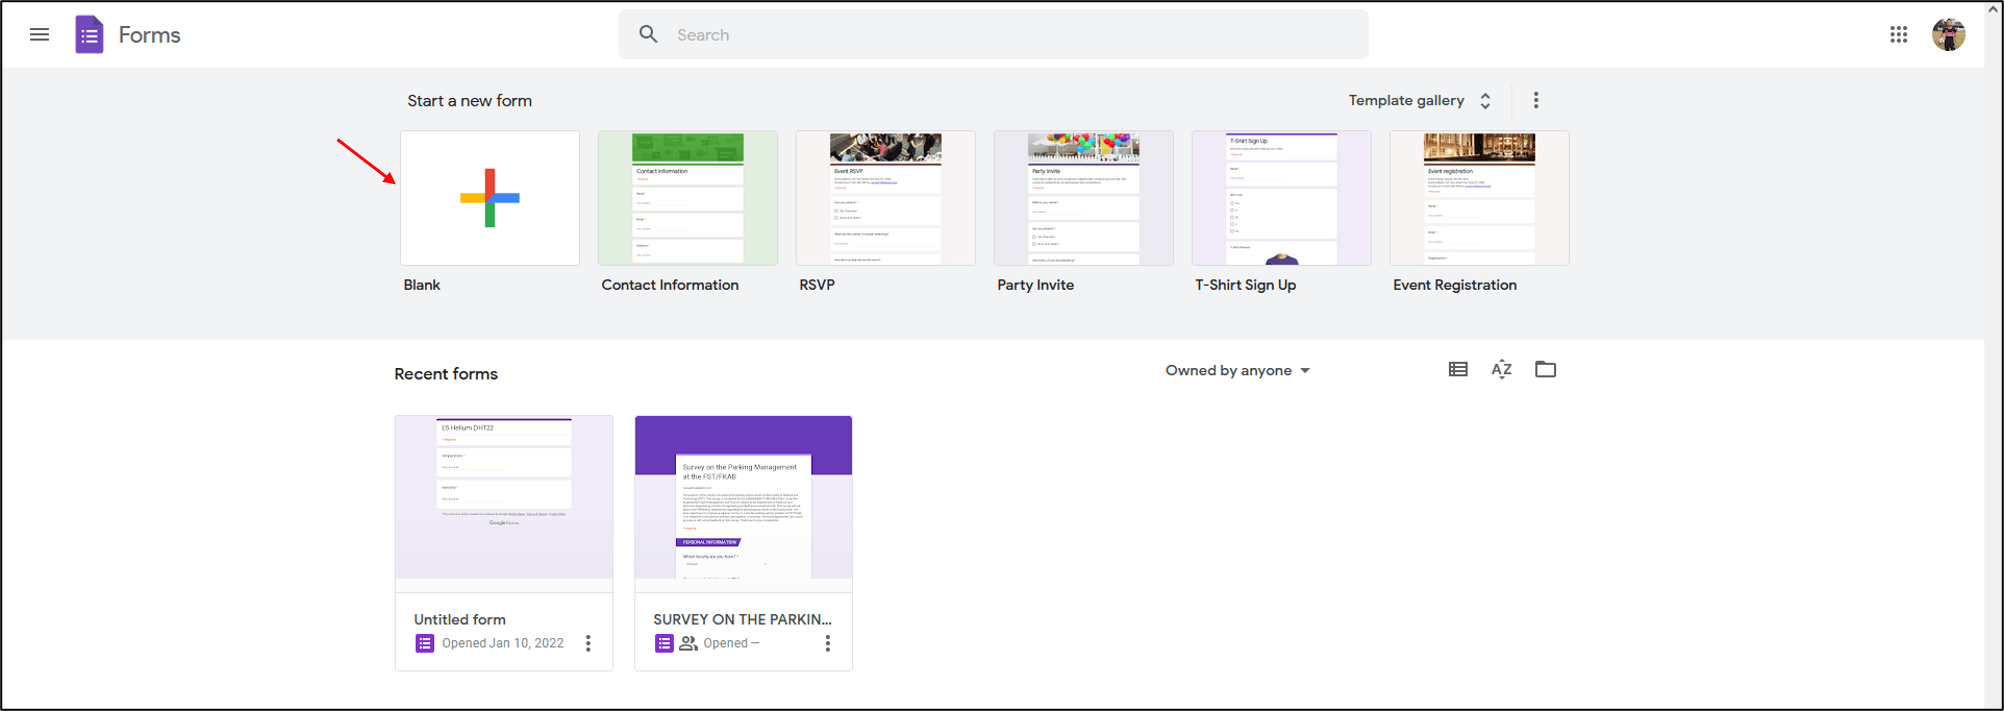
To create the integrations, it will ask for Google Form ID. So before proceed, we need to create a Google Form to collect the temperature and humidity data.
Go to Google Form which is linked to your Google account. Click "Start a new form".
Insert data types (temperature) in the Question space. Then, choose "Short answer" for the answer type.
Click "Add question" to add a field for humidity.
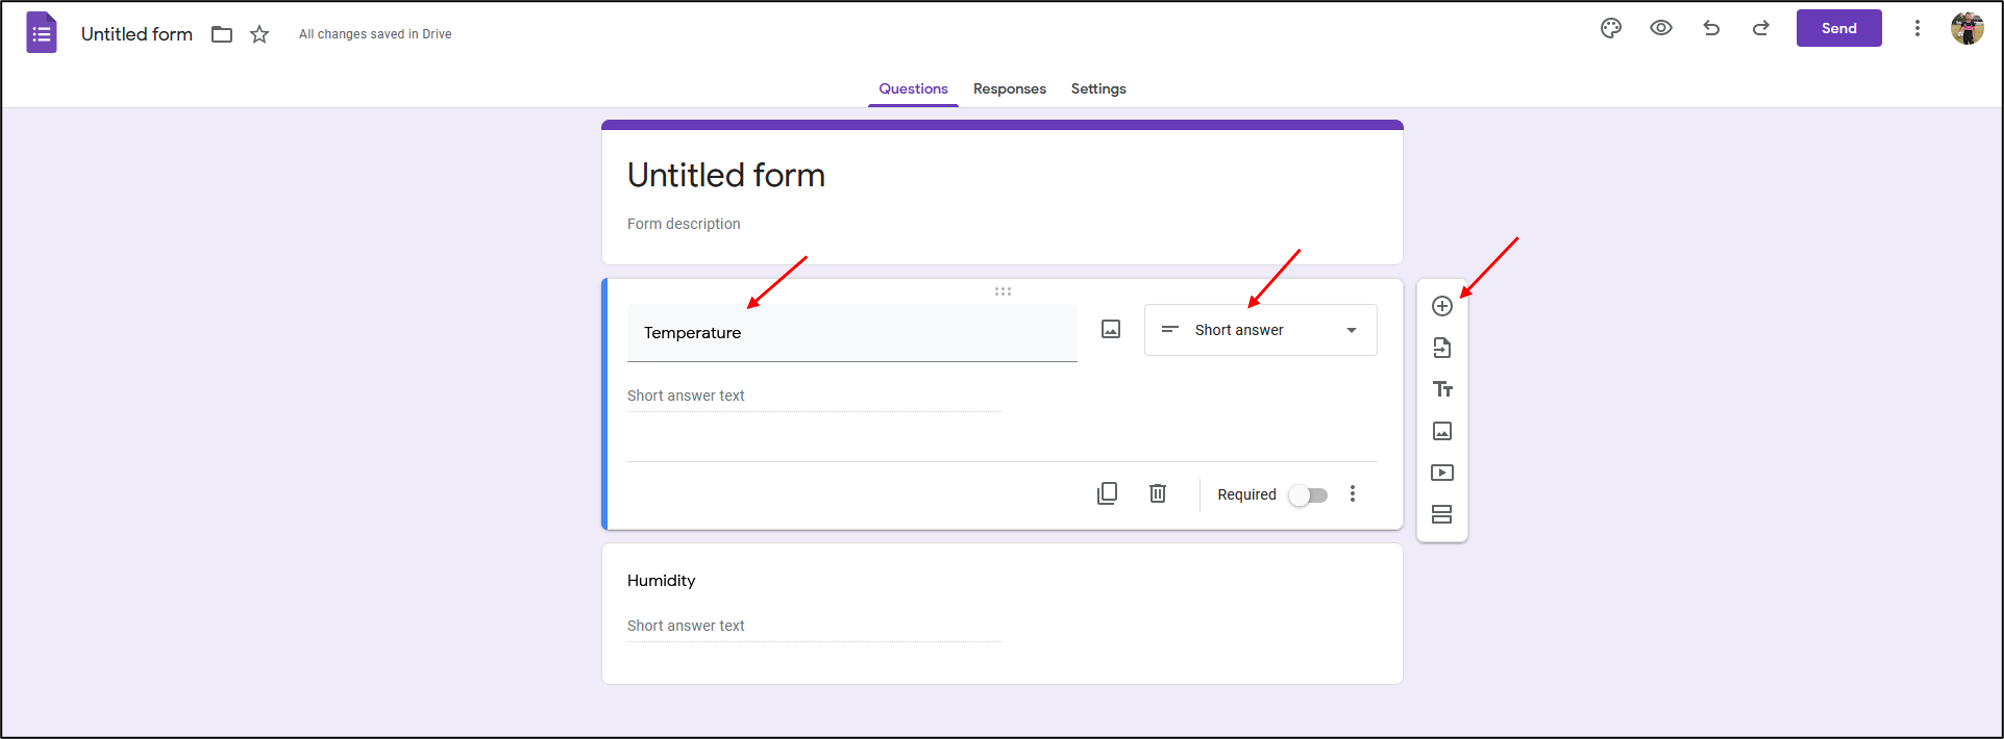
Click the "Send" button on the top right of the page and copy the link.
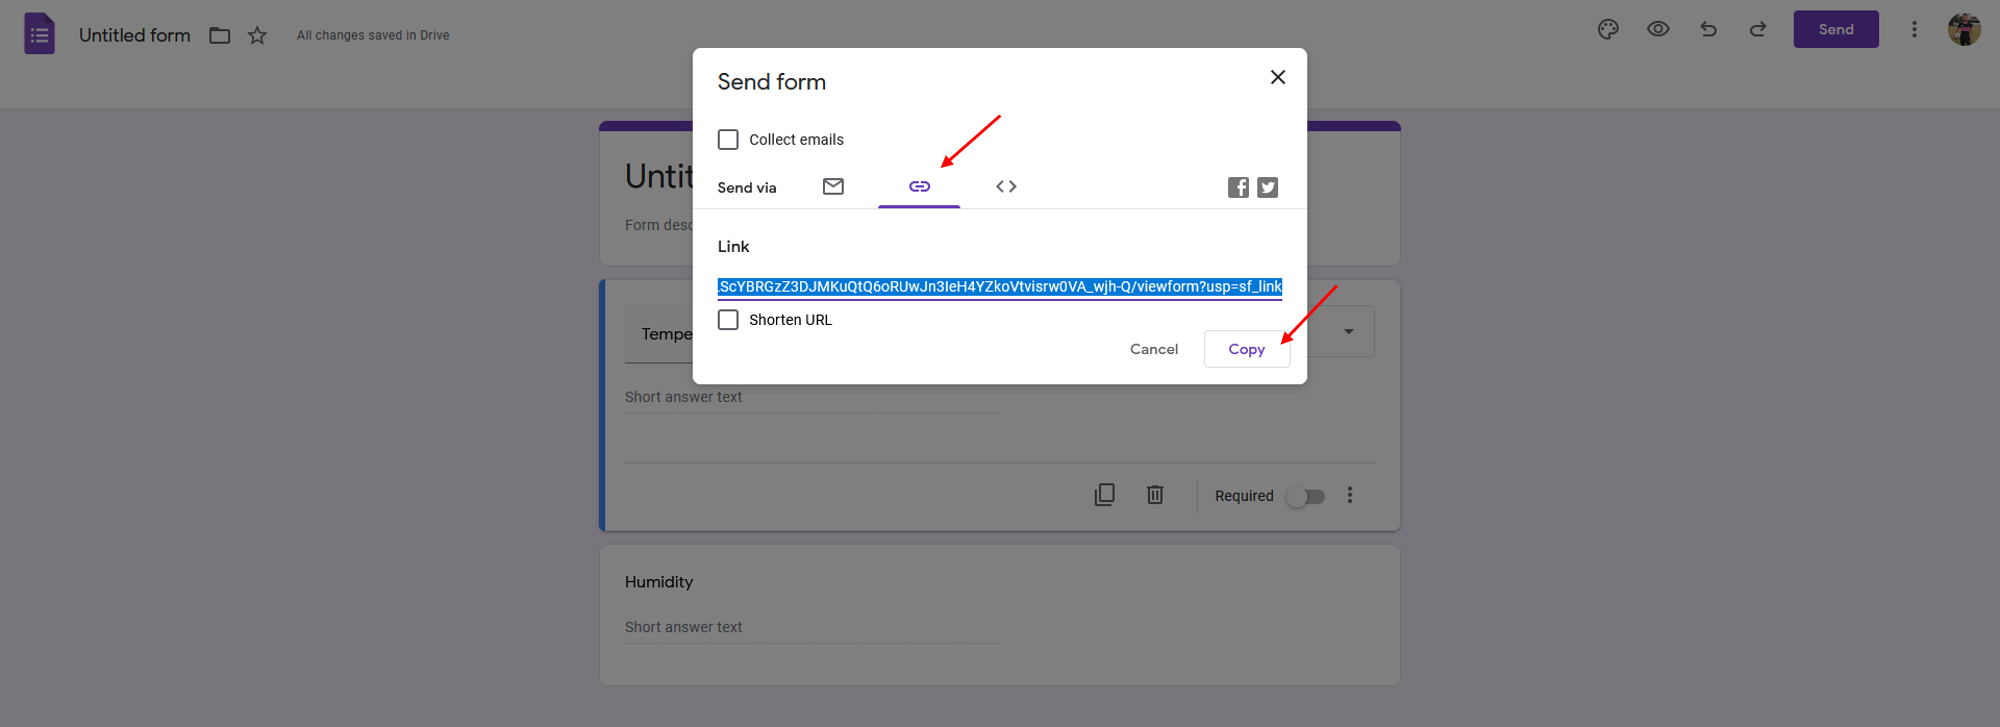
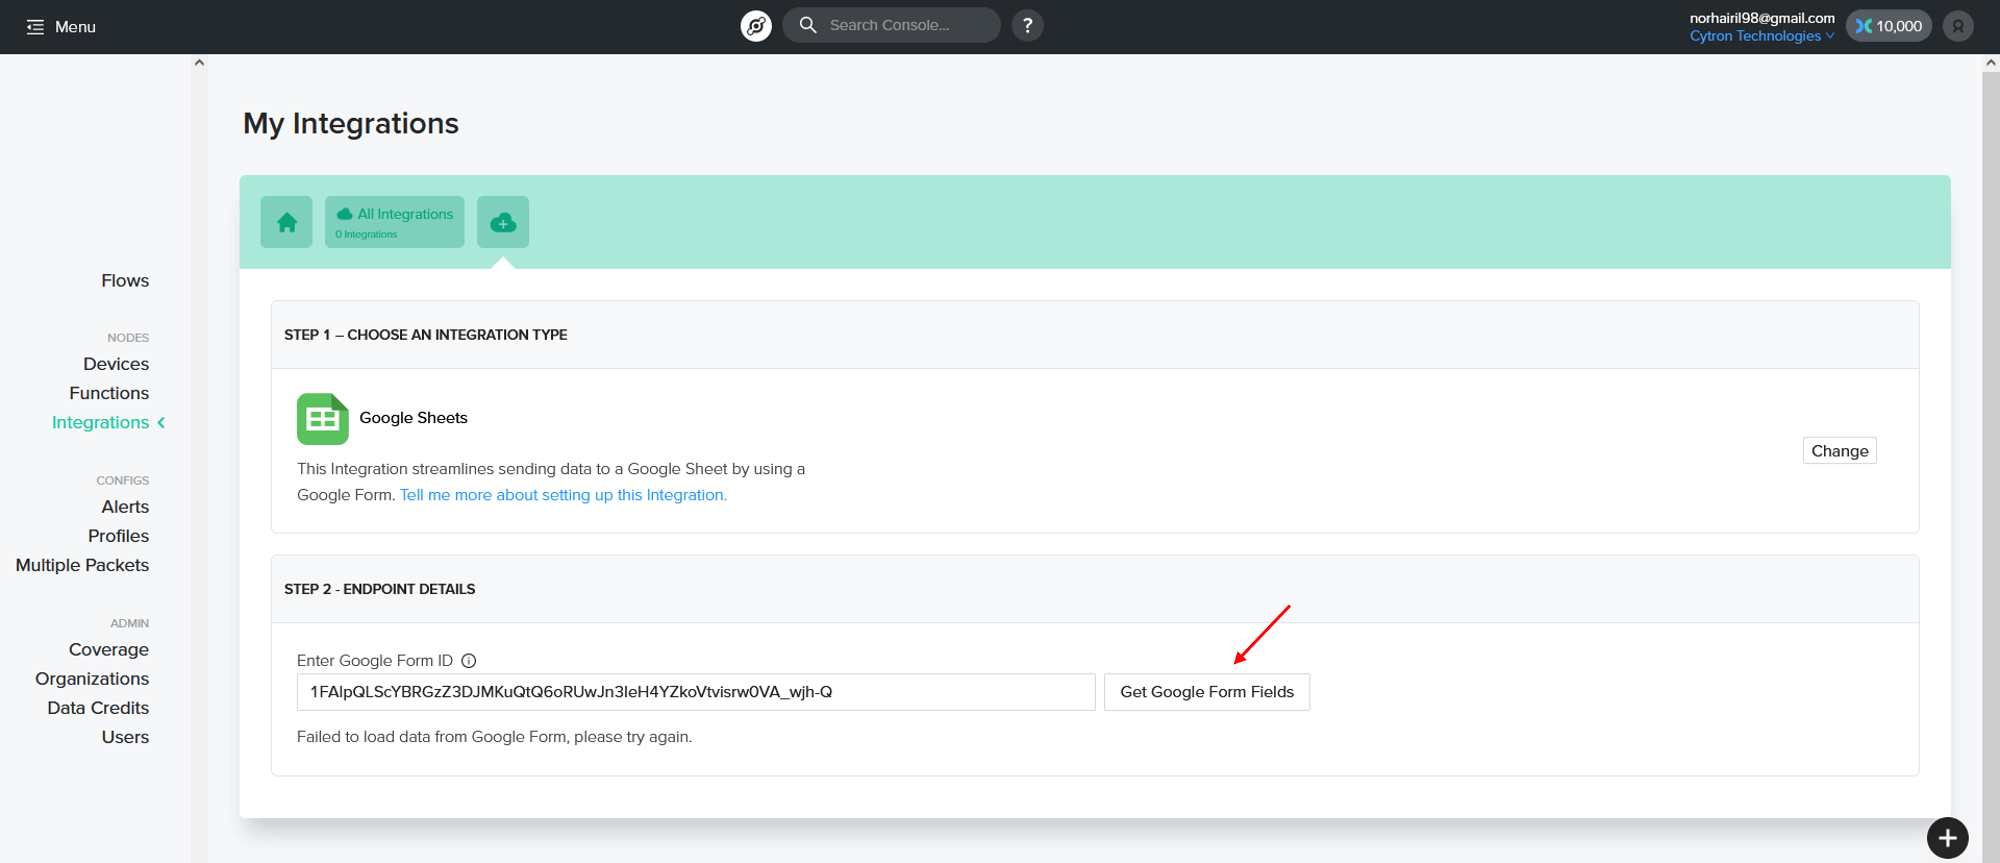
Go back to the Helium console and paste the link. We need to remove the beginning and ending slash to obtain the Google Form ID only. Remove "https://docs.google.com/forms/d/e/" and "/viewform?usp=sf_link".
Note: The Google Form ID should not have any forward or back slashes.
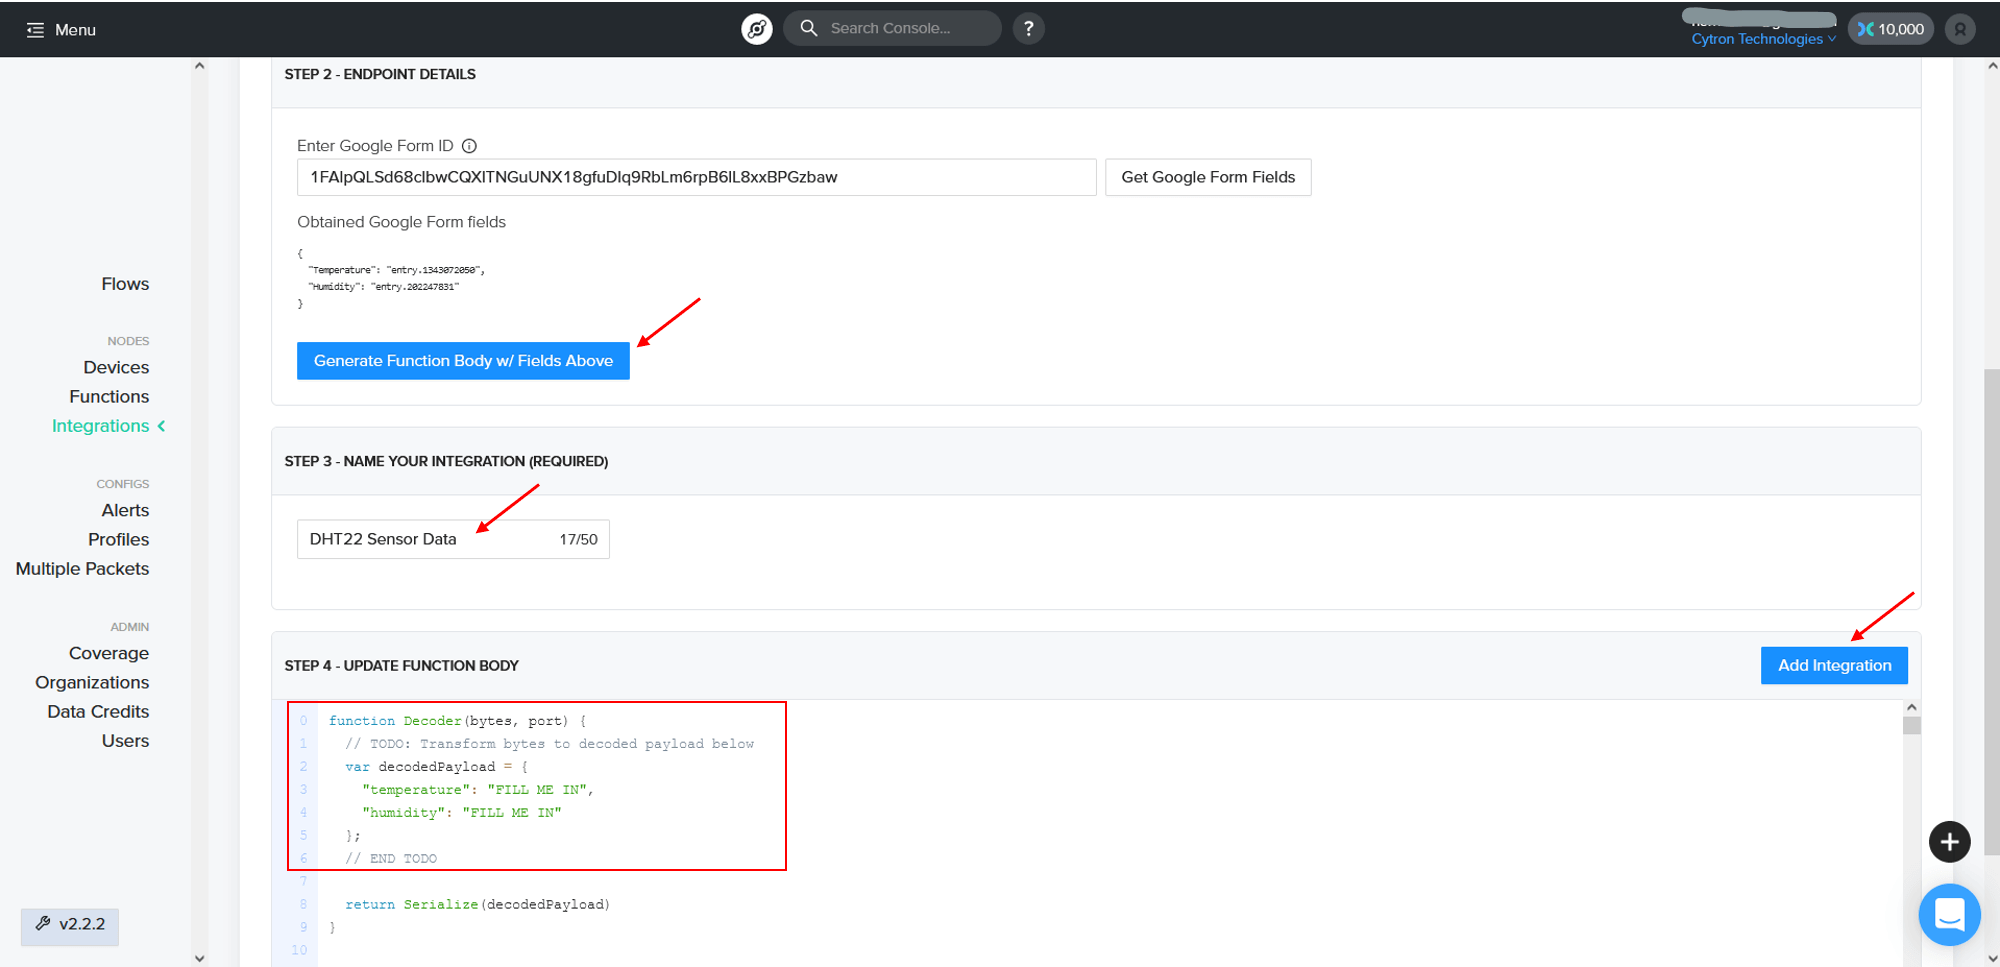
Then, click "Get Google Form Fields".
Once you obtained the Google Form fields, click "Generate Function Body w/ Fields Above".
Insert integration name. It can be anything that you like.
For the function body, remove lines 0 to 6 and replace them with the code here.
Note: Do not edit or change other parts of the function body!
Lastly, click "Add Integration".
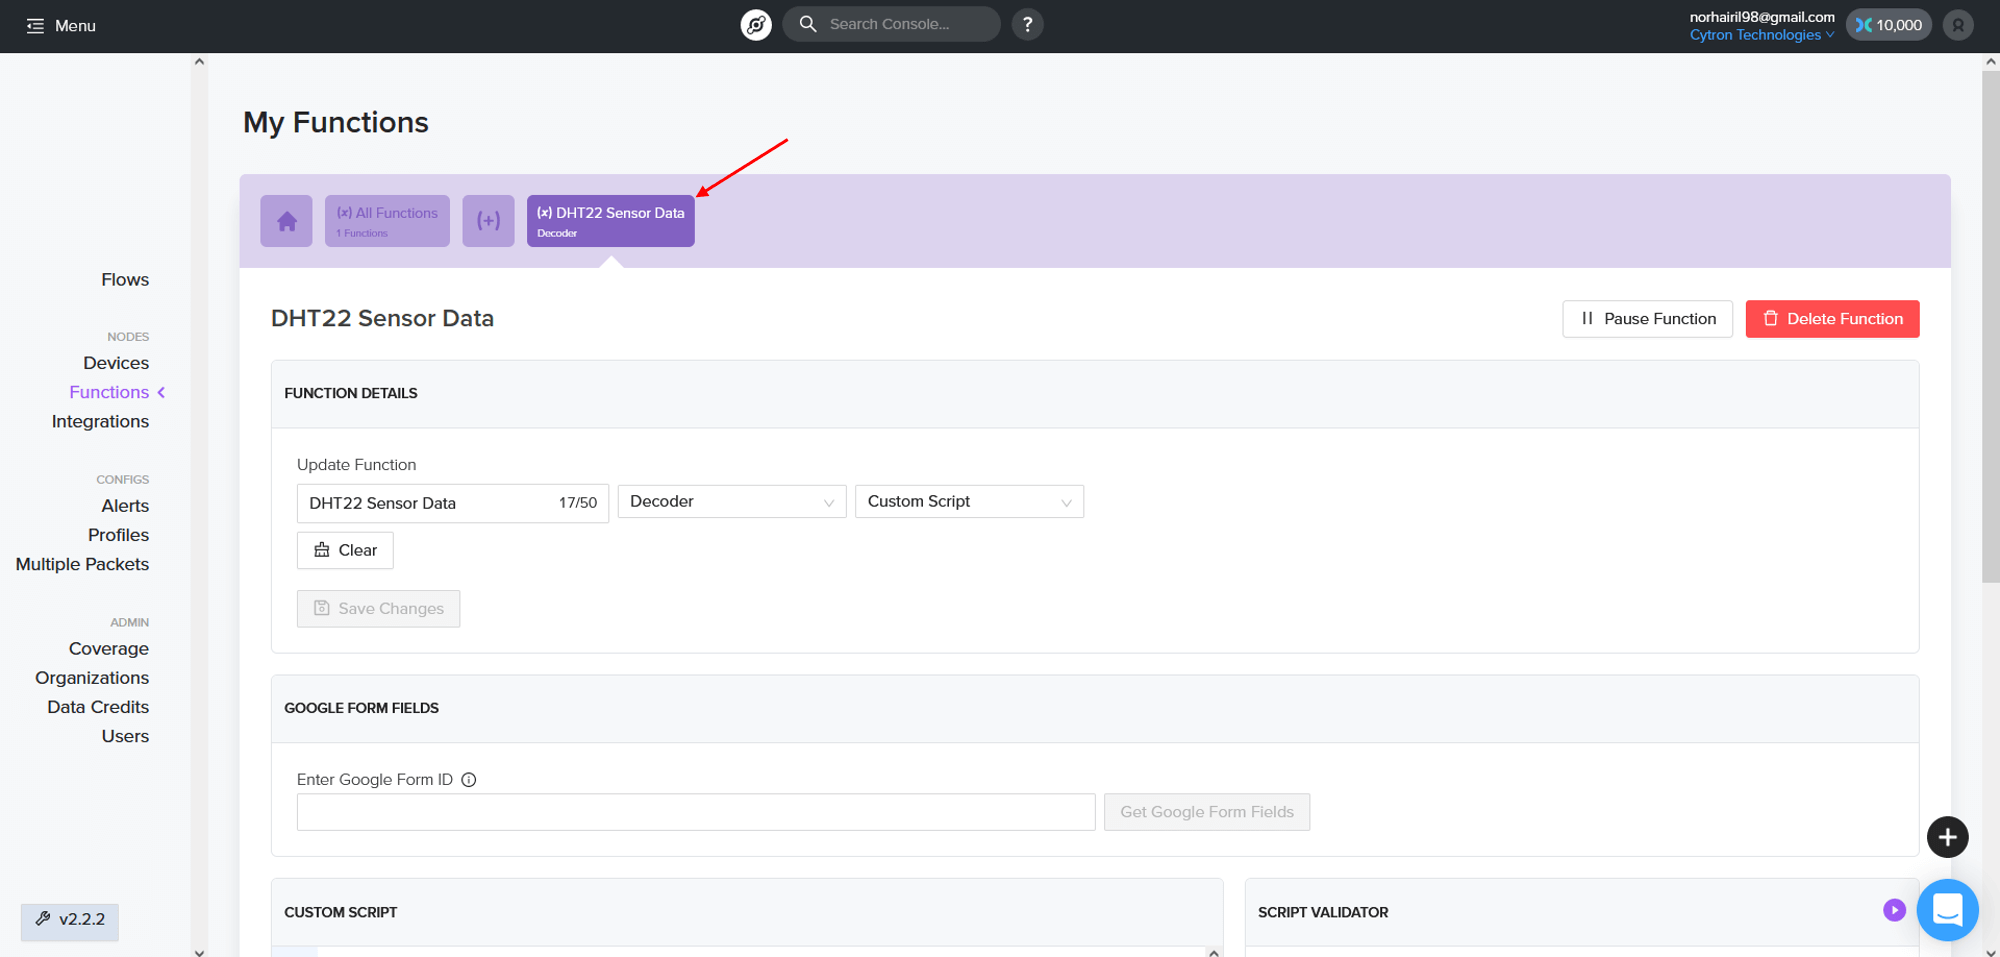
Helium console automatically creates the function once you have successfully added the Google Sheet integration. You can go to the "Functions" tab and click your integration name to observe the details of the function.
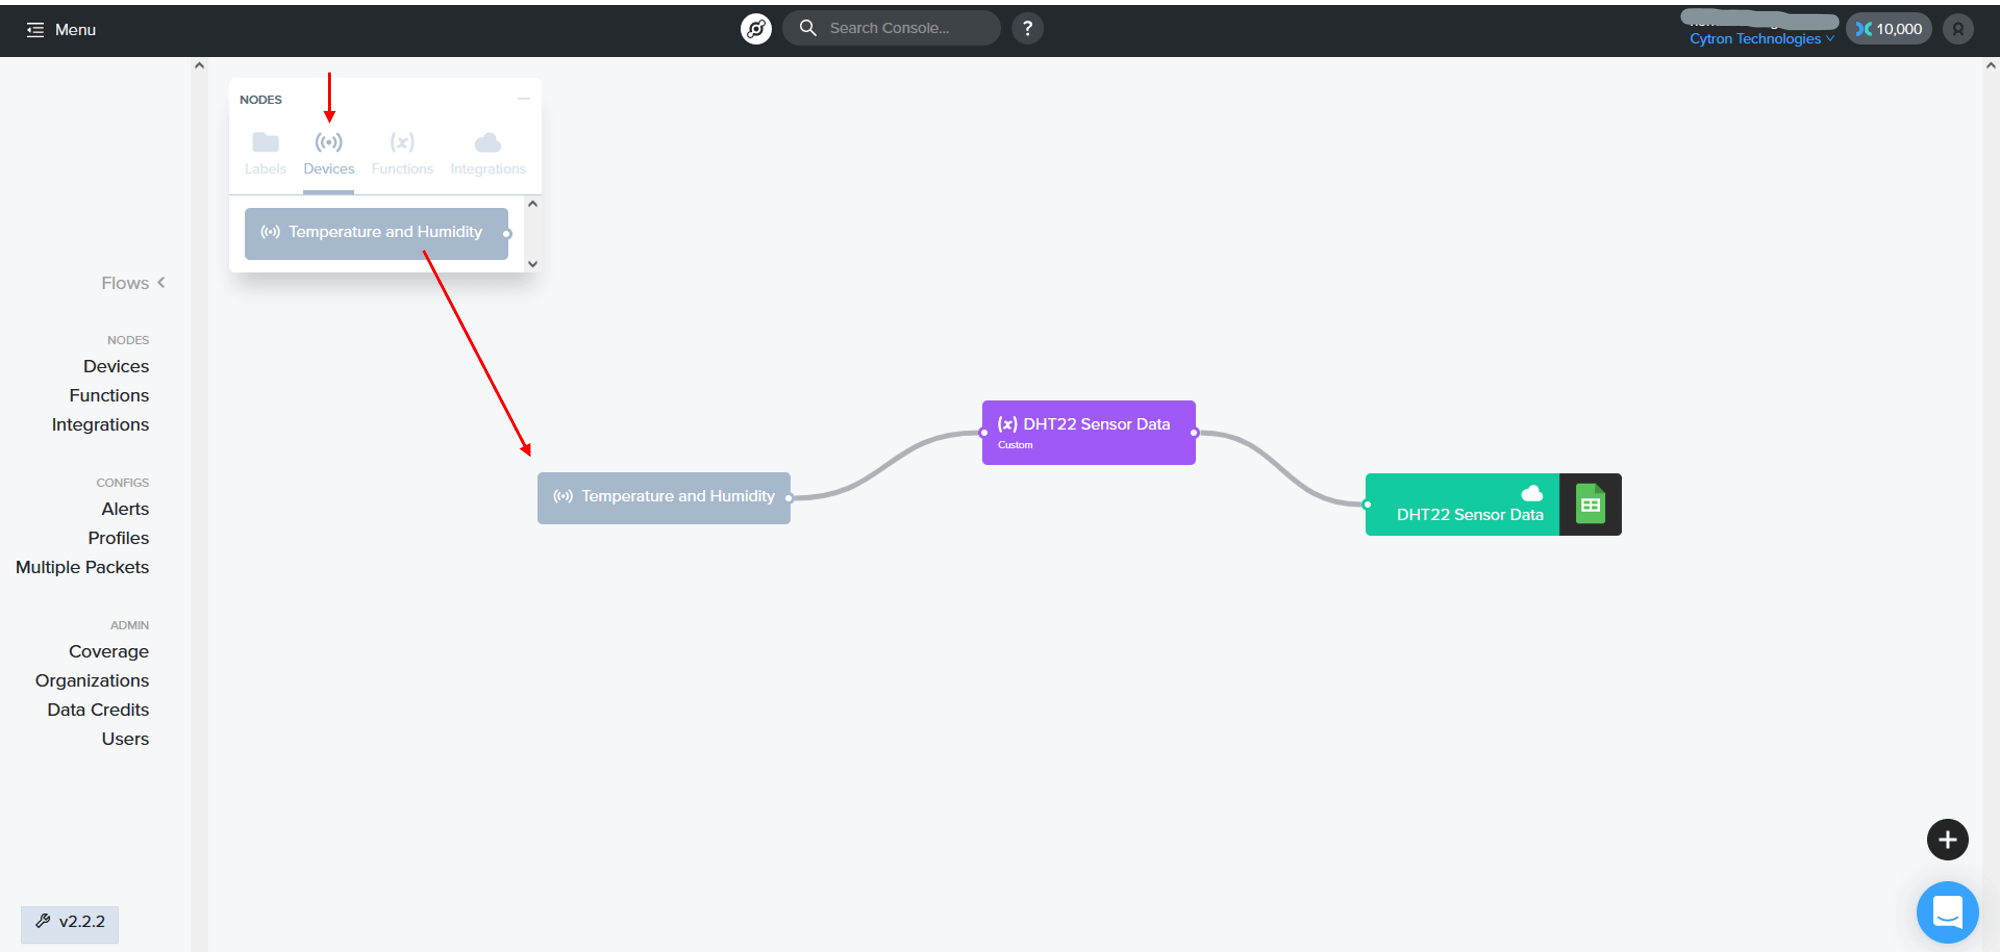
Step 5: Create Flows
Go to the "Flows" tab. You should see something like this.
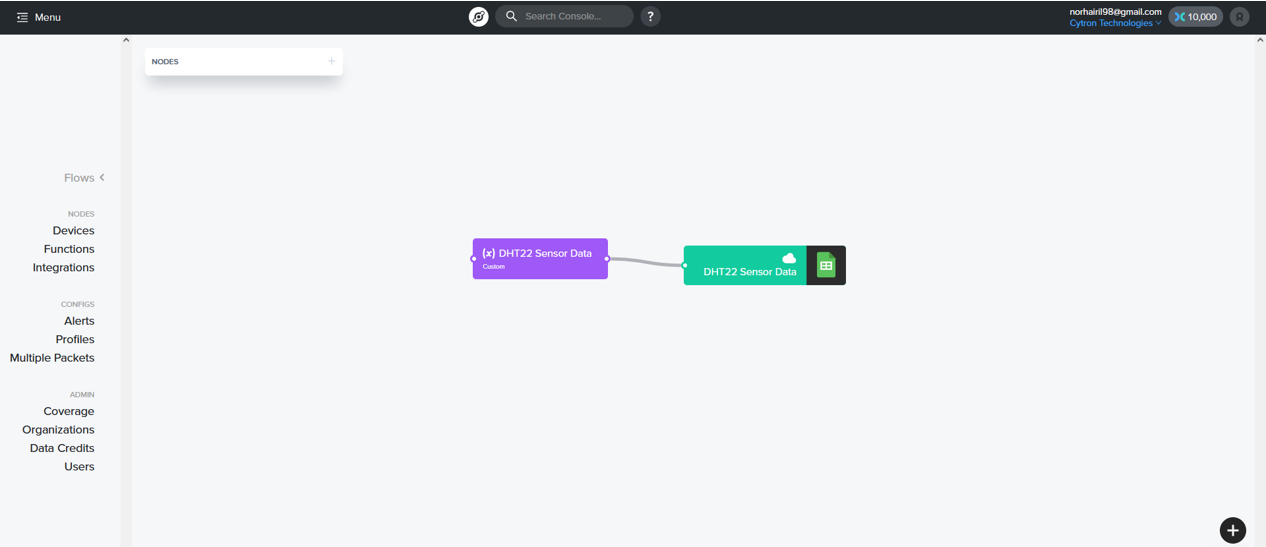
Remember that we need to have 3 components to complete this Helium project. So, the missing part is the devices. To add devices to the flows, just drag it and connect a line from devices to the functions.
It will automatically save every time you make changes.
That's all for the Helium Console part. Now you just need to upload the code.
Step 6: Upload The Code to Arduino
Open Arduino IDE. You can copy the project code from here. You need to do some adjustments to the code later.
From the online tool, copy DevEUI, AppEUI, and AppKey that you had converted and paste them into the sketch.
For this part, you can double-check by checking on the shield board itself to find the correct pin mapping. This is the pin mapping for the Cytron LoRa-RFM shield.
// Pin mapping
const lmic_pinmap lmic_pins = {
.nss = 10,
.rxtx = LMIC_UNUSED_PIN,
.rst = 7,
.dio = {2, 5, 6},
};
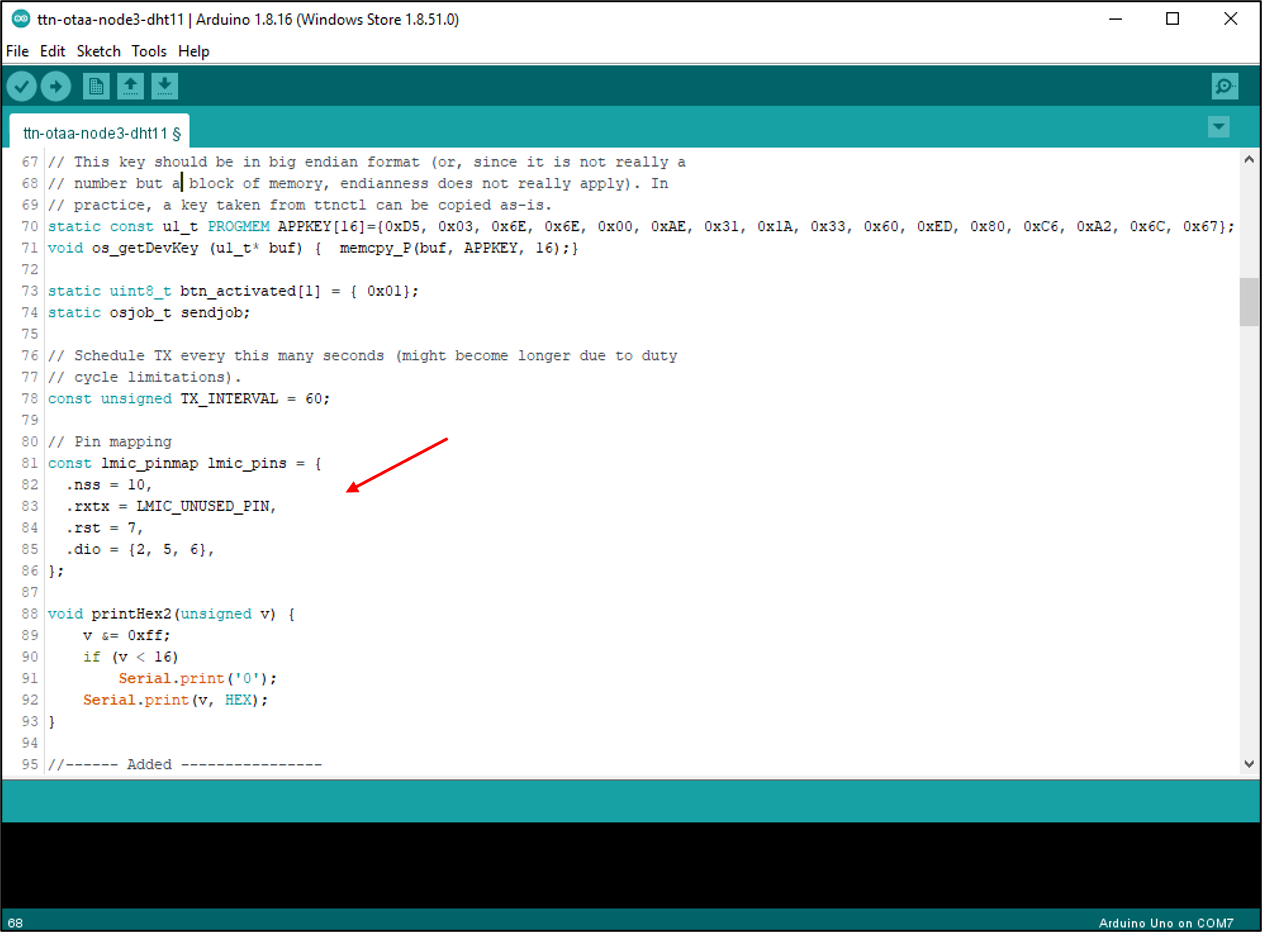
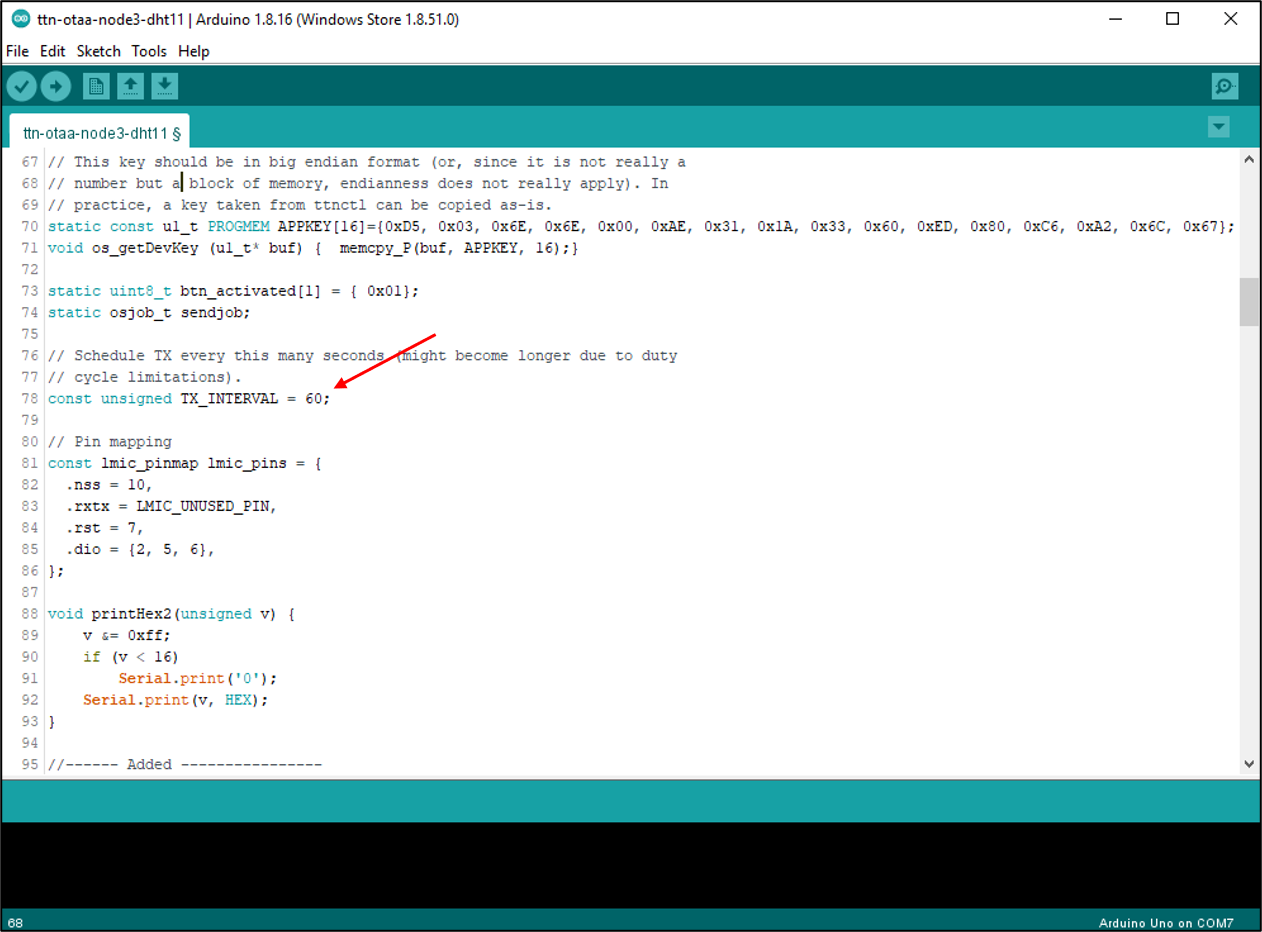
In this sketch, the temperature and humidity data will be transmitted every 60 seconds.
See variables TX_INTERVAL. You can change to other values to increase/decrease the transmission interval if you want to.
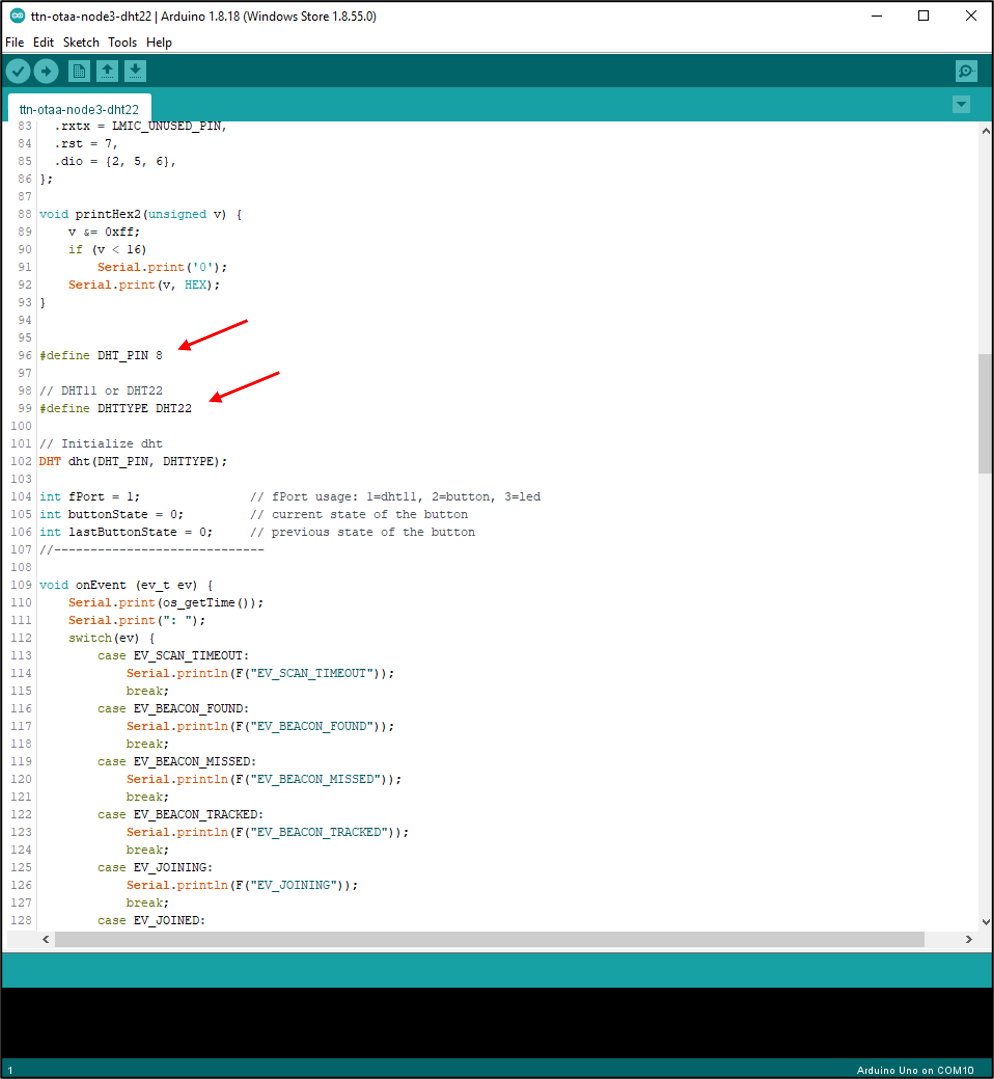
Check if you are using the right pin for your DHT sensor. In my case, I'm using digital pin 8 on the CT Uno board.
Then, define the type of your DHT sensor whether it is DHT11 or DHT22.
Connect the Arduino board to your computer using the USB cable.
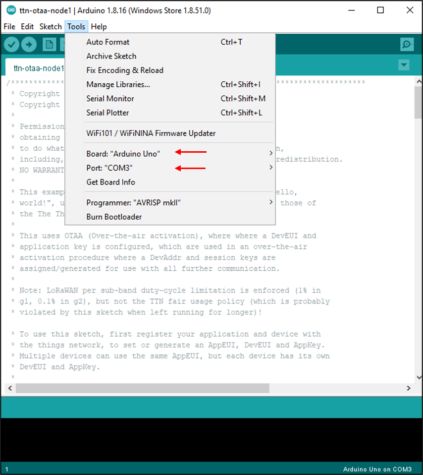
In the Arduino IDE, select the menu Tools > Board and select Arduino Uno. Then, select menu Tools > Port: your port.
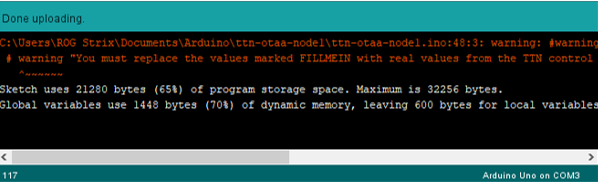
Compile the sketch. You should not see any errors (but there are warnings).
Upload the sketch to the Arduino board.
You can open the Serial Monitor to check if your node is successfully connected to the Helium Console. In a few seconds, the Serial Monitor will show the NWSKEY and APPSKEY of your node once it is successfully connected to the Helium network.
Step 6: Result
If you have correctly uploaded the code from Arduino IDE, the Helium console should have received the data.
In the Helium console, go to your device. The live data in bytes will display like this.
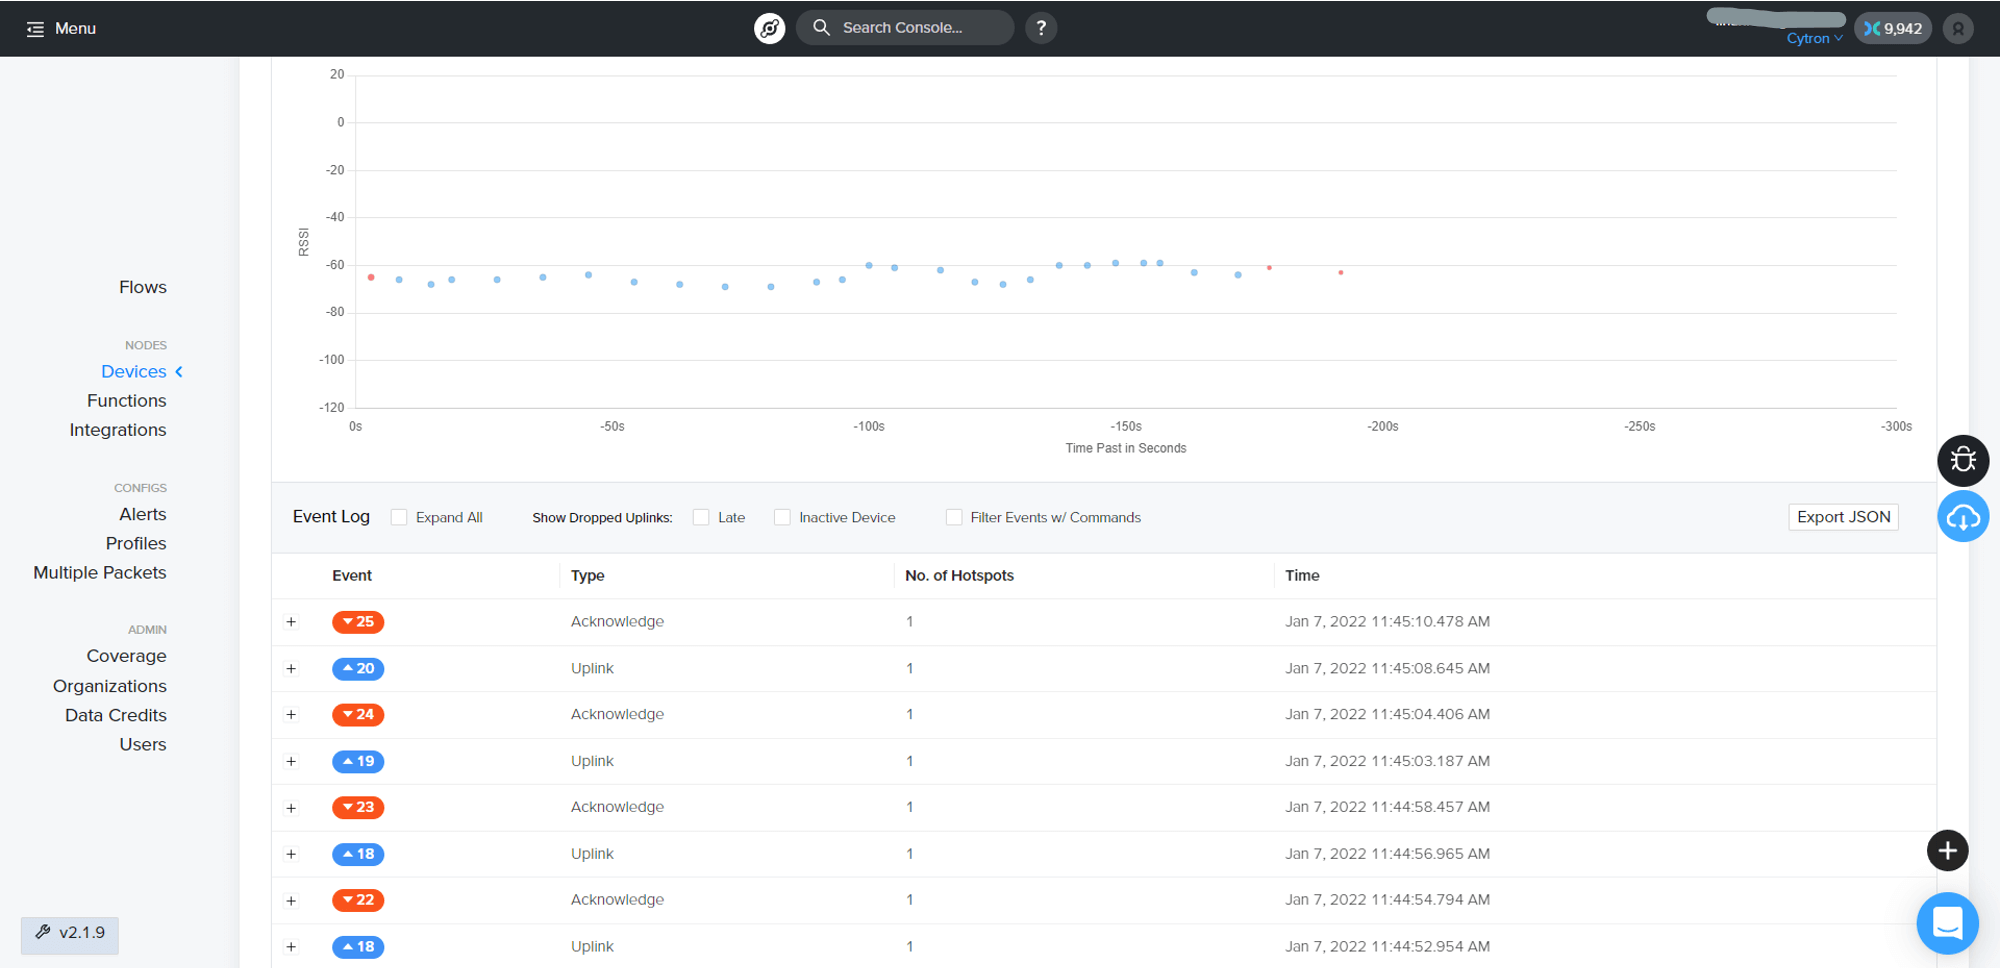
Note: The blue color dots indicate that the integration is a success. Red color dots means no integration applied while yellow color dots means there is an error occurs in your integrations setup.
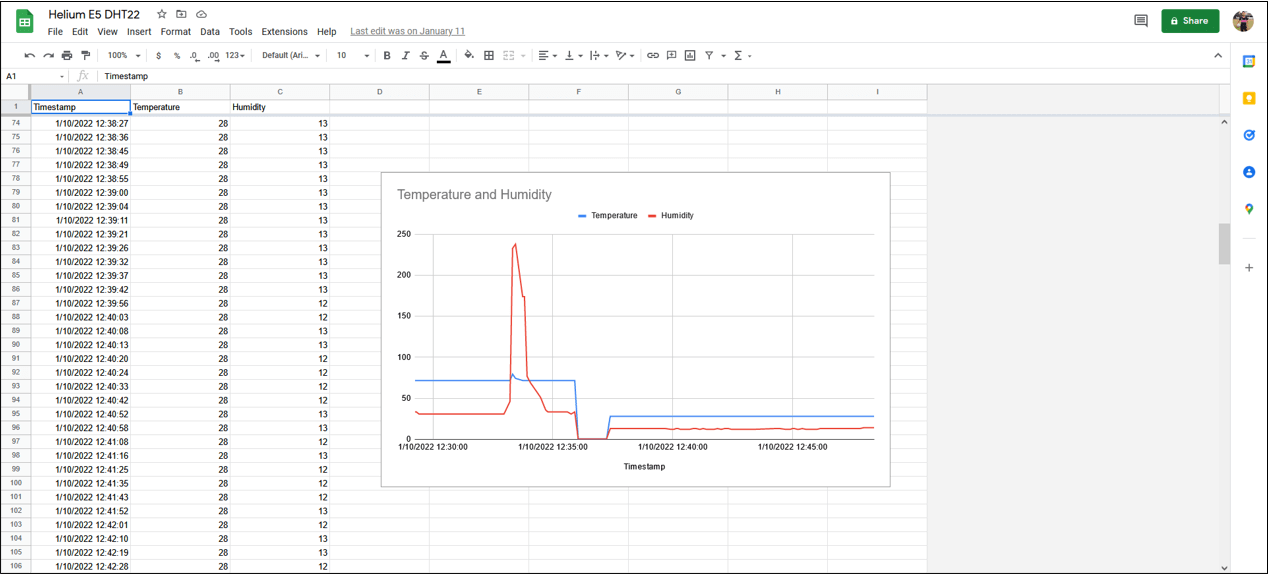
To observe the real values of the temperature and humidity data, go to the Google Form that you had created before this. Click "Responses" and open Google Sheet to see the live data.

You can create a graph or something like that to observe the data pattern. The graph also can update live data!
The tutorial ends here but you can try to explore other IoT projects that use the LoRaWAN network for low power consumption and long-range projects up to 30km range!
Please leave a comment if you have any questions :) Thanks.
Resources: