 International
 Singapore
 Malaysia
 Thailand
 Vietnam
Your shopping cart is empty!

Get started with Grove WiFi 8266 on the micro:bit
- Hao Zhen Goh
- 19 Aug 2021
- 1677
This post shows you the tutorial on how to get started with your Grove WiFi 8266 module on the BBC micro:bit board.
Hardware and Software Preparation
Hardware:
- REKA:BIT (incl. micro:bit) x1 or EDU:BIT (incl. micro:bit) x1
- Grove WiFi 8266 x1
Software:
Hardware Setup
If you are using REKA:BIT, click here. If you are using EDU:BIT, click here.
REKA:BIT Hardware Setup
1. Connect the USB cable to your computer and REKA:BIT.

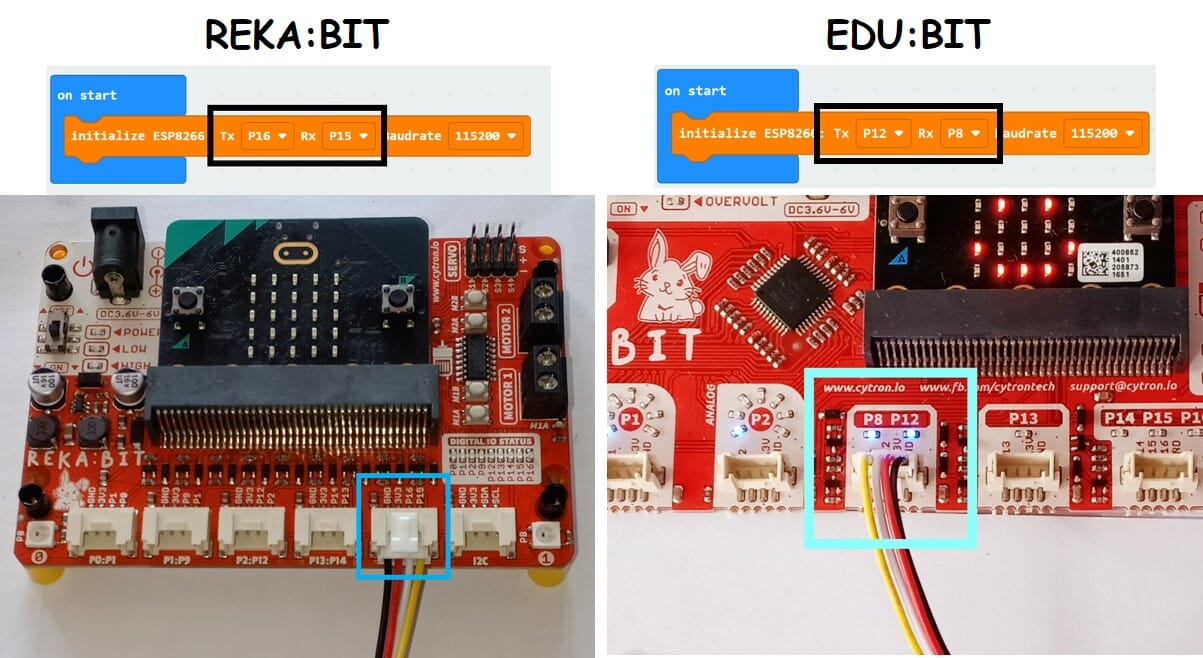
2. Connect Grove WiFi module to REKA:BIT’s Grove P15:P16 port.
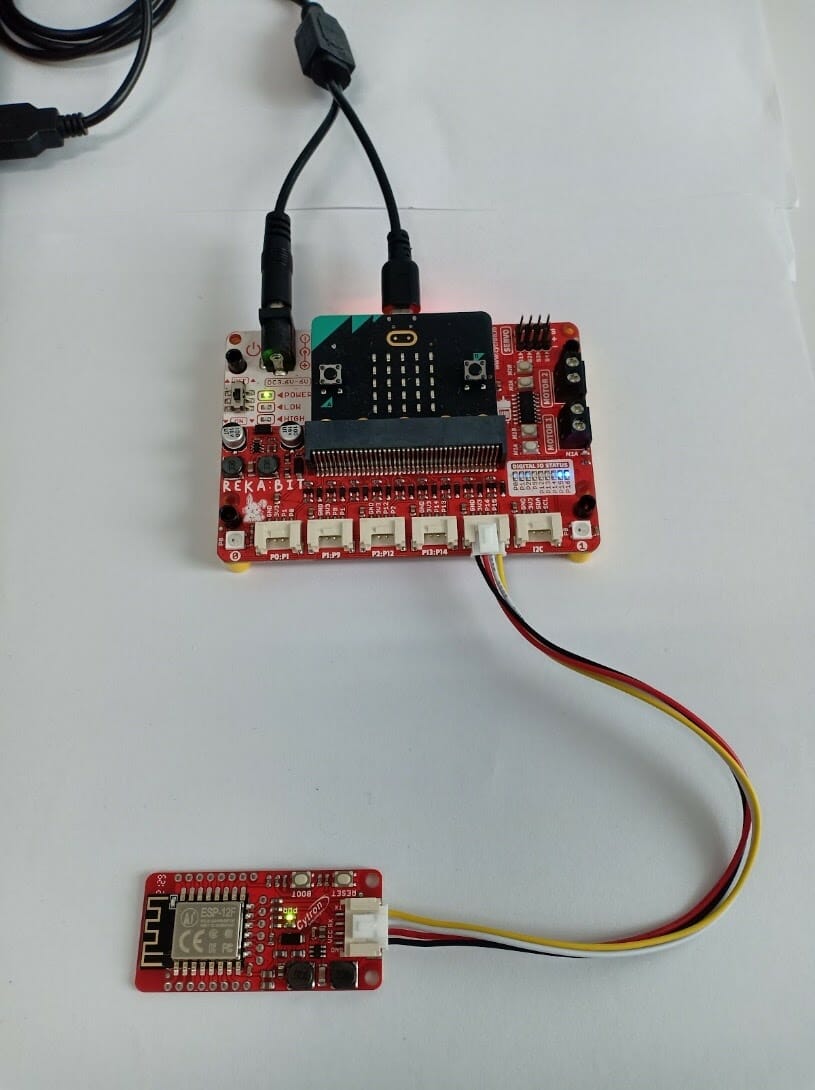
| REKA:BIT | Grove WiFi 8266 |
| TX (P16) | RX |
| RX (P15) | TX |
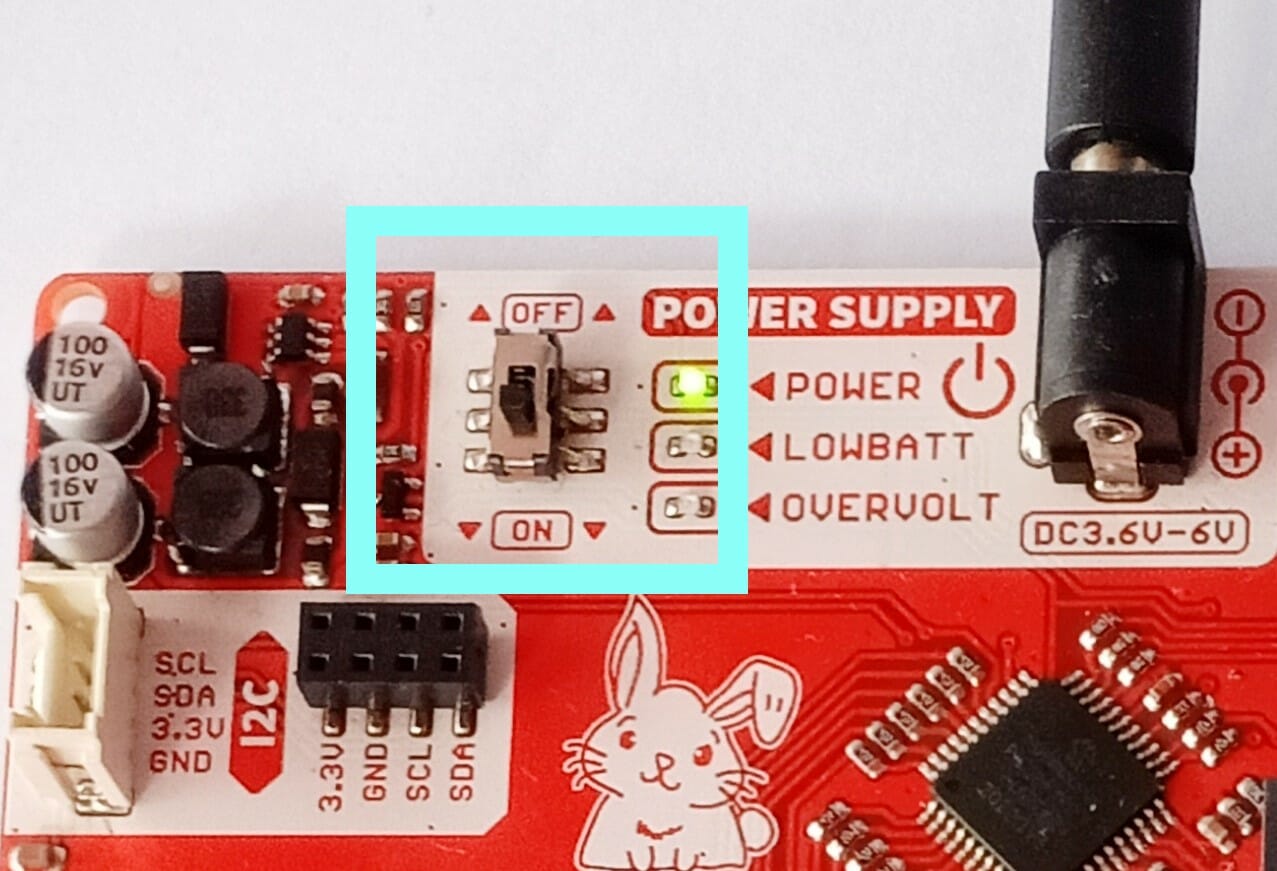
3. Remember to switch on the REKA:BIT's power.
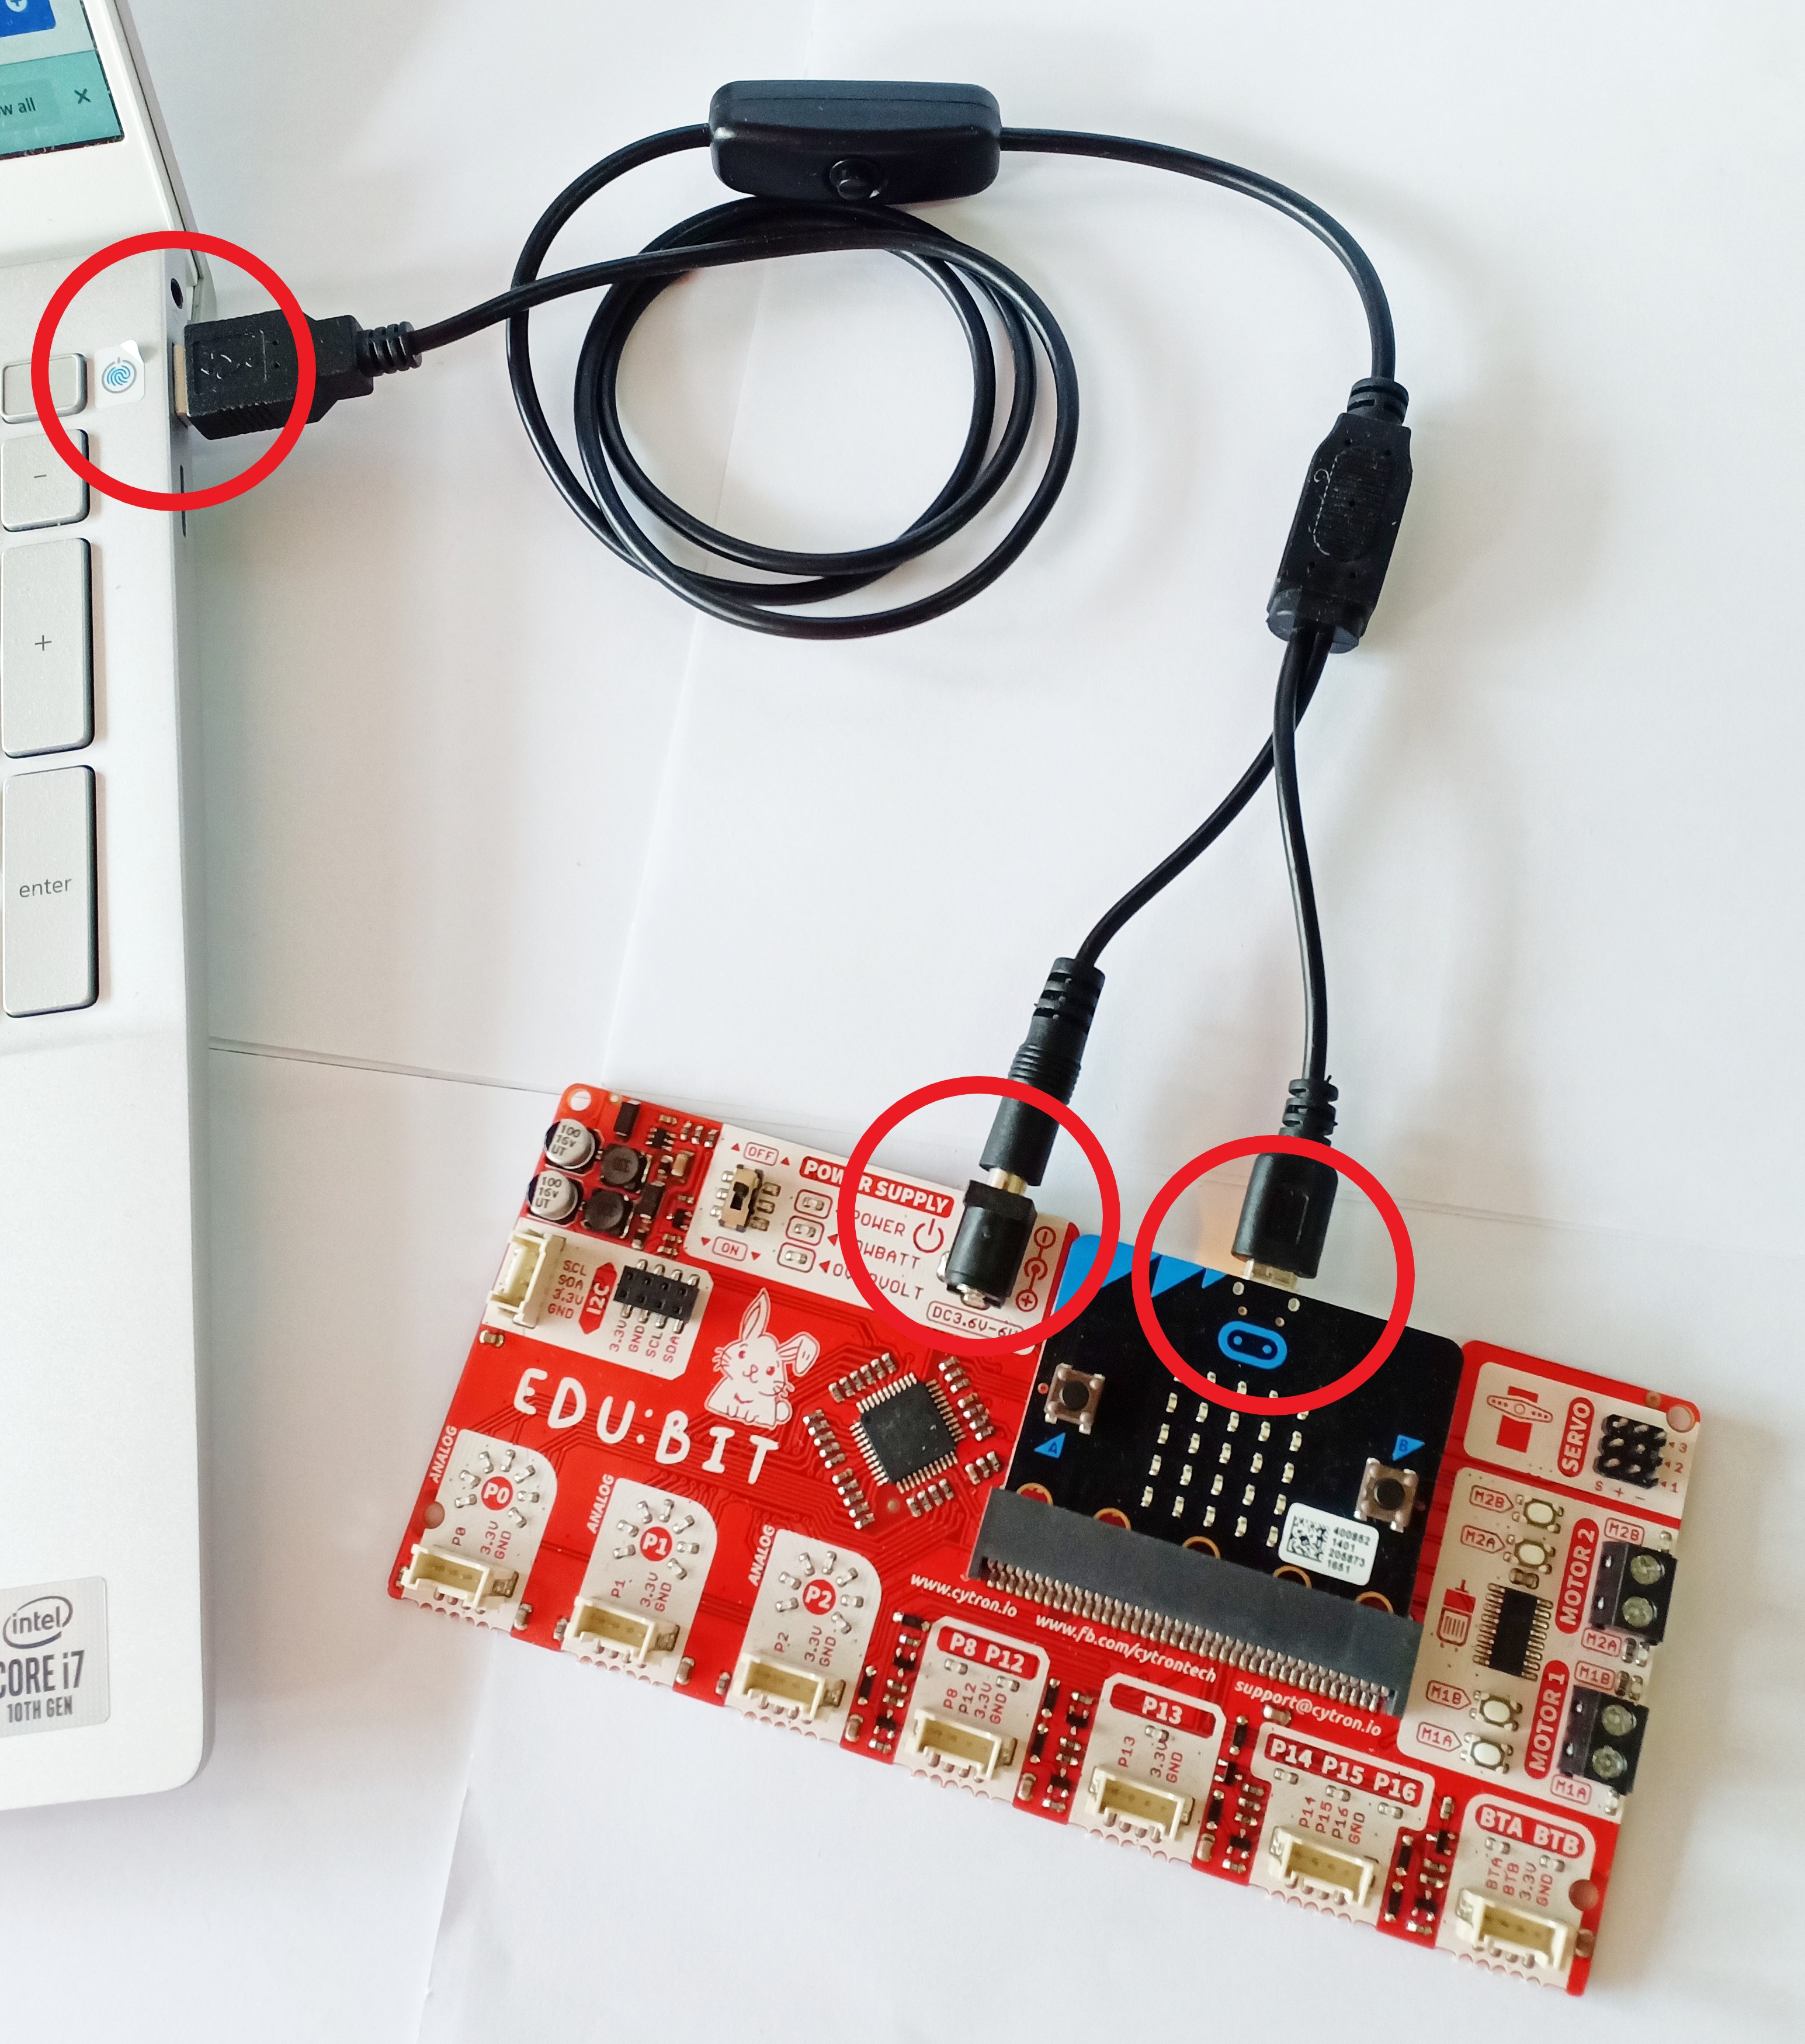
EDU:BIT Hardware Setup
1. Follow the video and break off your EDU:BIT (if you haven't do so).
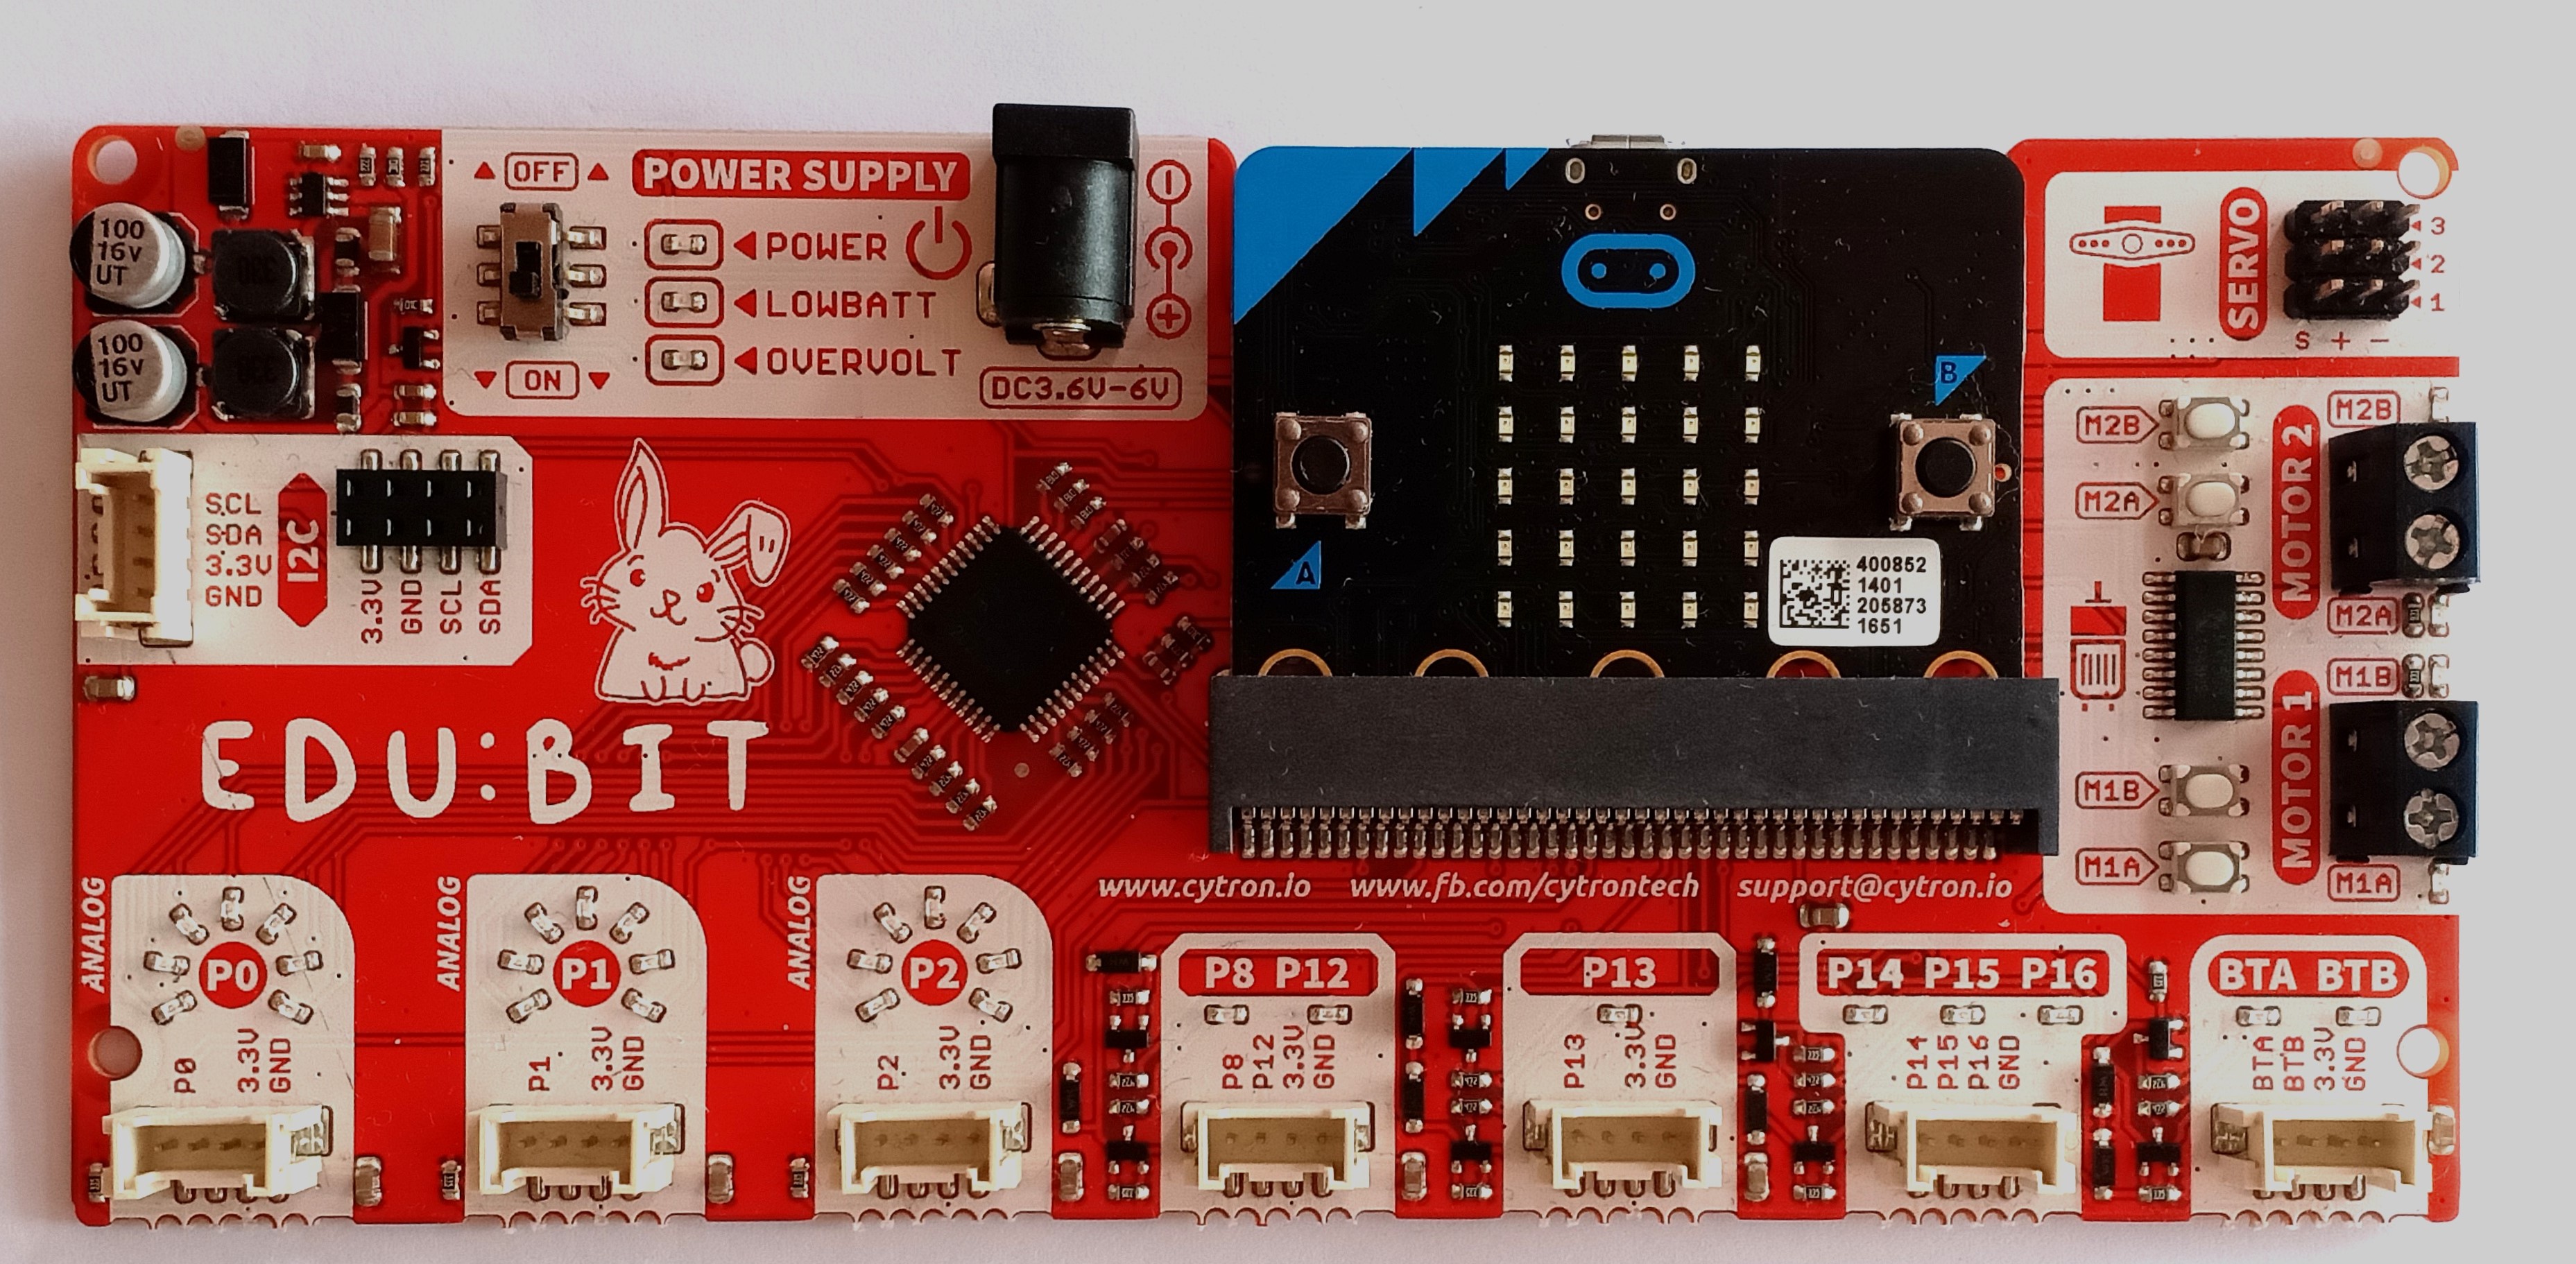
2. Connect the USB cable to your computer and EDU:BIT.
2. Connect Grove WiFi module to EDU:BIT’s Grove P8:P12 port.
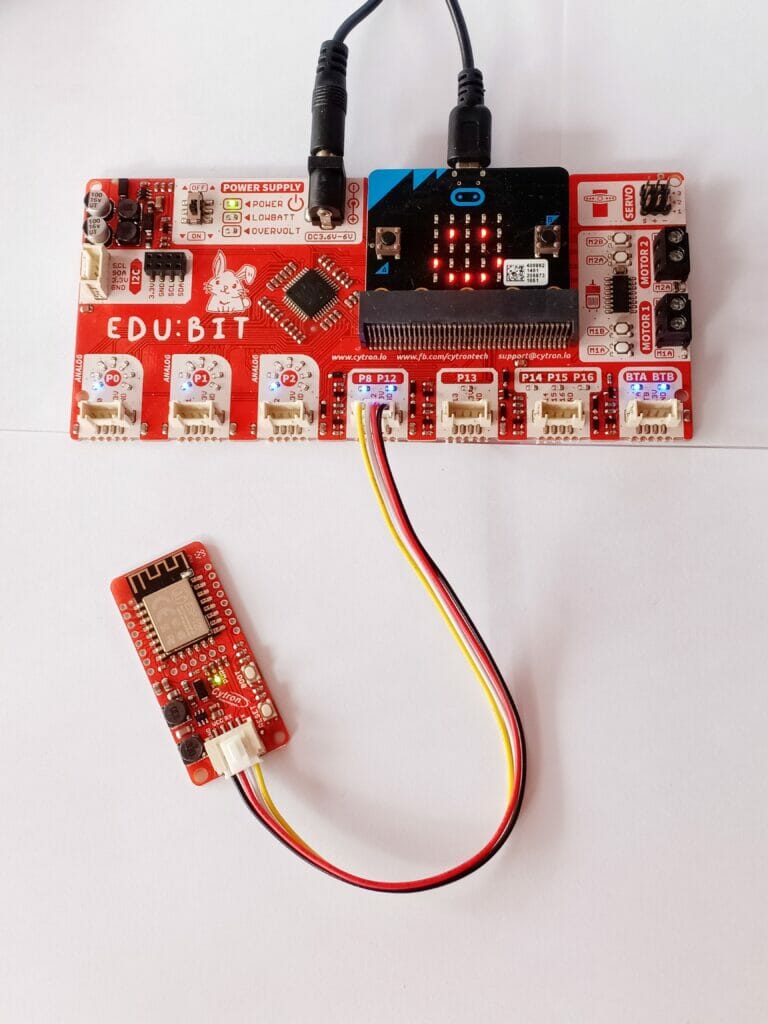
| EDU:BIT | Grove WiFi 8266 |
| TX (P12) | RX |
| RX (P8) | TX |
3. Remember to switch on the EDU:BIT's power.
4. Proceed to software setup.
Software Setup
MakeCode Editor for micro:bit
MakeCode is an easy drag-and-drop programming interface. It is a web application that works on the web browsers, so you don’t have to install anything on your computer to program this project. This is the best programming software for young makers, beginners or even any advanced users who wish to get things running in no time.
1. Go to Microsoft MakeCode Editor at https://makecode.microbit.org/.
2. Create a new project and give it a special name.
Note: If you need an offline editor, you may download it here.
Adding the MakeCode extension for Grove WiFi 8266
1. Select “Extensions” under the Settings icon, then search and add “Grove WiFi 8266” extension. Alternatively, you may insert the extension URL (https://github.com/CytronTechnologies/pxt-esp8266) into the search bar.

2. A new category “ESP8266 WiFi” will be added to the toolbox / category drawer.

Let’s Start Coding
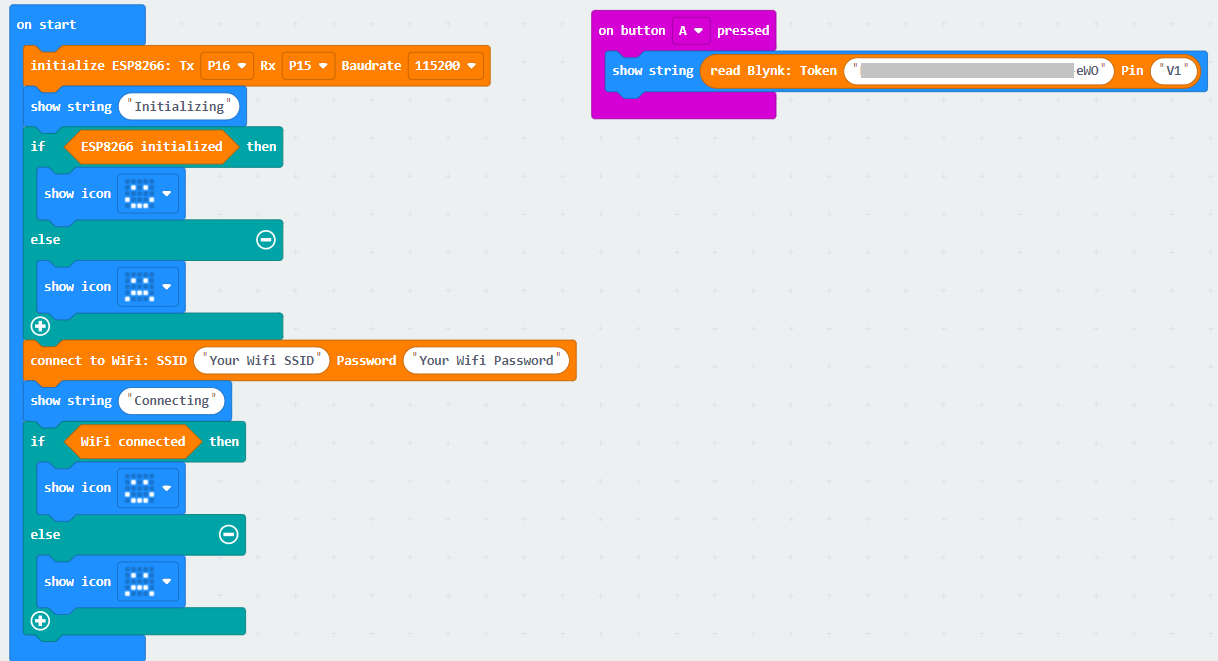
1. Select the [initialize ESP8266: Tx_ Rx_ Baudrate_] block from this new category and snap it to the [on start] slot. This will initialize the WiFi module once, every time when REKA:BIT is powered on or reset.
Note: Make sure that the WiFi module is connected to Grove P15:P16 port as stated on the MakeCode block.
- P15:P16 for REKA:BIT.
- P8:P12 for EDU:BIT.
2. Select the [show string _] block and fill in “Initializing”.
3. You may use the [ESP8266 initialized] and [if-else] blocks to verify whether the initialization is successful - show “smiley face” if successful, “sad face” if not.

5. Select [connect to WiFi: SSID_ Password_] block and fill in your WiFi connection’s SSID and password.
6. Select the [show string _] block and fill in “Connecting”.
7. You may use the [WiFi connected] and [if-else] blocks to verify whether the WiFi connection is successful - show “smiley face” if successful, “sad face” if not.

8. Download the code to your micro:bit. Follow this video if you are not sure how to do that.
9. Once the code is downloaded successfully, you should see the LED display updating information according to the code you wrote, indicating the status of the WiFi module initialization and WiFi connection.
Note: Make sure that REKABIT's power is turned on to power up the Grove WiFi 8266 module.
Explore the IoT Features
After successfully initialized the Grove WiFi 8266 module and connected to your local WiFi network, there are a few exciting Internet-of-Things (IoT) features for you to try out on your micro:bit. Choose either one to get started:
- Control and read data with Blynk
- Obtain the Internet time
- Send message to Telegram
- Data logging on ThingSpeak
1. Control & read data with Blynk
This feature allows you to transfer or read data from the micro:bit on Blynk project. To use this feature, you need to download the Blynk app on your smartphone, register a free account (for new users) and start a new project or open your existing project. Remember to choose “ESP8266” as the device to be used in the project. Besides, make sure your smartphone is connected to the internet.
Send data from micro:bit to Blynk
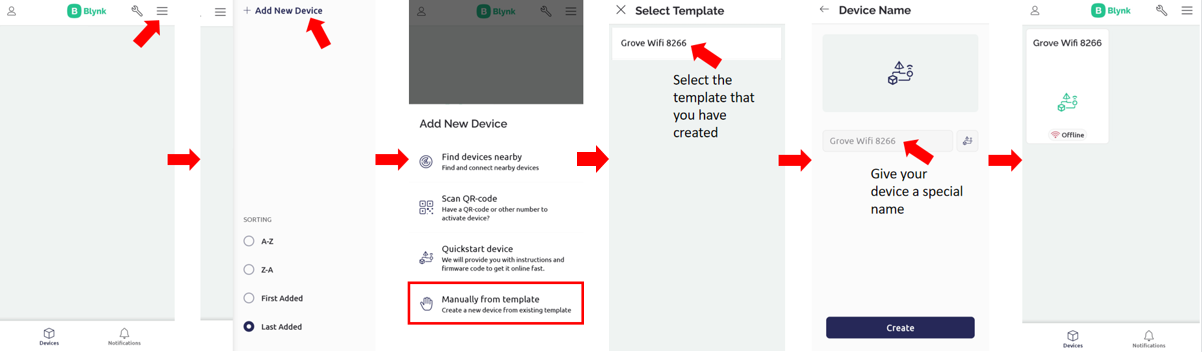
1. Create a new template and give it a special name (for example: Grove WiFi 8266).
You may refer to the Step 1 mentioned in that guide.
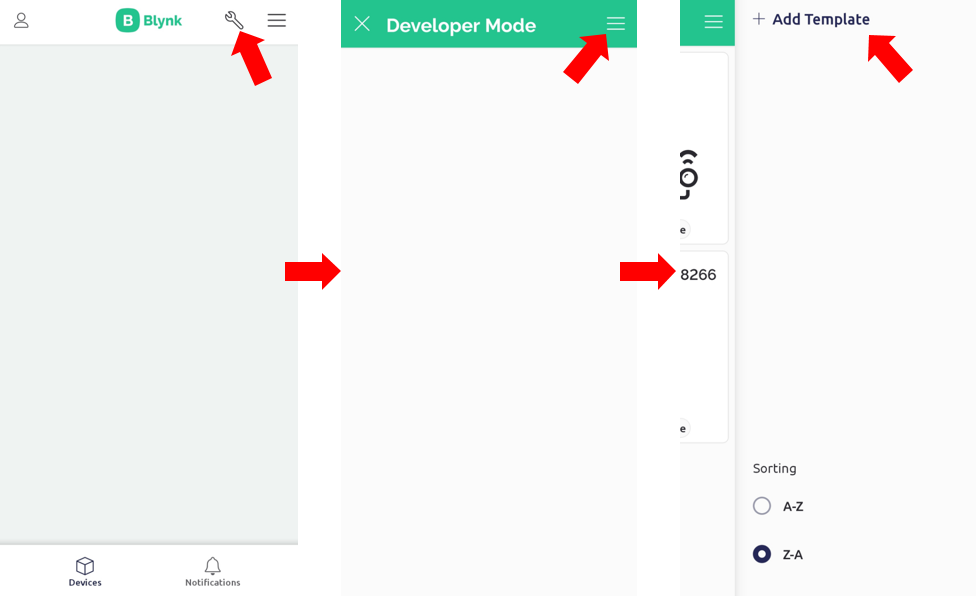
We will show you the steps on the Mobile App version to set up the datastream virtual pins and widgets. The web browser version will be very similar to what is being shown here.
2. Within the new template, create a new datastream for virtual pins.
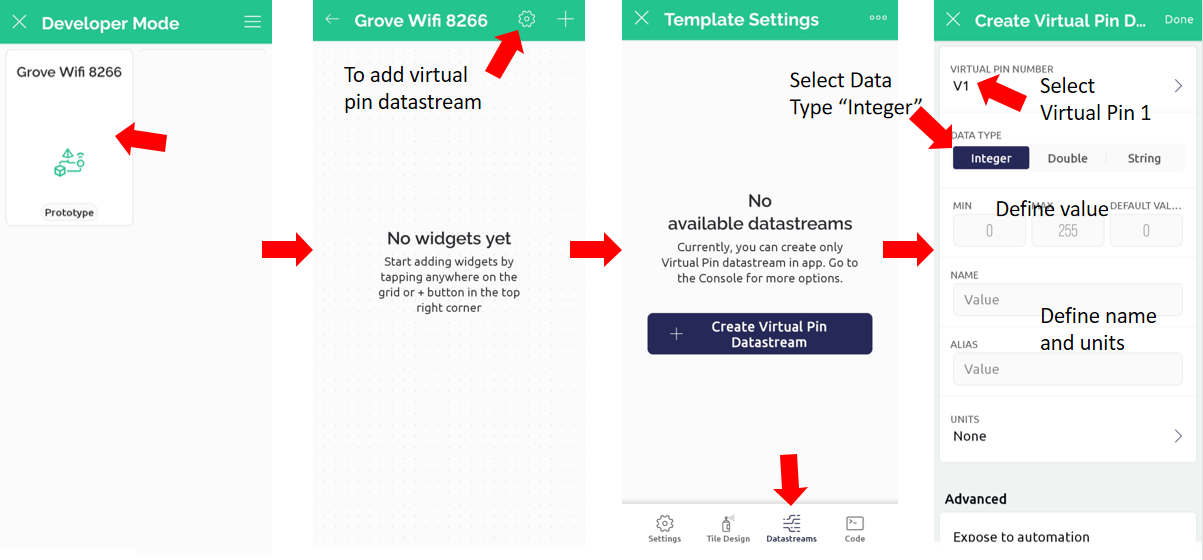
3. Add a new widget (Value Display) into your template and set up the new widget by selecting the correct datastream virtual pin that you have created.
 v2.png )
2. Now let's move on to the MakeCode editor. Select the [on button _ pressed] block from the "Input" category and snap the [Write Blynk: Token _ Pin _ Valve _] block from the “ESP6266 WiFi” - “Blynk” category.

3. Fill in the Token with Auth Token of the project as given in the email received from Blynk. Follow the steps here if you haven't done so already.
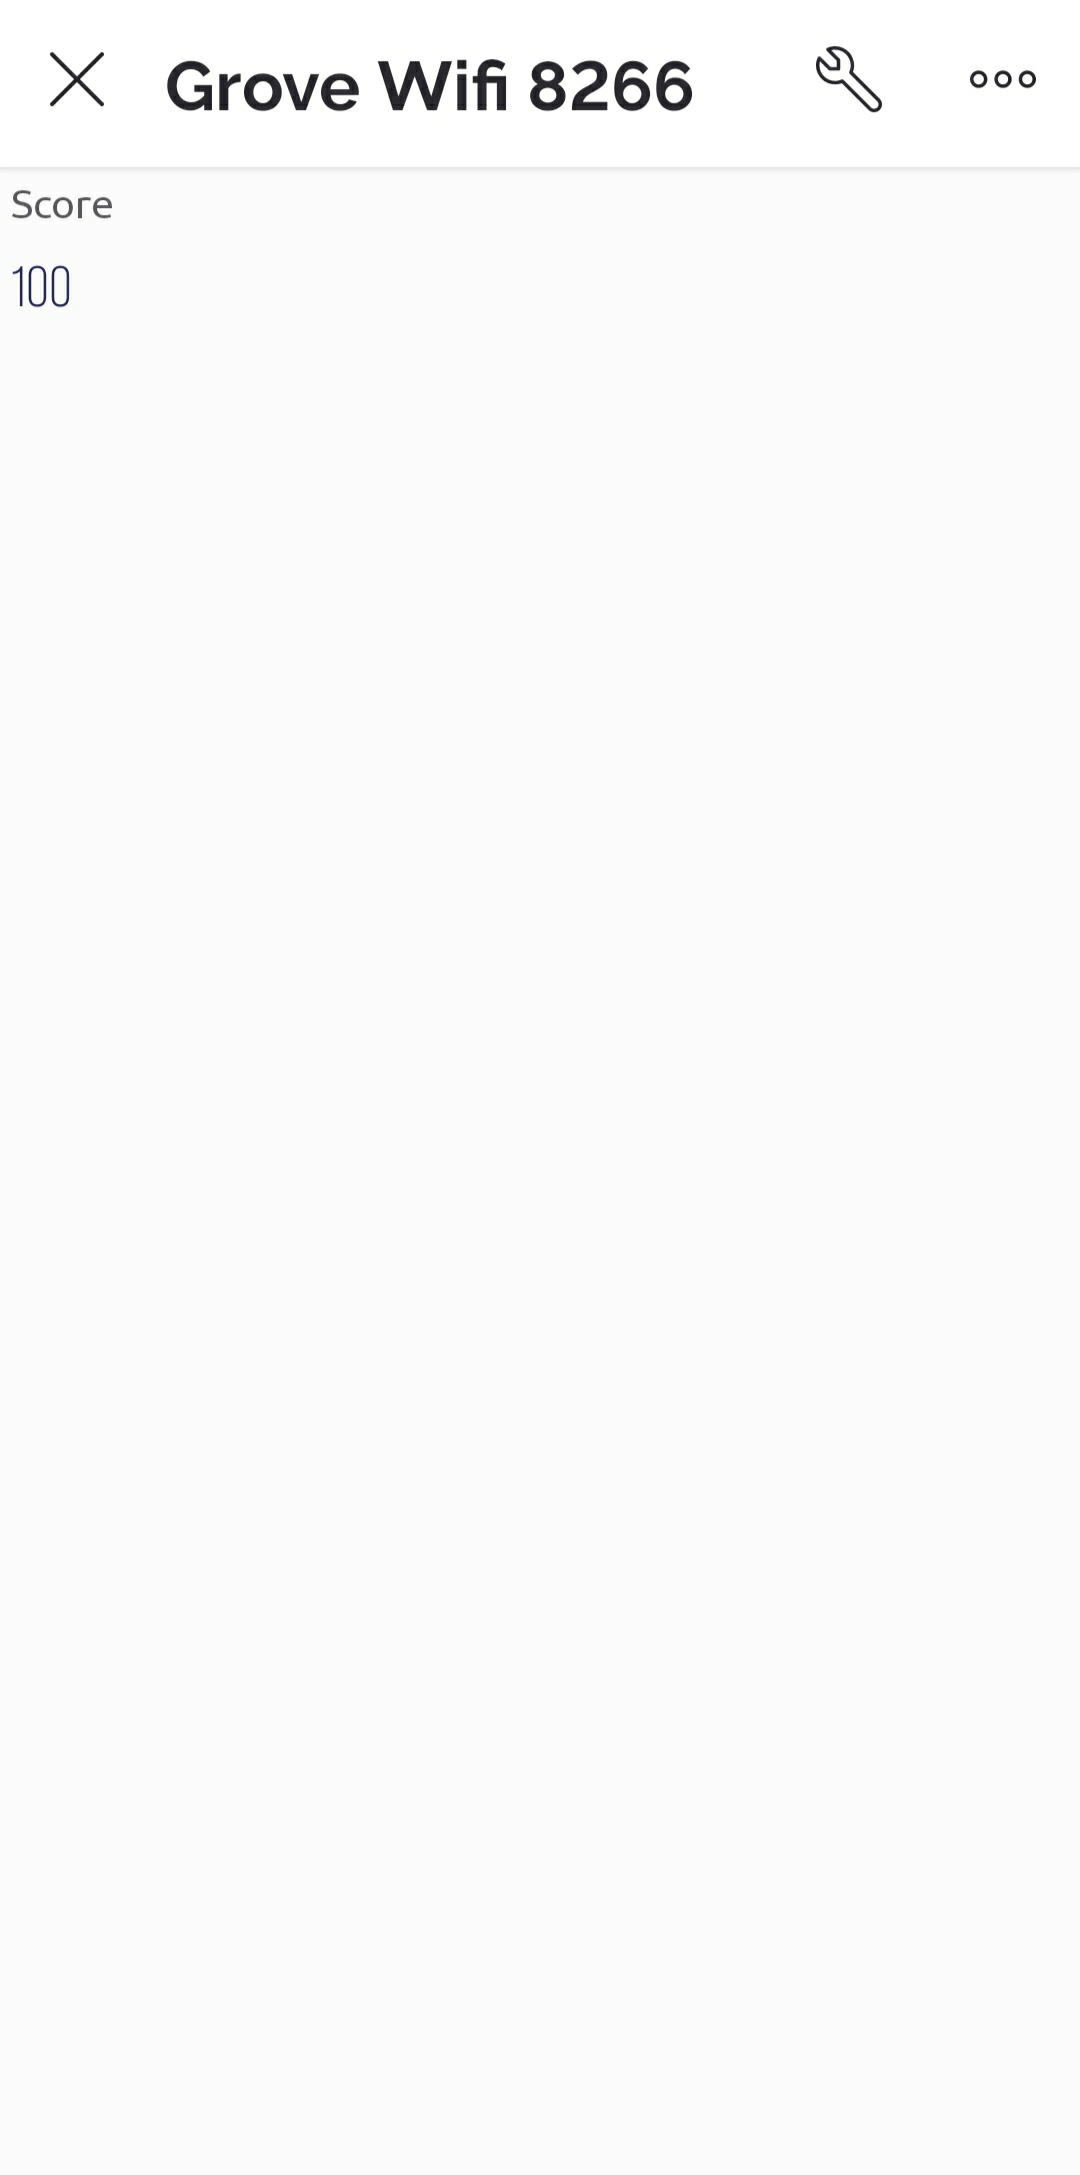
4. Then fill in the Pin with "V1" as chosen on Blynk app in Step 1. Here we put "100" to the Value column, but you may insert any variable or sensor reading that you want to send to your Blynk app.

5. You may use the [Blynk updated] and [if-else] blocks to verify whether the data is successfully updated to the Blynk server - show “tick” if successful, “cross” if not.

6. Download the code to your micro:bit.
7. On the Blynk IoT app, add new device to create a new Blynk IoT project.
8. Press micro:bit Button A to send data to virtual pin V1 of the Blynk project. On the Blynk app, you should see the Value Display widget showing "100" or any value that you sent from the micro:bit.
Send data from Blynk to micro:bit
1. Create a new template and give it a special name (for example: Grove WiFi 8266).
You may refer to the Step 1 mentioned in that guide.
We will show you the steps on the Mobile App version to set up the datastream virtual pins and widgets. The web browser version will be very similar to what is being shown here.
2. Within the new template, create a new datastream for virtual pins.
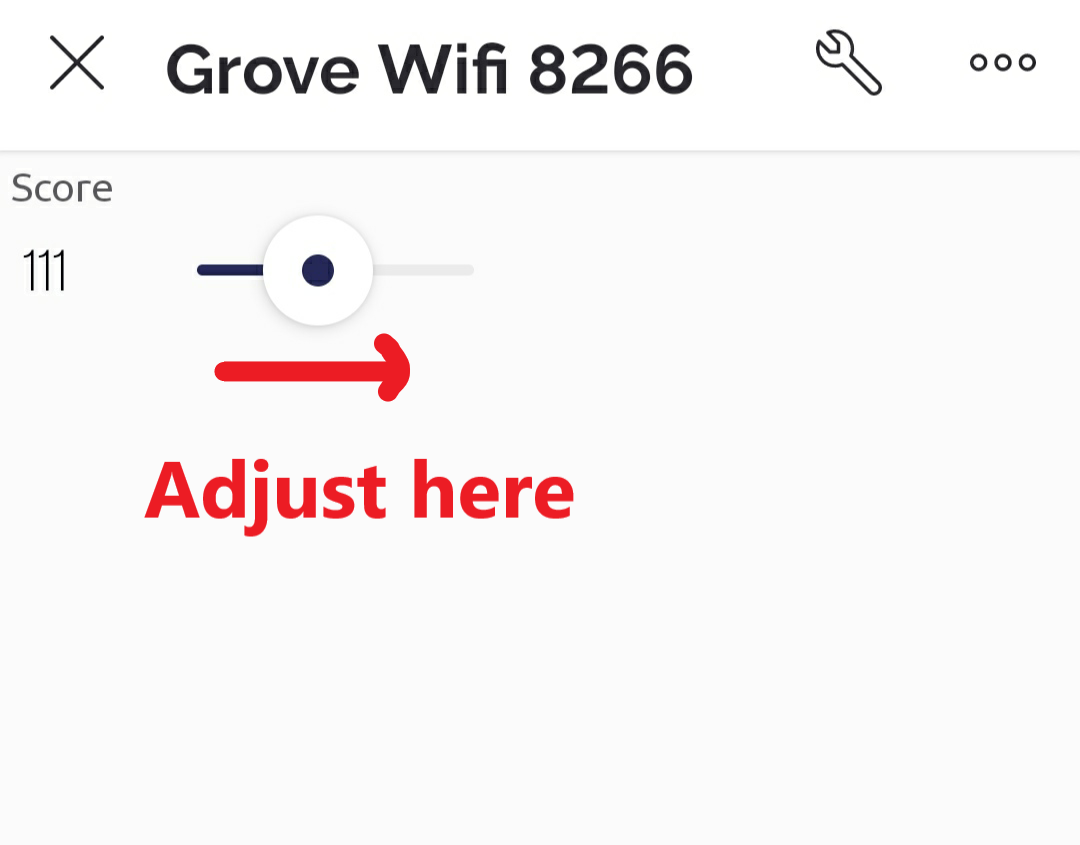
3. Add a new widget (Slider) into your template and set up the new widget by selecting the correct datastream virtual pin that you have created.
 v2.png )
4. On MakeCode editor, select the [on button _ pressed] block from the “Input” category.
5. Select the [show string _ ] block and snap the [Read Blynk: Token _ Pin _ ] block into the show string block.

6. Fill in the Auth Token of the project as given in the email received from Blynk and insert "V1" into the Pin column.
7. Download the code to your micro:bit.
8. On the Blynk IoT app, add new device to create a new Blynk IoT project.
9. Press micro:bit Button A to read the data of Virtual pin V1 from your Blynk app. Your micro:bit LED display should show the current value of the slider on the Blynk project.
2. Obtain the Internet Time
This feature enables you to get the information of current date and time via internet, from the Network Time Protocol (NTP) server, based on the time zone you set.
1. Select the [Initialize internet time at timezone _] block from the “ESP8266 WiFi” - “Internet Time” category and snap it to the [on start] block after the WiFi connection block.

2. Fill in the timezone, for example '8' for UTC+8.

3. Select the [show string _] block and fill in “Initializing Internet Time”.
4. You may use the [internet time initialized] and [if-else] blocks to verify whether the internet time is successfully initialized - show “smiley face” if successful, “sad face” if not.

Show current time
1. After initialization, select the [on button _ pressed] block from the “Input” category and snap in the [update internet time] block.

2. You may use the [internet time updated] and [if-else] blocks to verify whether the internet time is successfully updated - multiple [show string _] blocks display "hour : minute : second” if successful, otherwise shows “Error”.

3. Download the code to your micro:bit and observe the LED display.
4. Once the Internet time is initialized, press Button A on micro:bit to show the current time.
Show current date
1. After initialization, select the [on button _ pressed] block from the “Input” category and snap in the [update internet time] block.
2. You may use the [internet time updated] and [if-else] blocks to verify whether the internet time is successfully updated - multiple [show string _] blocks display “Day of week, day/month/year” if successful, otherwise shows “Error”.

3. Download the code to your micro:bit and observe the LED display.
4. Once the Internet time is initialized, press Button A on micro:bit to show the current day of week and date.
3. Send message to Telegram
This feature utilizes the Telegram API to send chat messages via a Telegram bot. To use this feature, first you must register a Telegram account and create a new Telegram bot through "BotFather" on the Telegram.
1. Follow the steps here to create a Telegram bot, get the API key of the Telegram bot and the chat ID.
2. Select the [on button _ pressed] block from the “Input” category and snap in the [send message to Telegram: API Key _ Chat ID _ Message _] block.

3. Copy the HTTP API key you obtained from BotFather after you have created a telegram bot and paste it into the API Key column.
4. Fill in the chat ID of the telegram group chat where you wish the message being sent.
Note: A “-” mark must be included in front of the chat ID for group chats, but for private user's chat ID is not needed.
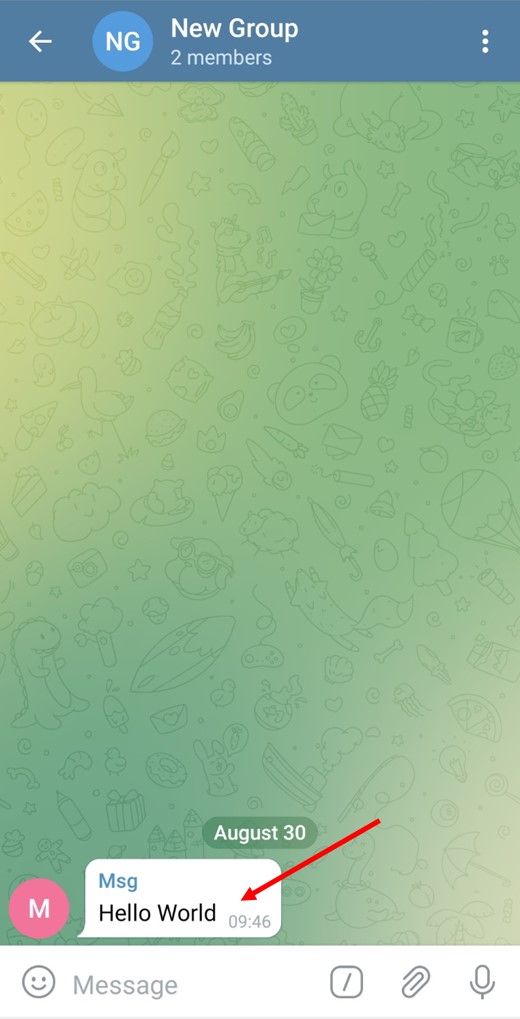
5. Fill in the message that you wish to be sent (for example “Hello World”).

6. You may use the [Telegram message sent] and [if-else] blocks to verify whether the message is successfully sent to your Telegram group chat - show “tick” if successful, “cross” if otherwise.

7. Download the code to your micro:bit and check if you can receive the Telegram message when Button A on the micro:bit is pressed.
4. Data logging on ThingSpeak
This feature allows you to transfer data from your micro:bit to the ThingSpeak channel. To use this feature, you need to register for a free account (new user) at the ThingSpeak website if you don't have one yet. Then create a new channel.
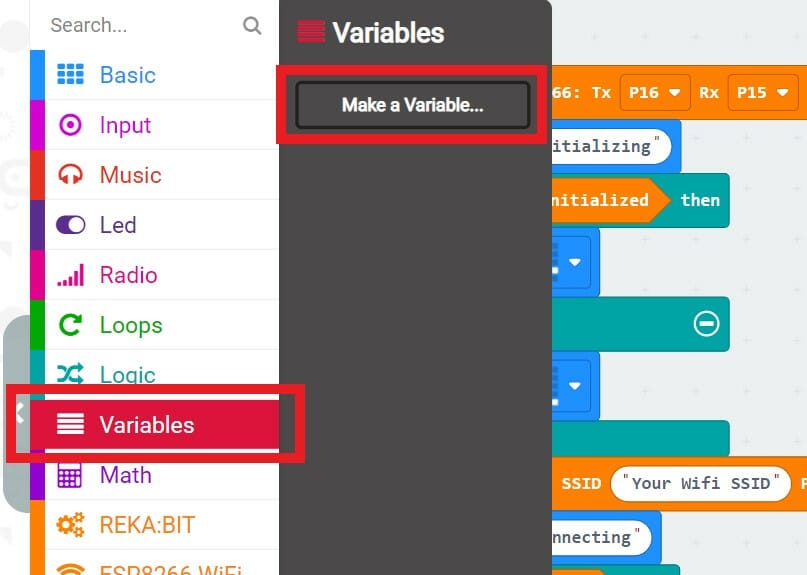
1. Make a new variable from the "Variables" category and name it "Number".
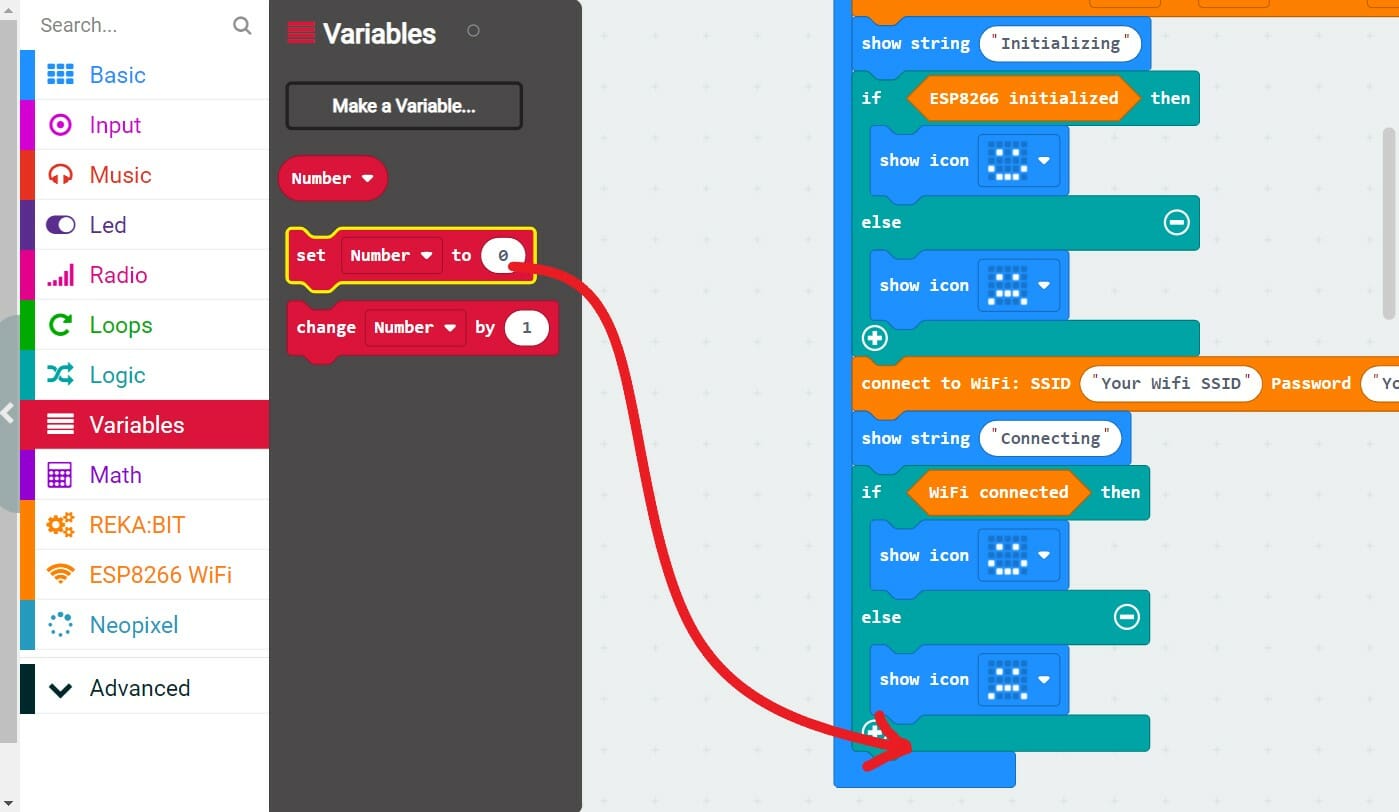
2. Select the [set _ to _] block from the "Variables" category and snap it to [on start] block, select "Number" and set the value to "0".
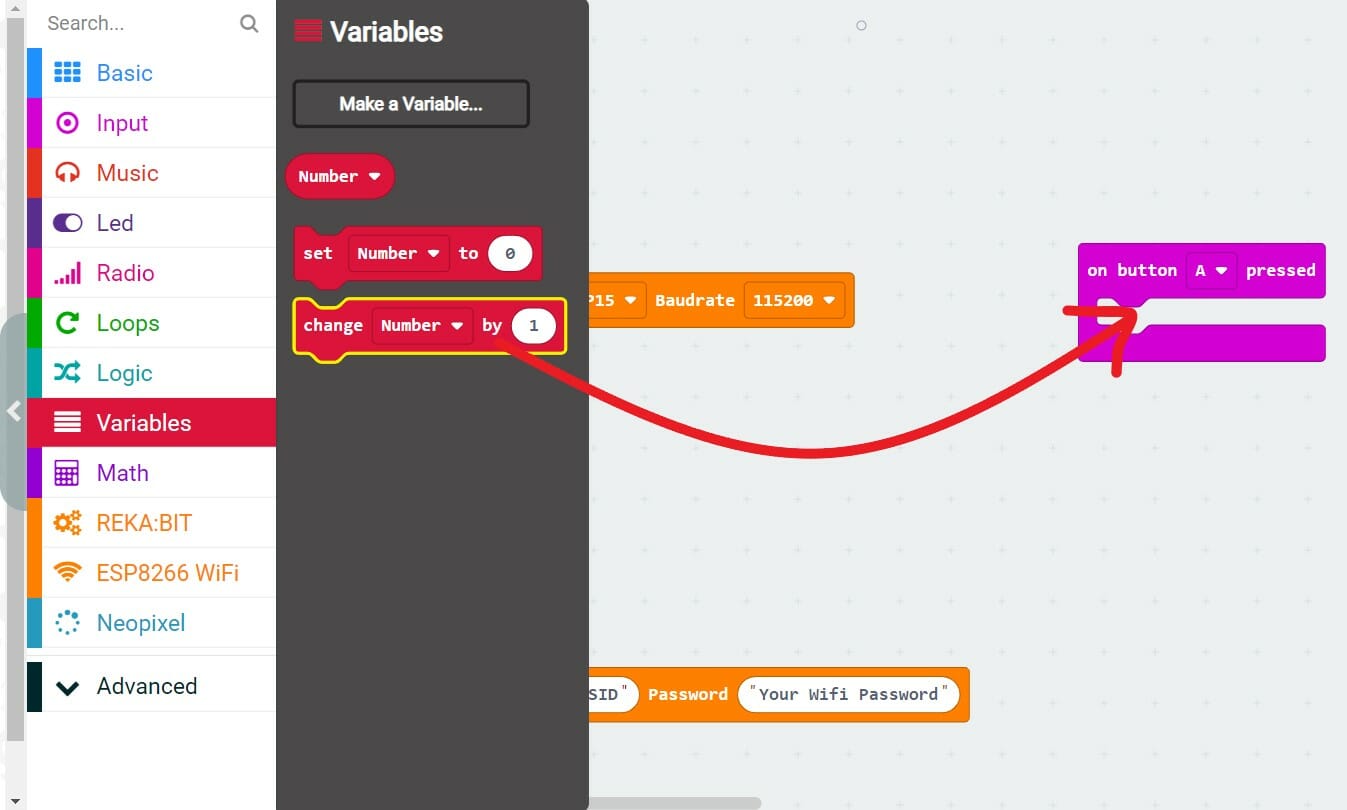
3. Select the [on button _ pressed] block from the “Input” category and snap [change _ by _] block from the "Variables" category. Select "Number" and insert "1" to the block, the "Number" will increase by 1 each time when the button is pressed.
4. Snap in the [Upload data to Thingspeak Write API key _ Field 1 _] block.
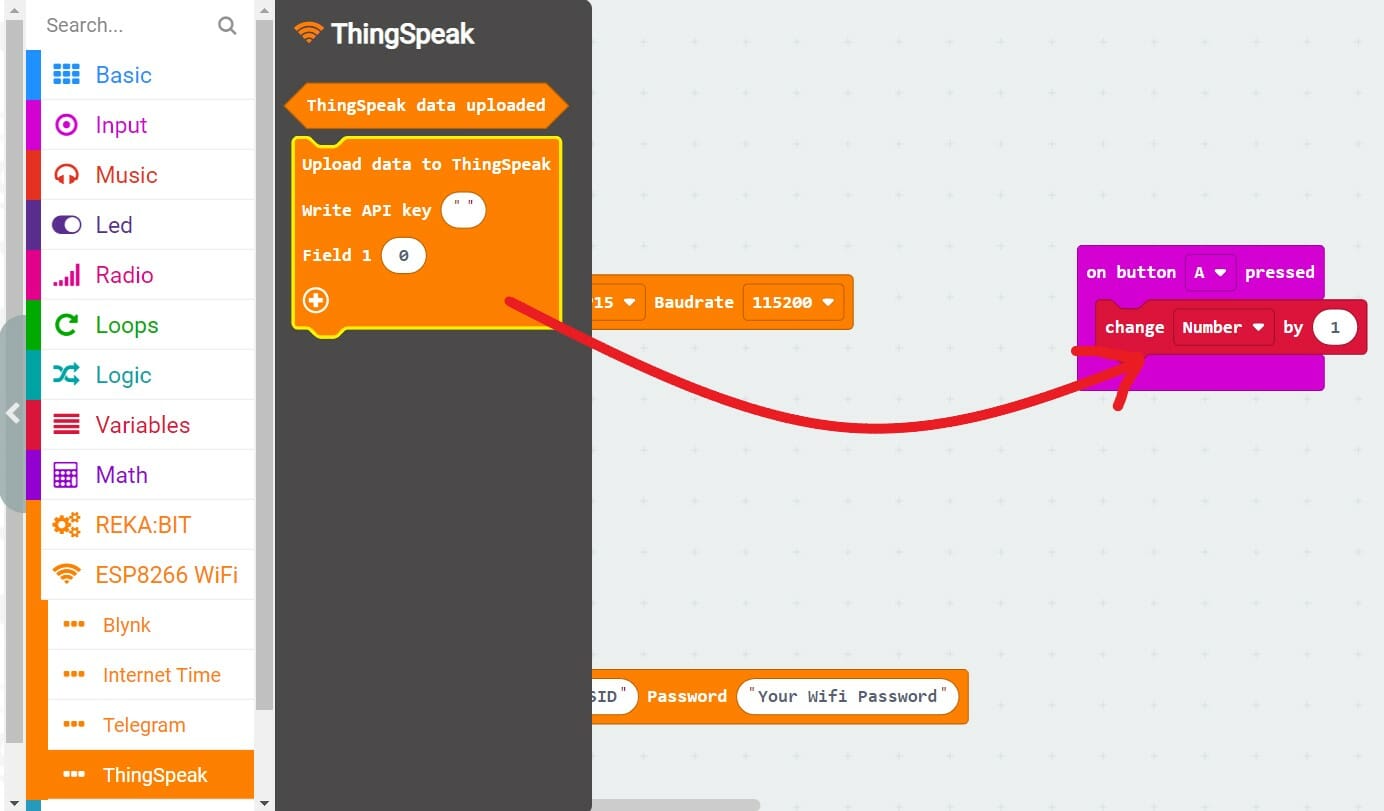
5. Go to your ThingSpeak Channel, select API keys and under “Write API key”, copy the API key stated there and paste it into your MakeCode block.

6. Insert the variable or value that you wish to send to ThingSpeak for each Field in the MakeCode block. For example, Field 1 is "Number" and Field 2 is "10".
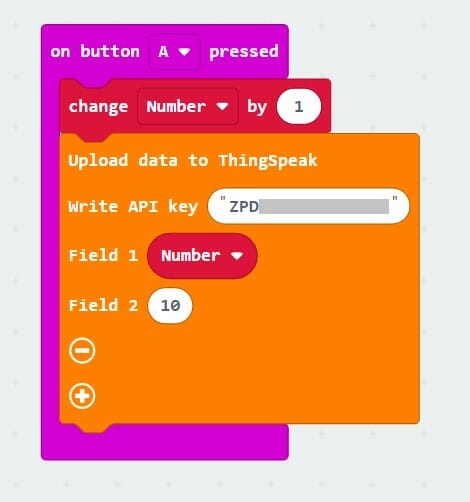
7. You may use the [ThingSpeak data uploaded] and [if-else] blocks to verify whether the data is successfully uploaded to your ThingSpeak channel - show “tick” if successful, “cross” if not.

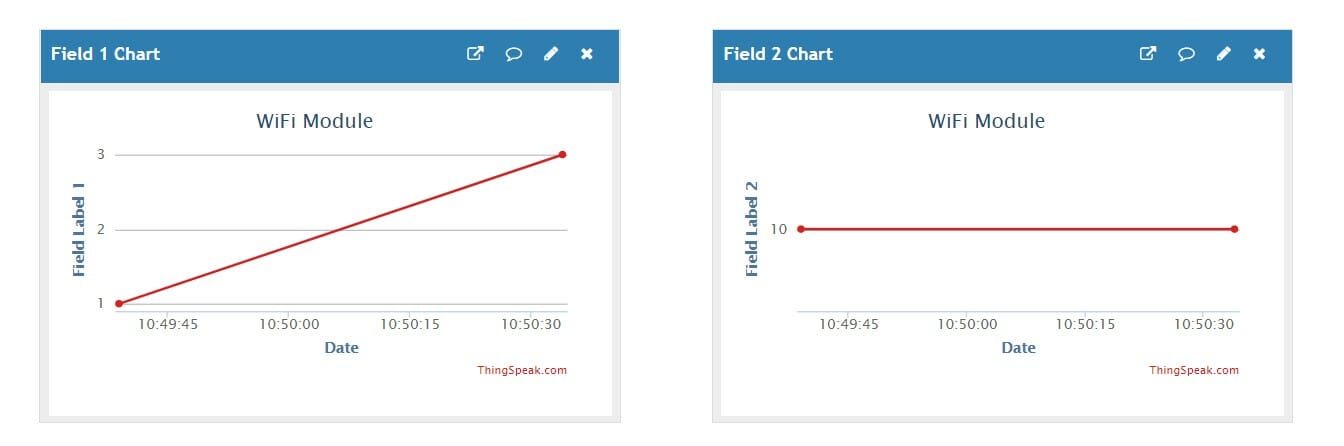
8. Download the code to your micro:bit and press Button A after the WiFi is connected. The values in the MakeCode block will be shown in each of the Field Charts at your ThingSpeak channel.
Tips: ThingSpeak will update the data to your channel once every 15 seconds.
Hope you learned how to use Grove WiFi 8266 module with the micro:bit and MakeCode. Thank you.
You are encouraged to further improve the code for higher efficiency and more advanced applications.
Related Tutorials
- Send Meal Selection and Locations through Telegram Bot Using ESP8266 Grove WiFi Module on micro:bit
- Display Internet Time (NTP) on micro:bit
- Control and Monitor Using Blynk IoT App and micro:bit
- IoT Push Notification Using Rain Sensor with micro:bit
- Build an IoT Plant Monitoring System with micro:bit and Grove Wifi Module
Related Posts

Remote Control ZOOM:BIT using Grove 8266 WiFi and Blynk
Do you want to remotely control your ZOOM:BIT just like a toy car? This tutorial shows the step-by-step guide on how to build a remote control ZOOM:BIT using Grove 8266 WiFi module and Blynk.....
Send Meal Selection and Locations through Telegram Bot Using ESP8266 Grove WiFi Module on micro:bit
Having a hard time deciding what to eat during lunch or dinner time? Having difficulties searching for the right place to get your meals done?....