 International
 Singapore
 Malaysia
 Thailand
 Vietnam
Your shopping cart is empty!

Getting Started with CM4 Maker Board
- Abdul Salam A Haris
- 08 Mar 2023
- Tutorial
- 1837
Introduction : CM4 Maker Board
What exactly is the CM4 Maker Board? It can be described as a versatile development board that utilizes the Raspberry Pi Compute Module 4 (CM4) as its brain. However, this is merely the beginning of what sets this board apart from others.
The CM4 Maker Board has much to offer whether you're a seasoned Pro Maker seeking for a more dependable and potent Raspberry Pi solution or someone who is just starting to start with the world of CM4. This board is ideal for a variety of applications, from robots to DIY home automation systems, and it has a wide range of features and functionalities.
So why not give the CM4 Maker Board a try and see what great things you can make with it? This fantastic board has enough to appeal to everyone, novice or seasoned expert alike!
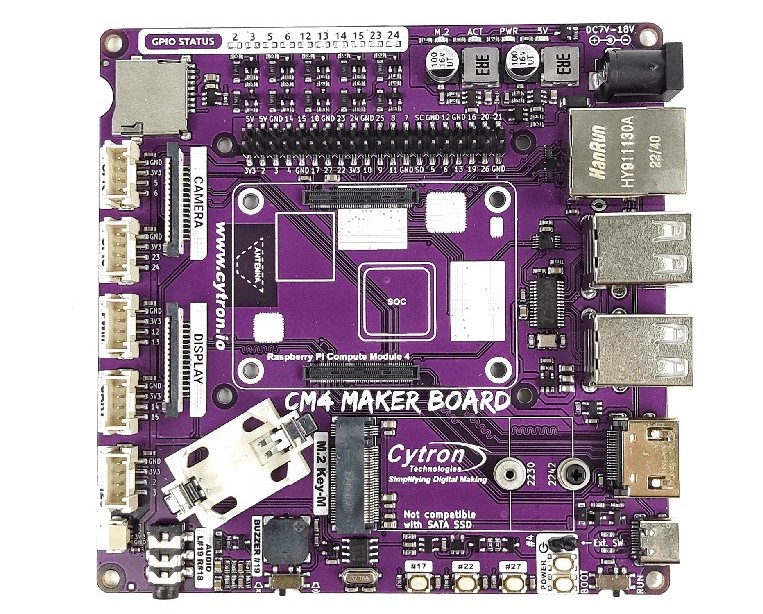
Figure 1: CM4 Maker Board.
The CM4 Maker Board is a fantastic tool with many useful features. One of its best features is that you can charge it using either a USB-C port or a DC jack. Also, it has a power button that makes turning it on and off a breeze. No more looking for the shutdown button or typing long commands! Click this link if want to know how to Setup Switch On/Off Button.
What's even fantastic is how simple it is to utilise and personalise this maker board. Because you can add various modules and accessories to make it function how you want it to, it's ideal for beginners and experts. It's similar to having a private tech playground!
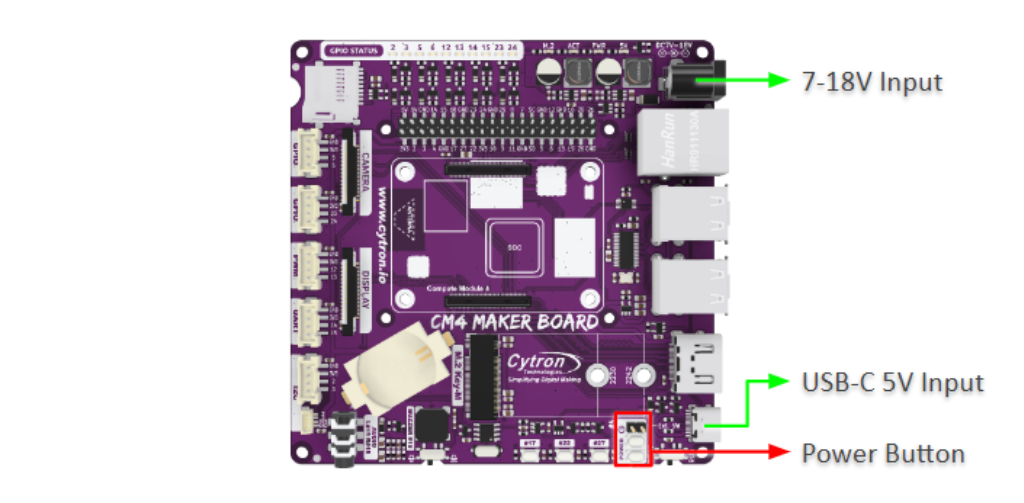
Figure 2: Power Button.
Prepare yourself with the CM4 Maker Board to boot up your Raspberry Pi OS in style! This incredible gadget provides not one, not two, but three alternative ways to set up your OS.
The Micro SD Card choice is ideal for you if convenience is important to you. Up until you locate the ideal configuration for your requirements, switching between several versions or setups are simple.
However, NVME SSDs are the better choice if you require greater speed and storage. Large files may be stored and many applications can be used simultaneously without experiencing any latency thanks to increased storage capacity and better data transfer speeds.
The CM4 Maker Board also support eMMC storage integrated into the CM4 board for those who prefer a more simplified setup. You can trust that your data is safe and secure with this choice because it is so quick and trustworthy.
Regardless of which option you select, the CM4 Maker Board will successfully boot your Raspberry Pi OS. Visit this link if want to know how to Boot Up Raspberry Pi CM4 on CM4 Maker Board.
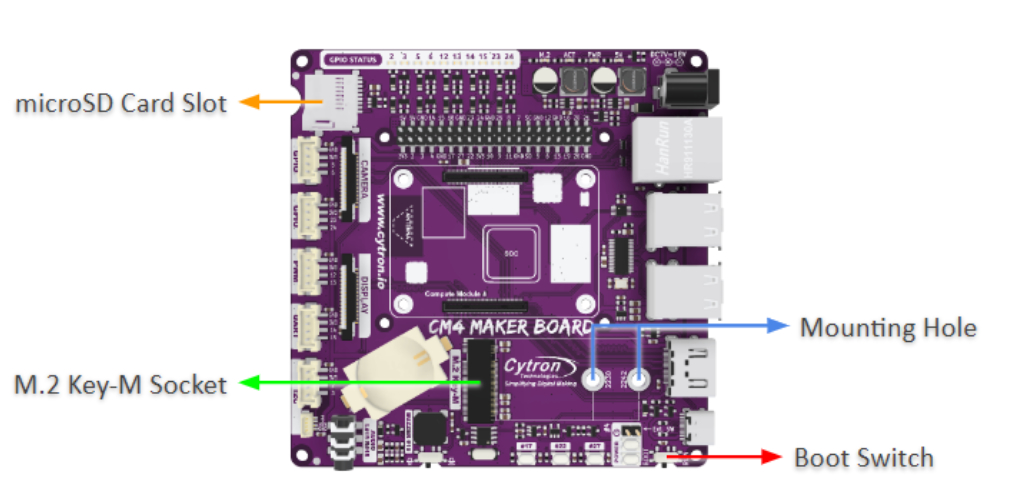
Figure 3: Storage
You may start your Raspberry Pi OS in a variety of ways with the CM4 Maker Board, but it also has a tonne of other fantastic features that you'll adore. In actuality, this board offers a lot of the same functions as a conventional Raspberry Pi.
To begin with, the CM4 Maker Board has Gigabit Ethernet, allowing you to quickly connect to the internet and use all of your preferred online resources. You will be able to accomplish anything at breakneck speeds, whether you're downloading files, streaming videos, or browsing the web.
Also, you'll have plenty of space to connect all of your preferred gadgets and peripherals thanks to the 4x USB2.0 ports. This board provides the ports you need to connect a keyboard, mouse, or external hard drive.
Not to mention the HDMI port, CSI Port, DSI Port, and 3.5mm Audio Out, which are all fantastic features. You can connect to a variety of devices using these ports and take advantage of the crystal-clear audio and video quality. Follow this link if want to know how to getting started with the Camera on the CM4 Maker Board or how to use 3.5mm Audio Jack.
And you'll be pleased to know that the CM4 Maker Board is completely compatible with RPI HATs (Hardware Attached on Top). This implies that you can quickly increase your board's functionality and personalise it however you like.
Figure 4: Standard RPI Ports.
The PCF85063A RTC (Real-Time Clock) that comes with the CM4 Maker Board is one of its nicest features. Even when your board doesn't have an internet connection, you can maintain accurate time with the help of this clever little gadget.
Hence, the CM4 Maker Board has you covered whether you're working on a project that needs to keep track of time or just wants to make sure that your board always knows what time it is.
And the best part is that using this functionality couldn't be simpler. You may quickly set the time and date by simply connecting the RTC to your board. Also, you can be sure that your board will always accurately display the current time thanks to the extra accuracy that this device offers. Click this link if you want to get a tutorial on how to make your own external real-time clock displayed on the OLED display.
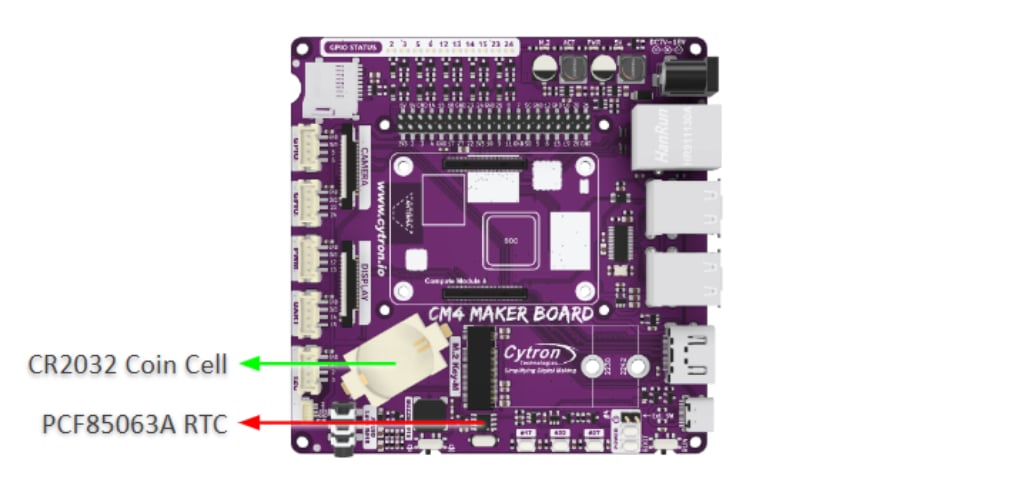
Figure 5: RTC.
This board is packed with amazing Maker's Features that will advance your do-it-yourself projects. The Grove Ports, for example, make it quite simple to add a variety of various sensors and modules to your board. These ports will make it simple for you to include additional functionality into your project, regardless of whether you're working on a robotics project, a smart home application, or something in between.
Not to be overlooked is the Maker Port, a special port that enables connection to a wide range of Maker modules and accessories. This port makes it simple to upgrade your board's features and make it exactly what you want.
That's not all, though. 10x GPIO LEDs, a Piezo Buzzer with a Mute Switch, and 3x Push Buttons are additional features of the CM4 Maker Board. With the help of these features, you may include a wide range of interactive elements in your projects, such as button controls, light and sound displays, and more. Click this link if you want to get basic tutorial on how to use GPIO, Grove port & Maker port and Buzzer & Buttons.

Figure 6: Maker’s Features.
The CM4 Maker Board is, all things considered, a fantastic tool that delivers a lot of wonderful features. Thus, why not give it a shot and see what type of incredible creations you can conjure up with this wonderful board? There are countless options!
Hardware Components
 Long Lead Time
RPi Compute Module 4 with Wireless 4GB RAM Lite
$60.50 $60.50
x 1 unit(s)

32GB Raspberry Pi Approved MakerDisk uSD with R...
$11.00 $11.00
x 1 unit(s)
")
NVMe 2242 B+M-Key MakerDisk SSD - 128GB (with R...
$36.25 $36.25
x 1 unit(s)

CM4 Maker Board & Kits : Maker’s Carrier Bo...
$56.00++ $56.00
x 1 unit(s)
Related Posts

Log Thermocouple Sensor Data to Google Sheets using CM4 Maker Board
Want to know how to display temperature data from a thermocouple MAX6675 (Max temperature 1024°C) in a Google Sheet using the CM4 Maker Board...