 International
 Singapore
 Malaysia
 Thailand
 Vietnam
Your shopping cart is empty!

Remote Control ZOOM:BIT using Grove 8266 WiFi and Blynk
- Hao Zhen Goh
- 25 Nov 2021
- Tutorial
- Beginner
- 674
Do you want to remotely control your ZOOM:BIT just like a toy car? This tutorial shows the step-by-step guide on how to build a remote control ZOOM:BIT using Grove 8266 WiFi module and Blynk.
Free roam your ZOOM:BIT at home or you can even make your own obstacle course and use your ZOOM:BIT to take the challenge!
Hardware and Software Preparation
Hardware:
- Zoom:bit (with micro:bit) x1
- Grove WiFi 8266 x1
Software:
- Makecode editor for micro:bit
- Blynk
Before You Start
Hardware Setup
ZOOM:BIT + Grove 8266 WiFi
1. Follow the steps in the guide book to build ZOOM:BIT.
Note: If you are new to ZOOM:BIT, you are encouraged to finish the lessons in the guide book before proceeding to this tutorial. For more information, kindly visit our product page here.
2. Unplug the Maker Line Sensor (P1:P9) from your REKA:BIT.
* We are not using Maker Line Sensor in this project; we need to reserve P1 for the WiFi module.

3. Use double-sided tape or tape to stick the Grove 8266 WiFi module in the ZOOM:BIT box.

4. Let the Grove cable pass through the hole and connect the Grove 8266 WiFi module to P0:P1 port.

5. Connect the USB cable to your computer and REKA:BIT board of your ZOOM:BIT.

6. Switch on the REKA:BIT.

Software Setup
micro:bit MakeCode
1. Go to Microsoft MakeCode Editor at https://makecode.microbit.org/.
2. Create a new project and give it a special name.
Note: If an offline version is needed, you may download it here [link: https://makecode.microbit.org/offline].
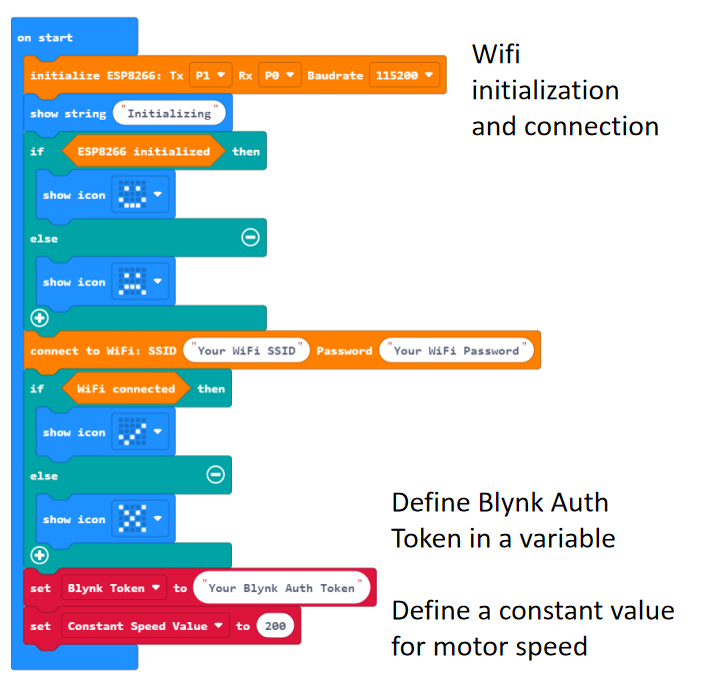
3. In your project, select “Extensions” under the Settings icon. You will need to add 2 extensions for this tutorial, both “ZOOM:BIT” and “ESP8266”.

4. Search and add “ESP8266” extension for Grove WiFi module, and “zoombit” extension for ZOOM:BIT.

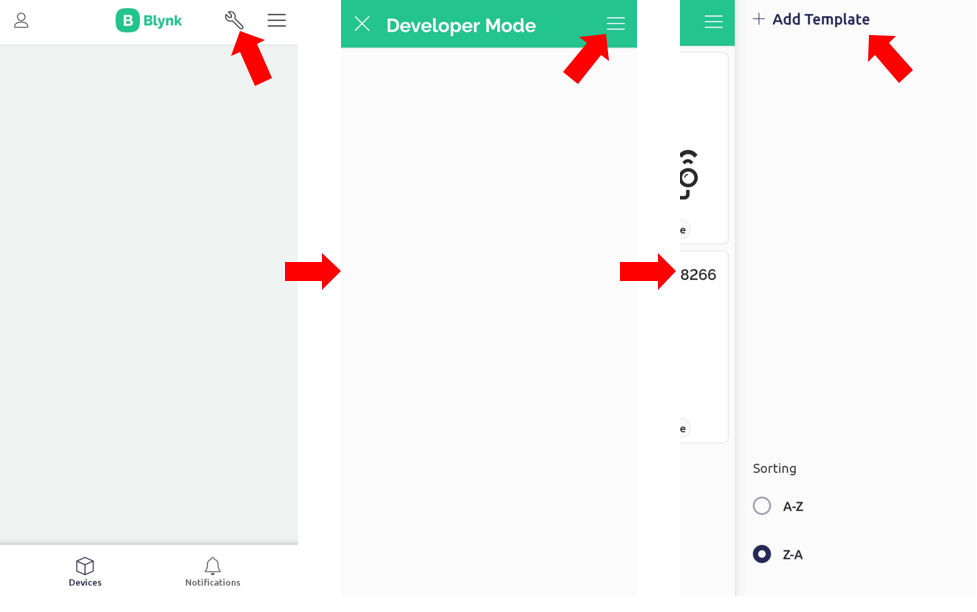
Blynk
1. Create a Blynk project in the Blynk app on your smartphone and get the Auth token for the project.
Follow the guide here if you are new to Blynk.
What Does the Code Do?
- Able to connect to WiFi.
- Able to connect to your Blynk project on your smartphone.
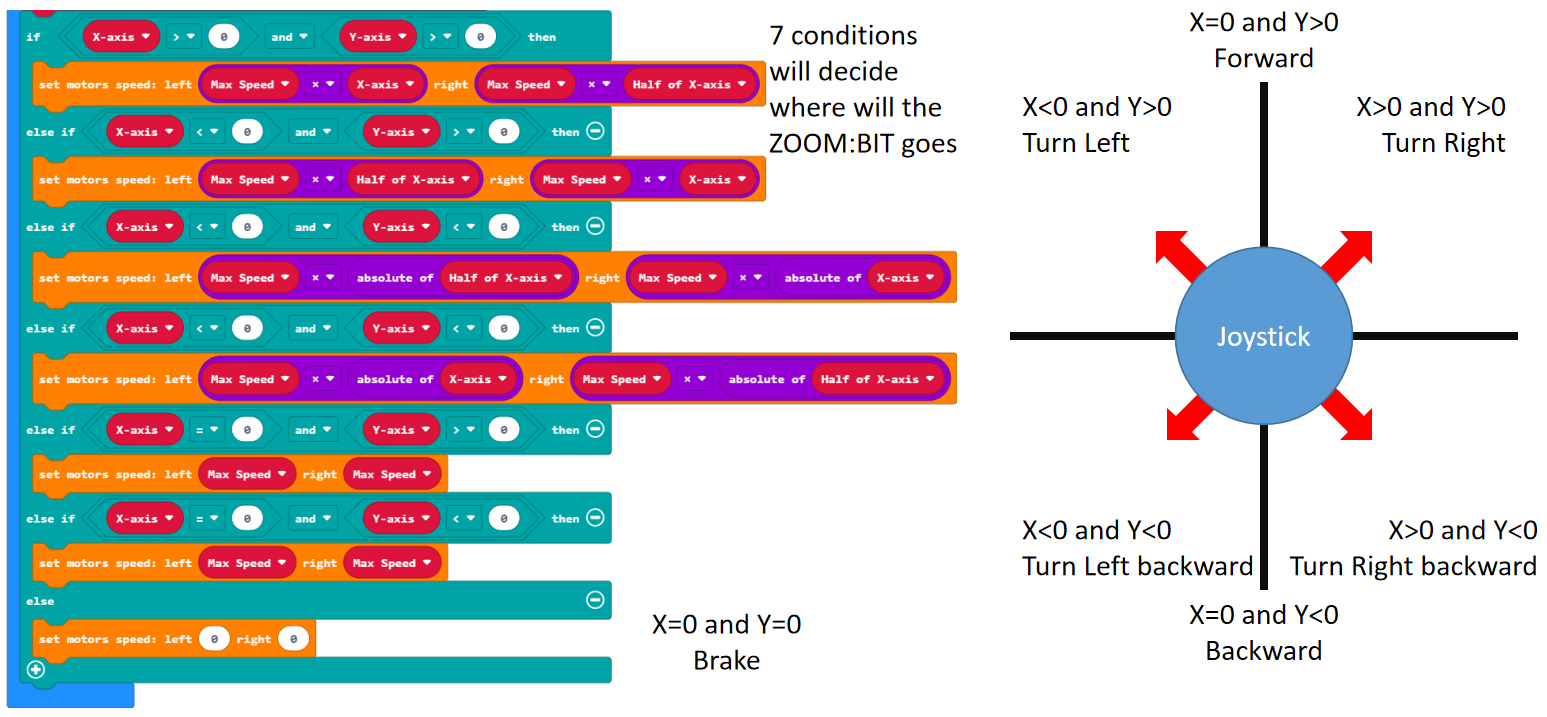
- Able to control the movement of ZOOM:BIT from Blynk including: moves forward, moves backward, turns left and turns right.
- Able to switch on or off the headlights of ZOOM:BIT from Blynk.
Let’s Start Coding
Step 1: Blynk Widget Setup
1. Create a new template and give it a special name (for example: Grove WiFi 8266).
You may refer to the Step 1 mentioned in that guide.
We will show you the steps on the Mobile App version to set up the datastream virtual pins and widgets. The web browser version will be very similar to what is being shown here.
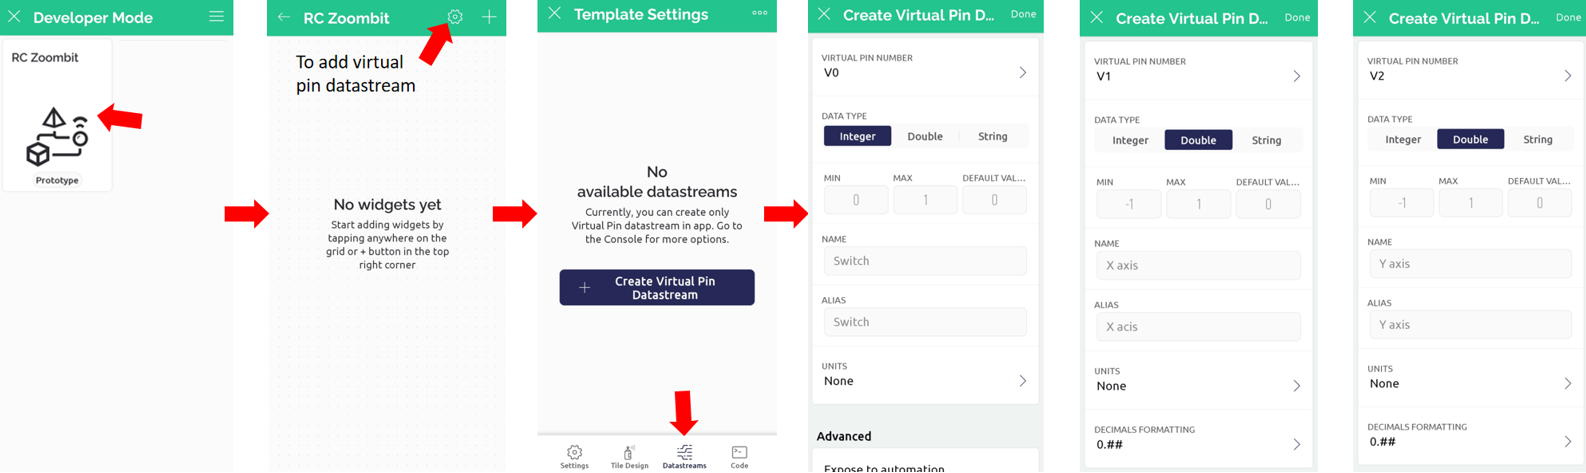
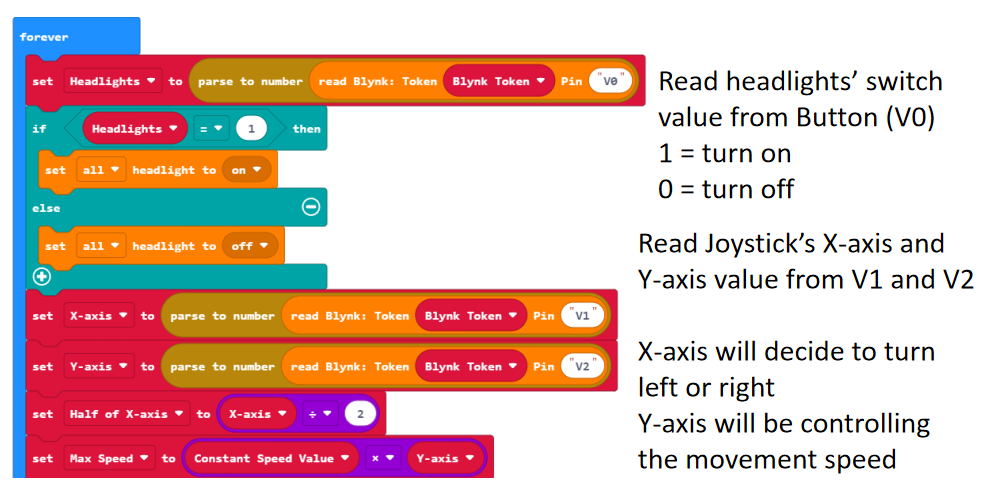
2. Within the new template, create a new datastream for the following virtual pins.
- V0 : Switch
- V1: X-axis
- V2: Y-axis
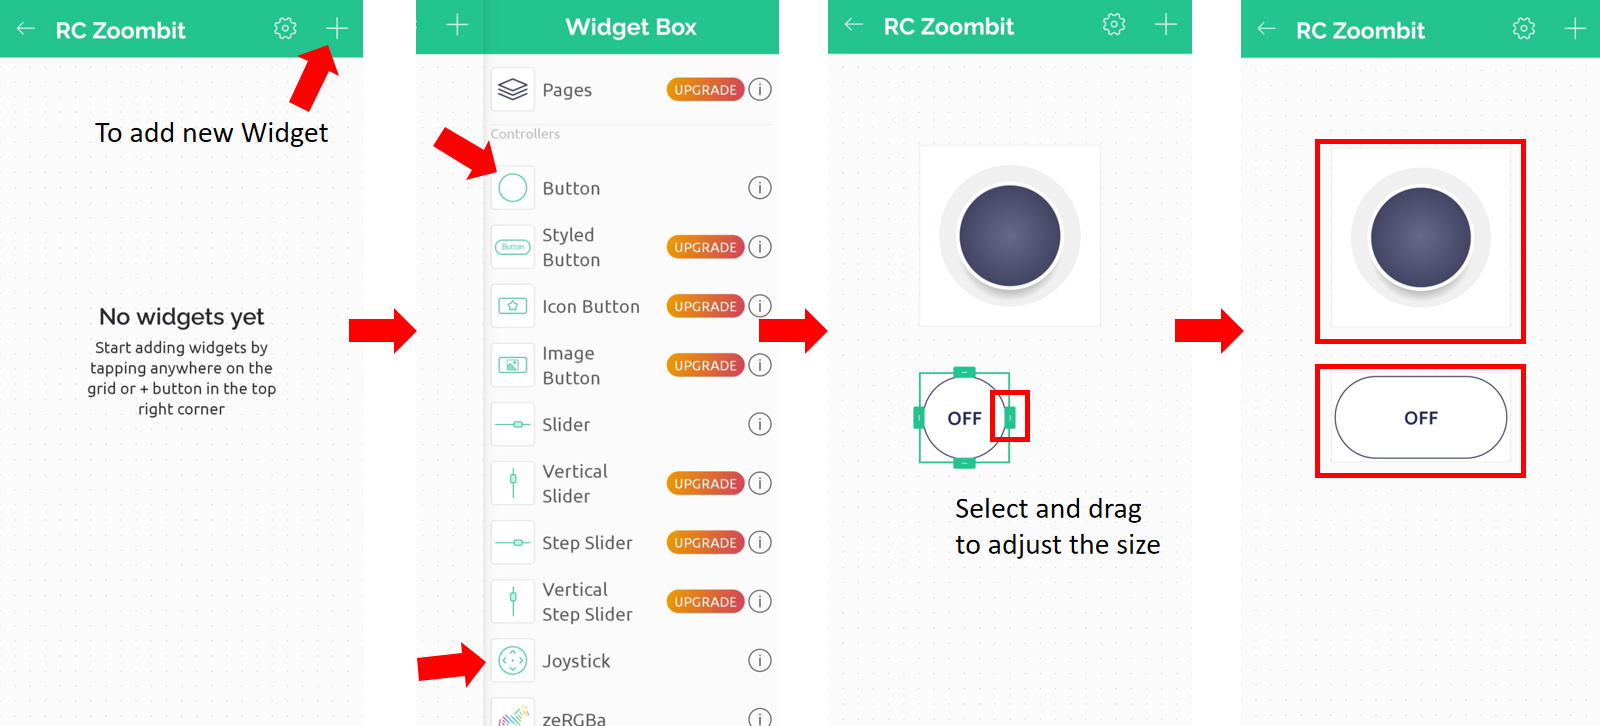
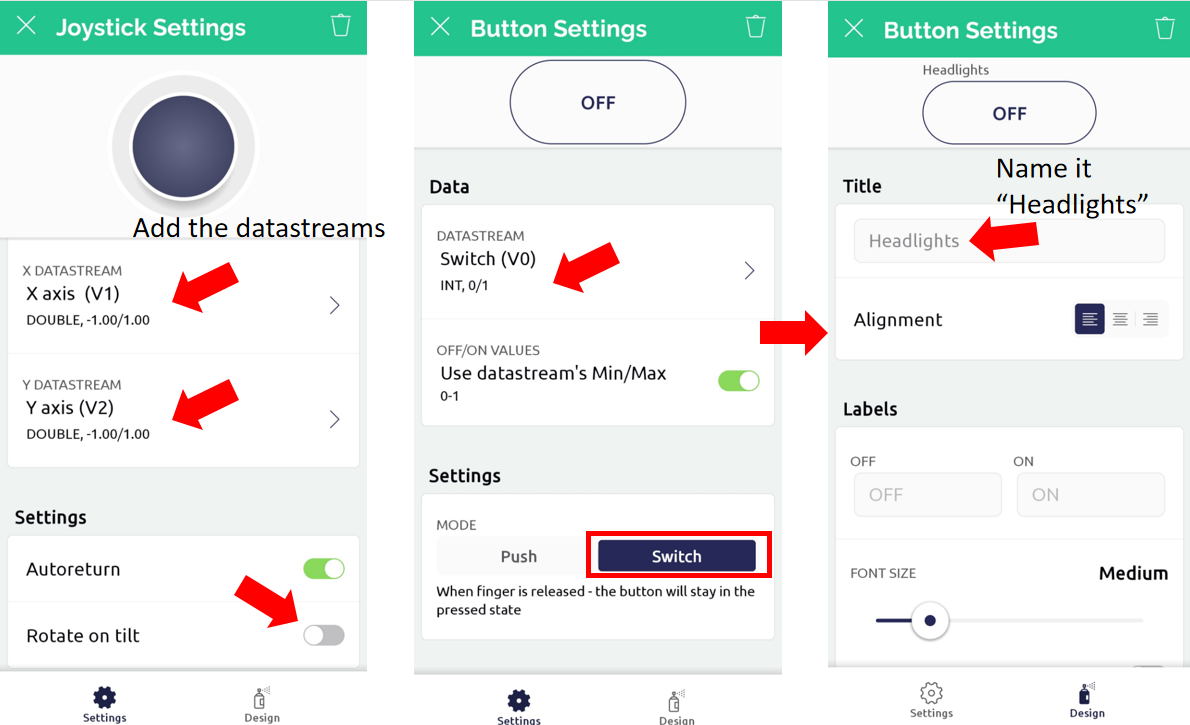
3. Add new widgets into your template and set up the new widget by selecting the correct datastream virtual pin that you have created. Select each of them and set up all the widgets.
- Button
- Joystick
4. On the Blynk IoT app, add new device to create a new Blynk IoT project.
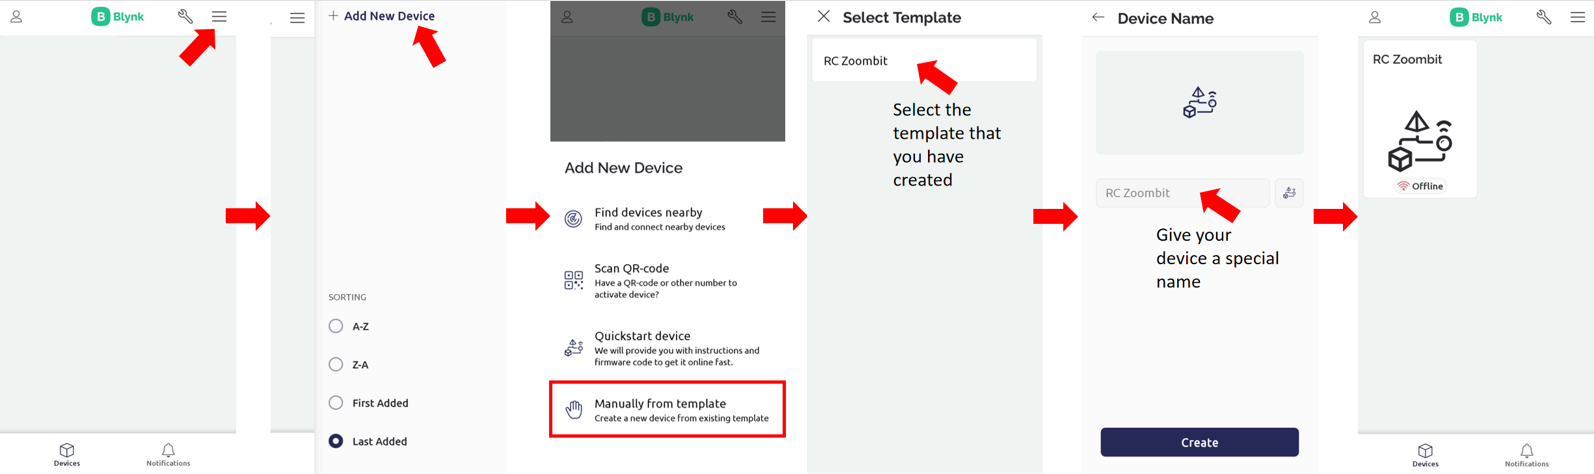
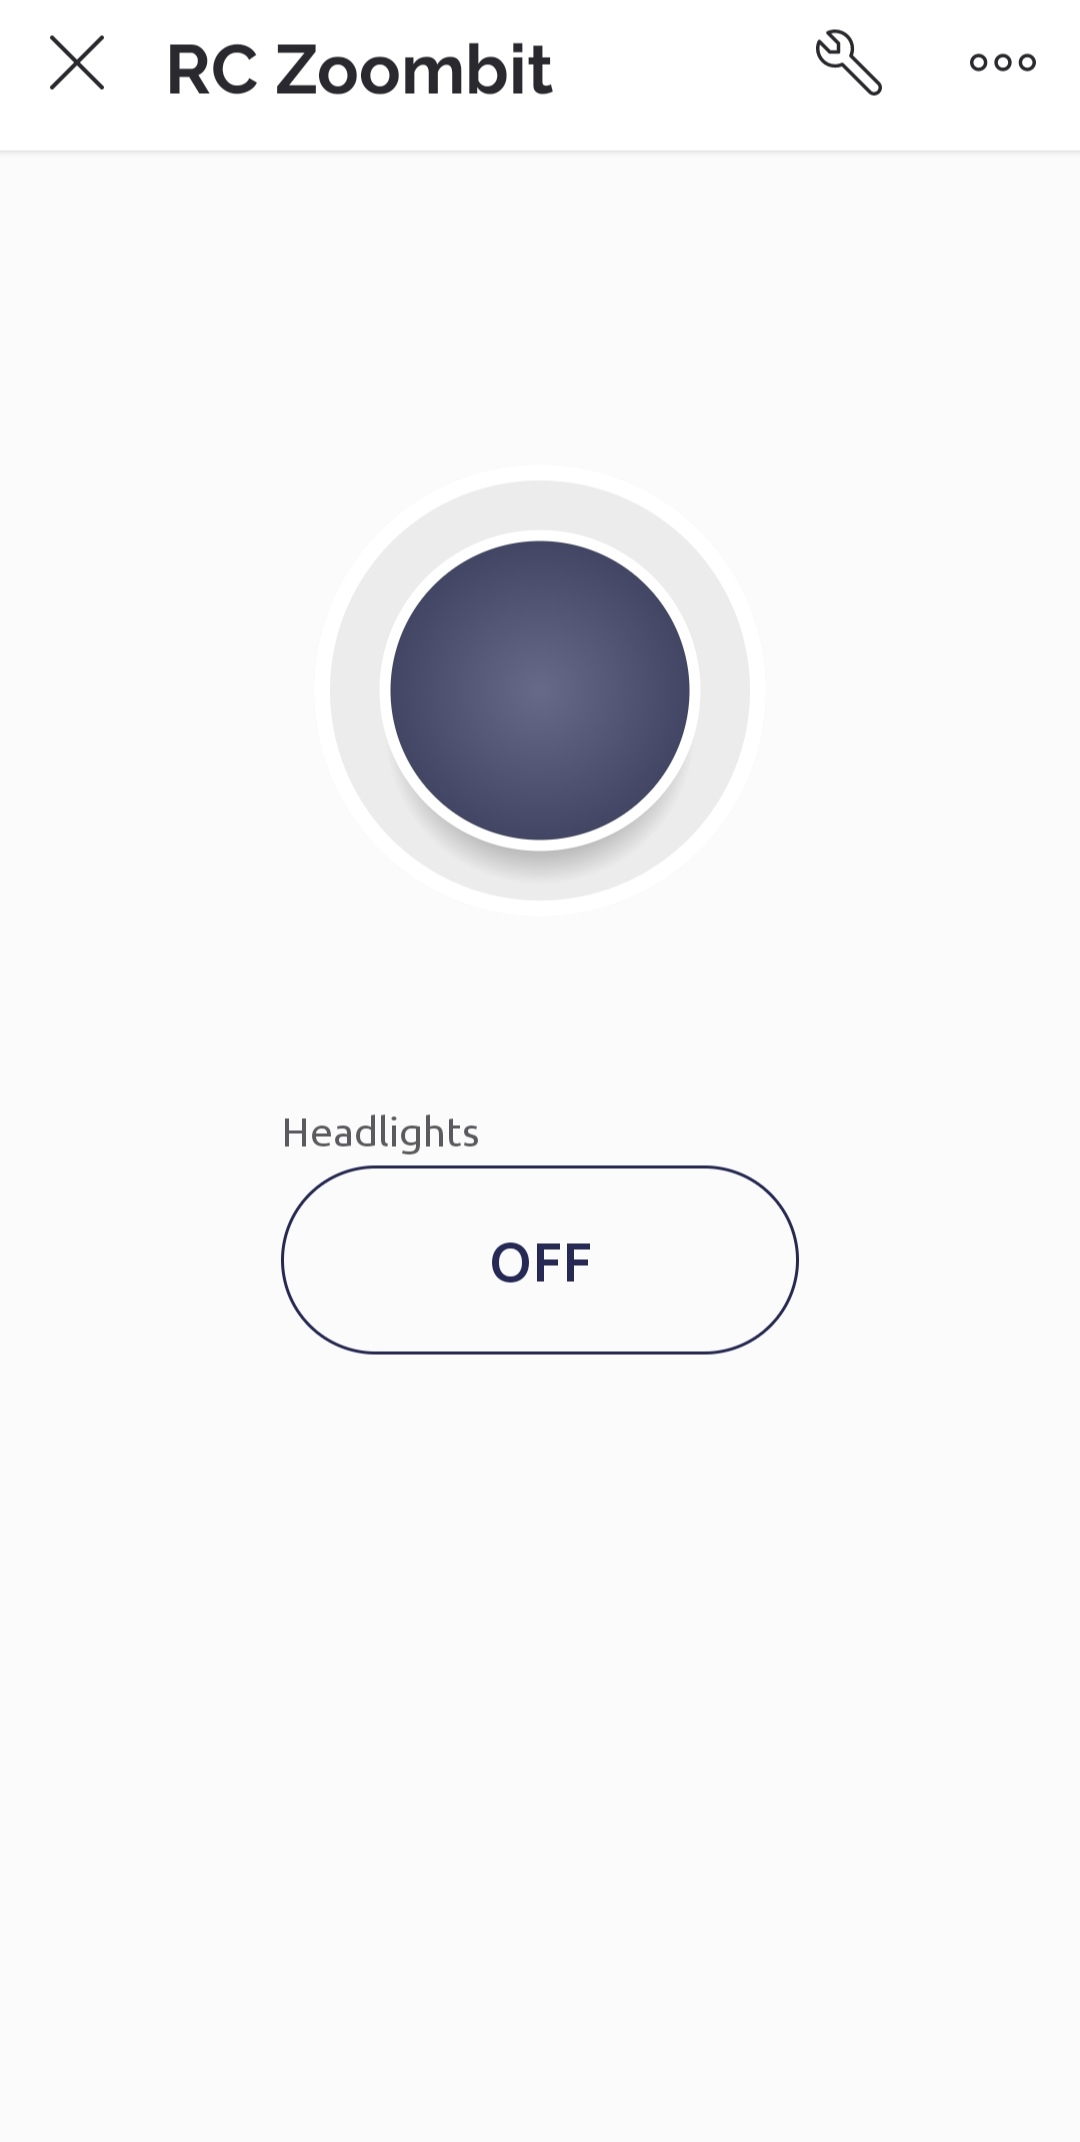
5. In the end you will get something like this:
Step 2: MakeCode Code
We've prepared the sample codes here, you may download and use it directly after you have done the Hardware Setup, Software Setup and Blynk Widget Setup.
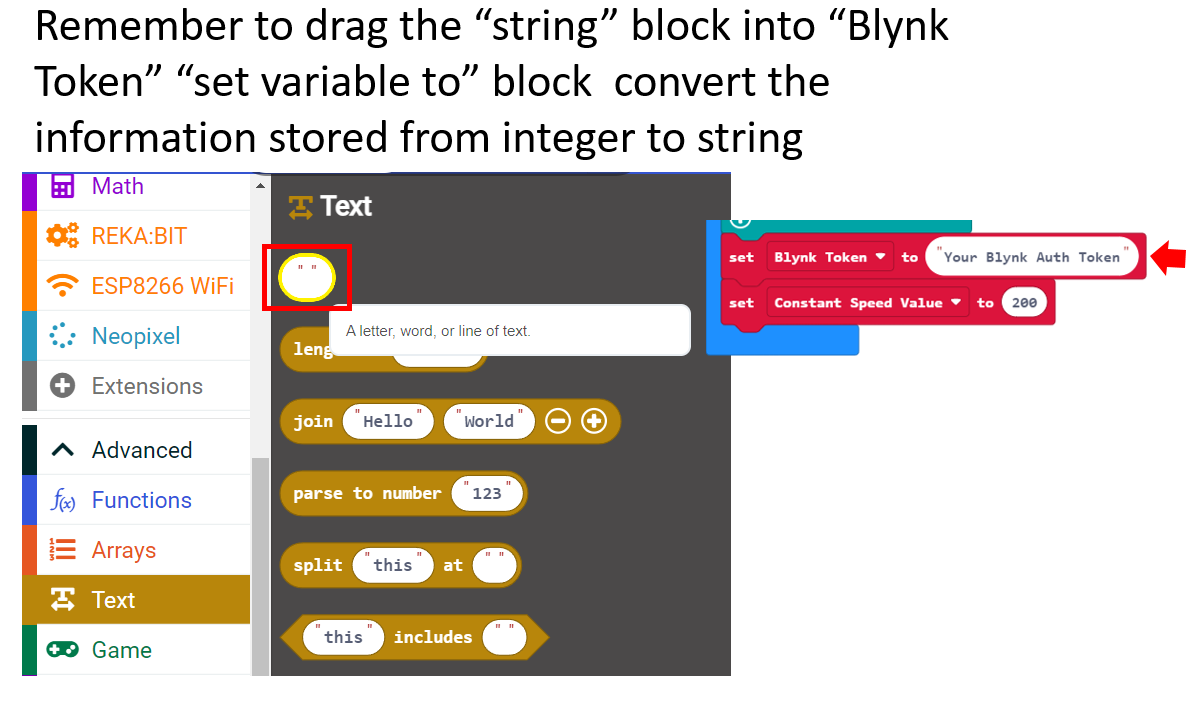
Remember to change the WiFi SSID, password and Blynk Auth Token.
You are encouraged to learn and explore all of the steps below.
1. Add the following blocks to your MakeCode Editor project. You can find those blocks in the category drawer according to their respective colours.

You may find the simple explanation and description of the code at the end of this tutorial.
There are several variables that we will use in this tutorial, including:
- Blynk Token
- Constant Speed Value
- Half of X-axis
- Headlights
- Max Speed
- X-axis
- Y-axis
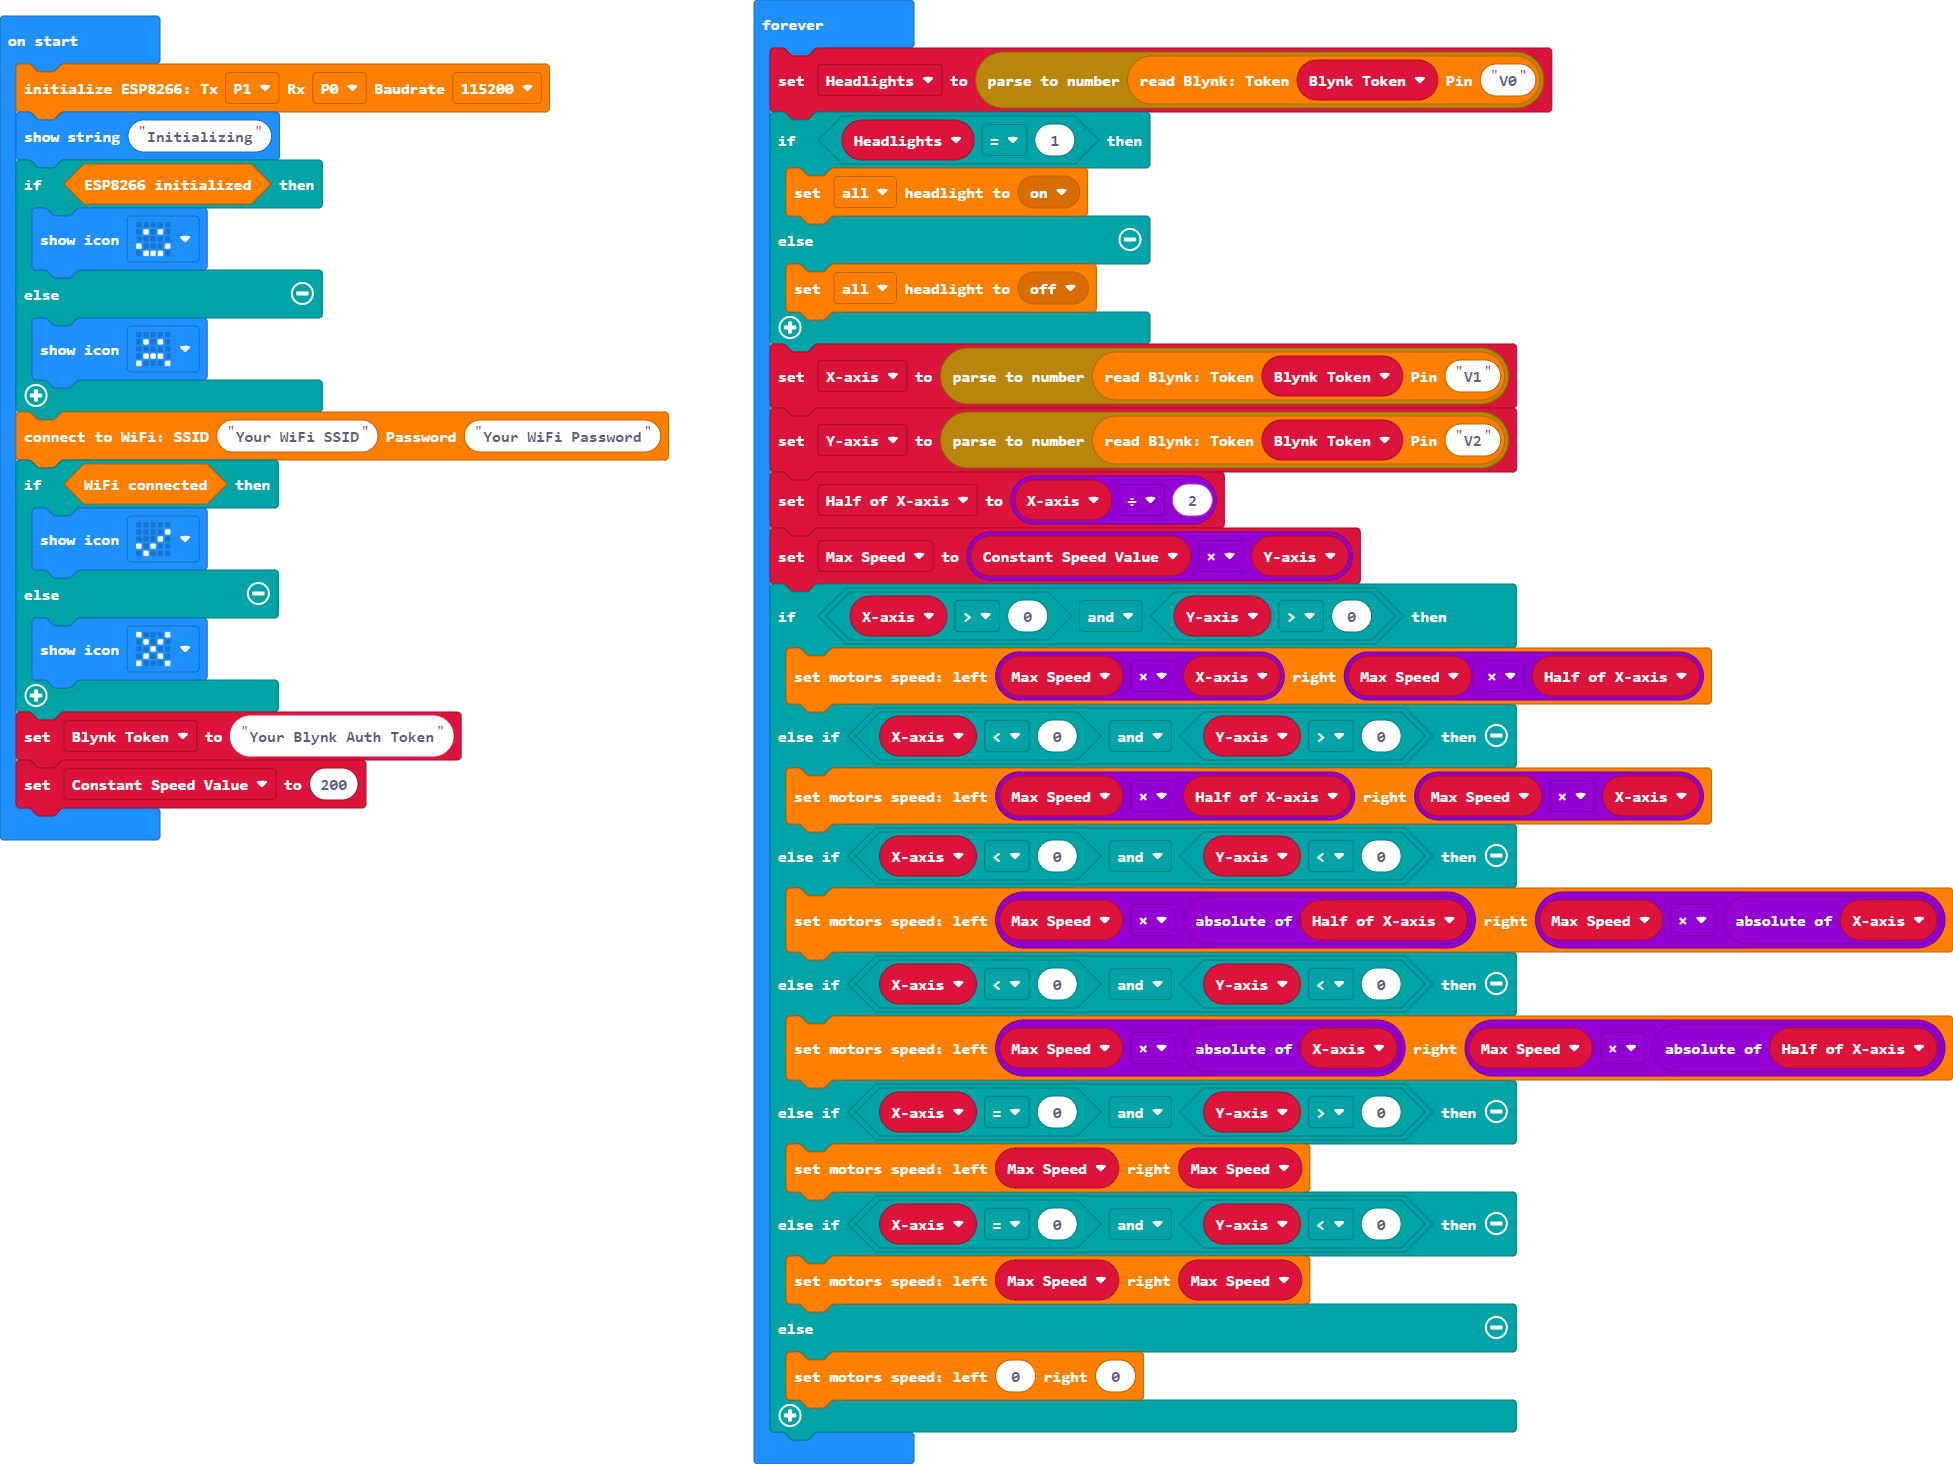
Note:
2. Flash your code to your ZOOM:BIT.
3. Turn on your ZOOM:BIT and wait for the internet connection to complete.
4. Open your Blynk IoT "RC ZOOM:BIT" device and let's start your journey.
Explanation:
GENTLE REMINDER
Please DON”T do this to your ZOOM:BIT:
- Crash your ZOOM:BIT into anything.
- Run down the staircase.
- Fall from an elevated platform, for example a table.
- Anything that would spoil the parts in your ZOOM:BIT.
Hope you learned how to use Grove WiFi 8266 module with the micro:bit and MakeCode. Thank you.
You are encouraged to further improve the code for higher efficiency and more advanced applications.
Hardware Components
 Best Seller
Grove WiFi 8266 - IoT for micro:bit and beyond
$6.60 $6.60
x 1 unit(s)
") -12%
-12%ZOOM:BIT Robot Car Kit for micro:bit (V2 included)
$54.75 $62.50 $54.75
x 1 unit(s)
") -22%
-22%ZOOM:BIT Robot Car Kit for micro:bit (without m...
$37.25 $47.50 $37.25
x 1 unit(s)
Related Posts

How to get Auth Token from Blynk
This guide will show you how to start up a Blynk Project and to get the Auth Token of your Blynk Project.....